I did finish the inserts a couple of weekend ago; but had a puzzle to put together - more on that momentarily.
Here's the Clear Yellow and Green inserts. I didn't bother to photo each version; since I pretty much decided I like the frosted Spiral Galaxy versions.
I didn't need to clear yellow; but I cut them anyway... because I need the smaller peices you'll see next. I think I'm going to use the clear yellow inserts to represent the 3X bonuses.
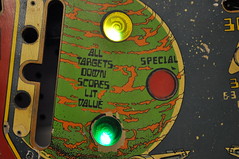
Observent people noticed there some details peices on the CAD drawing I showed earlier. These detail peices are for the Nacelle graphics in the original playfield. I was always... dissappointed these warp nacelles didn't light up on the original PF. So; I wanted to see if I could change that on The Mirror Universe.
Anyone like Puzzles? If so... have I got some fun for you:
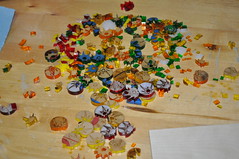
All kinds of colors of the rainbow. And no... I not real fond of puzzles.
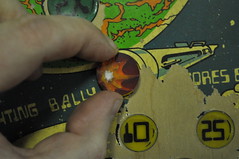
I laser cut some plywood in about the size of the nacelle image on the PF. and put together the puzzle of Yellow, Red, Orange to replicate the nacelle. Once I had the 20some odd peices in the correct order I "tooth pick" clamped the pieces tightly together:
and then used some acrylic solvent to glue the pieces using capillary action. I made sure these peices were tight together to ensure a tight bond was formed. I haven't really tried to "Break" these parts; but I've dropped them a couple of times and they haven't shattered.
I made two with the Yellow/Orange/Red/Yellow combo - the identical combo as the PF graphic. Since I had the peices; I went ahead and created a combo which more closely resembles the Enterprise... W/ Red as the main color; orange/yellow/white.
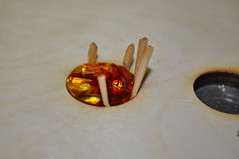
Once I had the pieces welded together with the solvent; I need to make them level. However, I notices that even tho I cut these parts from the same file; their with minor gaps between some of the pieces where they didn't meet. I didn't want to see unfiltered light come from between the acrylic. I pondered; thought about Epoxy w/ some kind of dye... but remembered that I created some crafts with the wife many years ago. It was some plastics stainglass in a bottle. I had pearl white; but couldn't find the Red or Yellow. I tried Michaels... and all they had was some sh1tty martha stewart glass "paint" for $4 a bottle. "Meh" I thought. So I waited until Monday when Hobby Lobby would be open. A lunch trip turned up the exact thing I remembered:
Ruby Red Gallery Glass and the
Sunny Yellow. These two oz bottles were like $2.75 a bottle. Using the bottle applicator; I filled the cracks with the appropriate color. I didn't get the Orange- because I wan't sure Pumpkin Orange would match the acrlyic orange. Since red and yellow always border orange; I could use one of the two. I used pearl white for the center "star" on the red insert.
Once I had the cracks filled; I proceeded to attempt to use the orbital sander to help level these inserts; at which one of the yellow inserts went flying into the neather regions of my garage. a quick search didn't turn it up. At that point I went to manually sanding these parts flat.
The result?
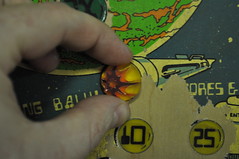
And the money shot:
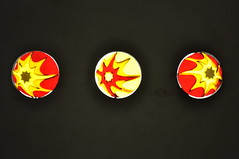
I like the red a lot better than the yellow.


