Author Topic: Bally Eight Ball Restoration  (Read 3249 times)

0 Members and 1 Guest are viewing this topic.

Offline Operator68

  • Trade Count: (0)
  • **
  • Forum Posts:
  • Traralgon Victoria
Re: Bally Eight Ball Restoration
« Reply #30 on: November 13, 2012, 10:06:58 PM »
Incredible result, proberly better than when it was new. I never get sick of reading your resto threads. Cant wait to see it finished.  @@*

Offline ajlaird

  • Trade Count: (0)
  • ******
  • Forum Posts:
  • Greensborough, Melbourne
  • Go Ahead, Make My Day
Re: Bally Eight Ball Restoration
« Reply #31 on: November 13, 2012, 10:45:48 PM »
Fantastic work, can't believe how complicated that stencil was!! The results speak for themselves!!

Offline ktm450

  • Trade Count: (+1)
  • ******
  • High Score Initials:
  • Forum Posts:
  • Geelong, Victoria
Re: Bally Eight Ball Restoration
« Reply #32 on: November 14, 2012, 10:44:32 AM »
That looks awesome mate

Offline pinball god

  • Trade Count: (+1)
  • ******
  • High Score Initials:
  • Forum Posts:
  • Melbourne
  • Metallica is here to stay
Re: Bally Eight Ball Restoration
« Reply #33 on: November 16, 2012, 12:13:01 PM »
nice work, BTW, how long do you leave the stencil on between colours? Do you wait until its touch dry or fully?
Still loving my Metallica Premium

Offline Strangeways

  • Pinball Restoration is my passion
  • Administrator
  • Trade Count: (+9)
  • *****
  • High Score Initials:
  • Forum Posts:
  • Melbourne
  • ABN 68 283 634 461
    • Ride The Boney Beast
Re: Bally Eight Ball Restoration
« Reply #34 on: November 16, 2012, 08:44:45 PM »
nice work, BTW, how long do you leave the stencil on between colours? Do you wait until its touch dry or fully?

Rob - I wait at least 24 hours in summer. This gives the paint time to shrink, expand and do everything else before it cures. Usually, the second stencil is applied over the fresh paint. I NEVER risk painting too soon, or I could lift the paint.

I have painted undercoat / primer and then 4 hours painted the base coat. That's no problem. The paint dries in 1 - 5 minutes. That's why you need to prepare and work fast !
Aussie Pinball - Proud to be Australia's Premier Pinball Forum

http://www.australianpinballrestorations.com.au/

http://www.rtbb.com.au/catalog/

We carry the largest range of NEW Ramps in Australia

Offline Strangeways

  • Pinball Restoration is my passion
  • Administrator
  • Trade Count: (+9)
  • *****
  • High Score Initials:
  • Forum Posts:
  • Melbourne
  • ABN 68 283 634 461
    • Ride The Boney Beast
Re: Bally Eight Ball Restoration
« Reply #35 on: November 27, 2012, 11:34:09 PM »
Big Update !

Many additional hours have been spent on this game, and I'm really enjoying myself with this restoration. It is great to re assemble a machine after a repaint, but there's a lot of work to be done beforehand !

The internal components now need to match the standard of the freshly painted cabinet. Starting with the door and the chimes / tilt board. They need to be stripped and the metal parts need to be re-plated. I enjoy re-plating small parts, and it is a lot more secure knowing I won't have any parts "lost" at a professional re-plater.

Here's the before shots ;


All parts are stripped and cleaned. some parts go into the tumbler and some are chemically treated and then re plated using my "home kit". The results ;


After re-assembly ;


That's a lot of work to get it looking this good. But it is worth it if you want a high end restoration.


Door trim is added to the cabinet. The plunger is polished to a high shine. The carriage bolts are original, but have been buffed to make them look new !


Here's a small mistake with the stencils. Will be covered anyway, but let's see if Gav picks it up  #@#


New ground braid installed. All the replated parts (to date) are refitted. Slowly coming together.


Door mounted as a test. I still have to plate the hinges.


Another round of plating !


The backboard aluminum is polished. Looks much better in person. I've replated the board brackets, and they will go in next.


Siderails are re grained. Not "buffed" or "polished" to a high shine. This is the way they were unboxed.New door buttons as well. I'm very happy with the progress !


All I need to do is locate another set of chimes and I'm back on track !

 %.%
Aussie Pinball - Proud to be Australia's Premier Pinball Forum

http://www.australianpinballrestorations.com.au/

http://www.rtbb.com.au/catalog/

We carry the largest range of NEW Ramps in Australia

Offline Retropin

  • Trade Count: (+4)
  • ******
  • Forum Posts:
Re: Bally Eight Ball Restoration
« Reply #36 on: November 27, 2012, 11:43:36 PM »
Yes...i know and i thought about this bit for some time. It was a compromise of having registration crosses under the side rails so the stencils could be aligned or continuing the black up the front edge and losing your corner to work from.
registration is so crucial with these that i felt a white gap that SHOULD be covered by the lock down was a small price to pay... and anyway.. if this was a Clay Farrel job then it can be easily fixed with a Sharpie..

... %.% %.% %.% %.% %.%

Offline Caveoftreasures

  • Trade Count: (+16)
  • ******
  • Forum Posts:
Re: Bally Eight Ball Restoration
« Reply #37 on: November 28, 2012, 02:46:42 PM »
Amazing work as usual.
Behind every garage door could be a pinball collectors
"Cave of Treasures" 55 in my collection

Into  Stern -JJP - Cars , Road Bikes- Jet Skis - Star Trek n Sci-Fi & Electronics    
Beware of Stalkers & Walkers when playing The Walking Dead

My 7yr old son Hunter is my best mate in the world !

Offline Crashramp

  • Trade Count: (+3)
  • ******
  • High Score Initials:
  • Forum Posts:
  • Albury
Re: Bally Eight Ball Restoration
« Reply #38 on: November 28, 2012, 08:58:43 PM »
Great work Nino. This is such a nice looking title too. I love watching your updates on these restorations, especially the ones on games I really enjoy like this one. Classic title brought back to life!   @@*

Offline pinnies4me

  • Administrator
  • Trade Count: (+5)
  • *****
  • High Score Initials:
  • Forum Posts:
  • Victoria
Re: Bally Eight Ball Restoration
« Reply #39 on: November 28, 2012, 09:24:01 PM »

Been watching this one for months mate, outstanding stencil work - like you said, it is like unwrapping a present! Found the same with the recent Firepower (another of Gav's great stencil efforts).

I especially love all the brightwork - have you done a post on the re-plating process? I seem to recall one, but couldn't find it.

“If you wanna escape, go up to a pinball machine. There’s a magic button on the front that takes you to a world under the glass and makes the the rest of the universe disappear.”

Offline greenechidna

  • Trade Count: (0)
  • ****
  • Forum Posts:
  • straight down the guts
Re: Bally Eight Ball Restoration
« Reply #40 on: December 04, 2012, 12:28:52 AM »
Seconding the love for the shiny bits...you have to wonder if they came that bright out of the box!
 Definitely worth the effort for the overall effect, even those bits the average punter never sees.
I guess having such  good results on everything so far puts pressure on you to nail the p/f & b/g

I spy a nice High Hand B/G in the background, working it's way down the queue  $#$

Offline Strangeways

  • Pinball Restoration is my passion
  • Administrator
  • Trade Count: (+9)
  • *****
  • High Score Initials:
  • Forum Posts:
  • Melbourne
  • ABN 68 283 634 461
    • Ride The Boney Beast
Re: Bally Eight Ball Restoration
« Reply #41 on: December 04, 2012, 12:32:55 AM »
Seconding the love for the shiny bits...you have to wonder if they came that bright out of the box!
 Definitely worth the effort for the overall effect, even those bits the average punter never sees.
I guess having such  good results on everything so far puts pressure on you to nail the p/f & b/g

I spy a nice High Hand B/G in the background, working it's way down the queue  $#$

Next in the queue  ^^^ ^^^

Thankfully, the Eight Ball will have a STUNNING new repro playfield AND backglass. It will look amazing with these two additions. Just placing the repro in the game gives an overall picture of where the game is headed. Light at the end of the tunnel !
Aussie Pinball - Proud to be Australia's Premier Pinball Forum

http://www.australianpinballrestorations.com.au/

http://www.rtbb.com.au/catalog/

We carry the largest range of NEW Ramps in Australia

Offline greenechidna

  • Trade Count: (0)
  • ****
  • Forum Posts:
  • straight down the guts
Re: Bally Eight Ball Restoration
« Reply #42 on: December 04, 2012, 12:55:11 AM »
OK...missed that bit. I was looking at the original pics and thought it was going to be an almighty challenge to bring them up to par

Willit get a new slab of playfield glass as well?

Epic resto Nino

Offline goodolddays

  • Trade Count: (0)
  • ******
  • Forum Posts:
  • Riverstone NSW
Re: Bally Eight Ball Restoration
« Reply #43 on: December 04, 2012, 09:26:12 AM »
Looks fantastic as usual Nino . So much work but the reward is worth it  ^^^
I need more room ! and more $$$

Offline Strangeways

  • Pinball Restoration is my passion
  • Administrator
  • Trade Count: (+9)
  • *****
  • High Score Initials:
  • Forum Posts:
  • Melbourne
  • ABN 68 283 634 461
    • Ride The Boney Beast
Re: Bally Eight Ball Restoration
« Reply #44 on: December 31, 2012, 02:21:27 PM »

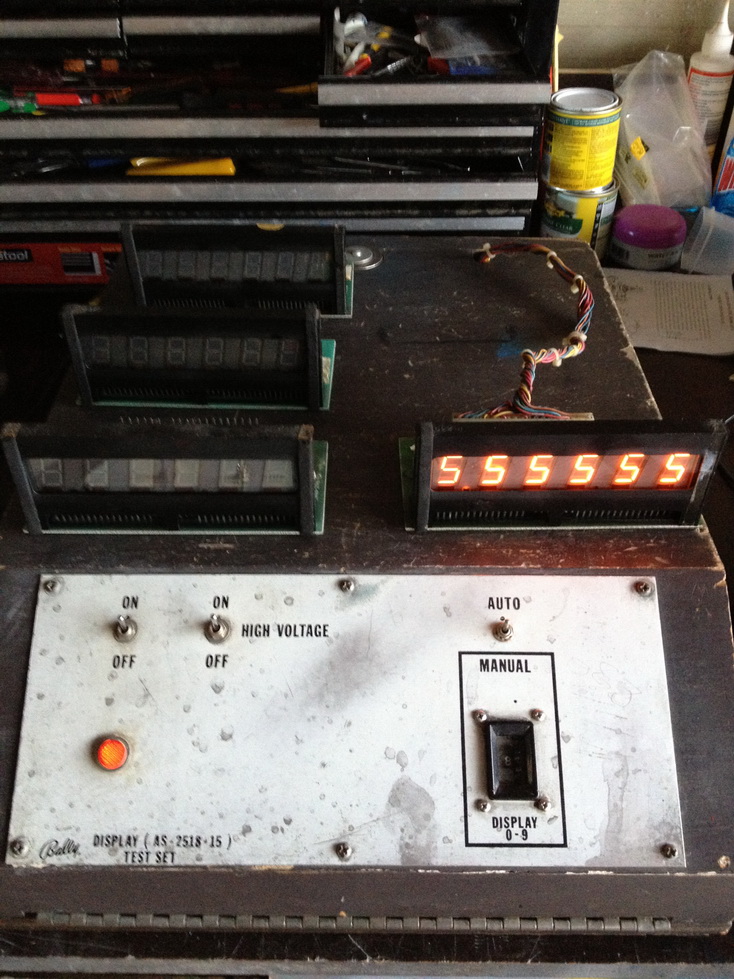
The boardset from this game are the next part of the process. I started with the displays. All 5 are in very good condition. All i needed to do was upgrade the digit resistors to 100K 1/2 Watt resistors as the old ones were oly 1/4 Watt and they will "go open" in time. I used my Bally Factory Test Fixture for the first time and ended up repairing around 20 displays at the same time !


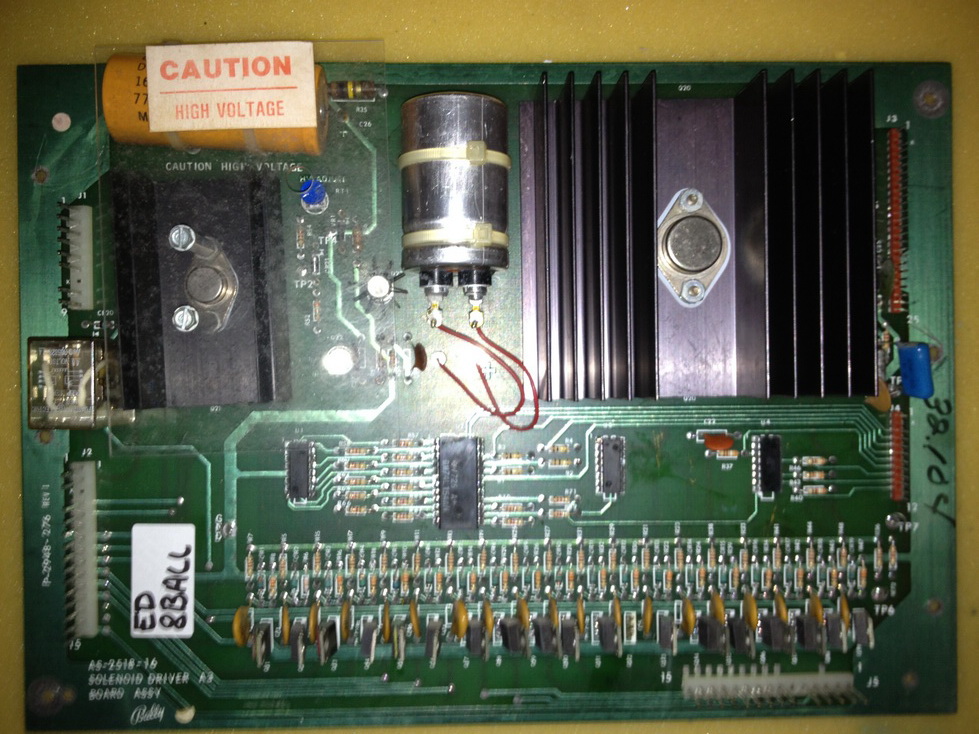
Next was the Solenoid Driver - I cover my repair and upgrade process here - http://aussiepinball.com/index.php?topic=158.0

Whenever a pinball is advertised for sale, this process is ignored, yet it is the first sign of short cuts in reconditioning or restoration. I've seen 30 year old original capacitors in machines with Alteks installed ! This is a HUGE problem. C23 HAS to be replaced - and I usually replace C26 as well. For this board, there was a previous attempt at repairing the HV section (displays), and it simply was a poor attempt. I've rebuilt the entire section. All the connectors are replaced. The pins will also be replaced (repinned) - Not just the 0.156, but also the .100.

Before (just the upgrades done - not the connectors - yet) ;


After ;


Unfortunately my Ball Factory SD tester is not working properly at the moment, but it was easy enough to test in the game.


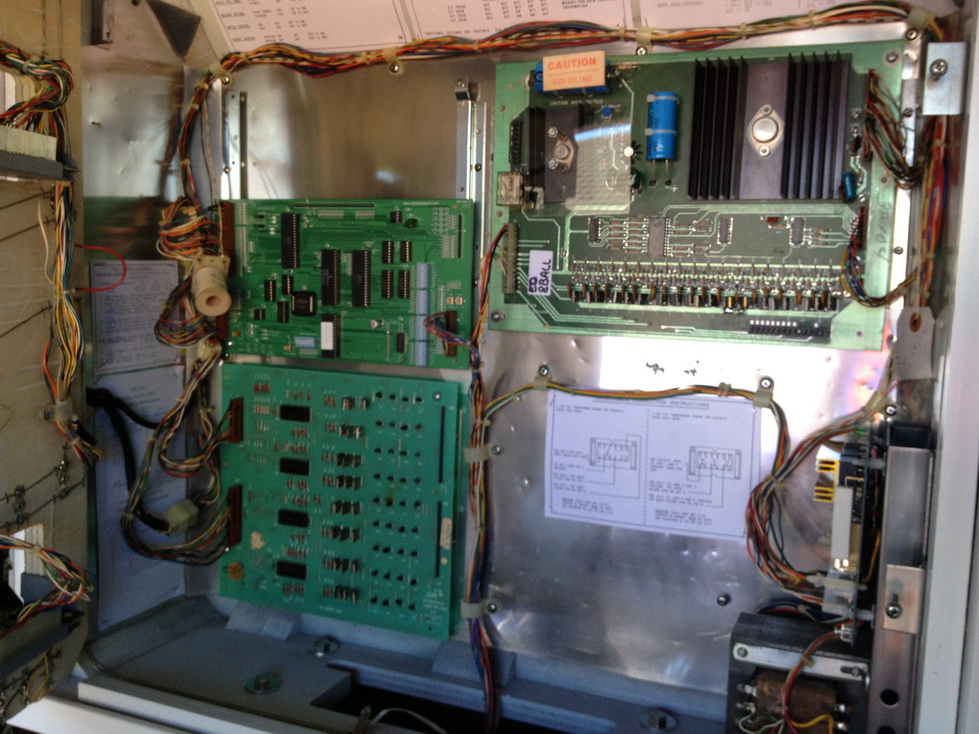
I've used the Homepin Power Supply Board - which was a breeze to build and install ! - http://www.homepin.com/rectifierpcb.html


I purchased an Altek board from Pinball Resource to complete the boardset. The Lamp driver was in excellent condition.


Displays installed. ALL the lamp sockets have been replaced. Tedious work, but some were corroded. Best just to replace ALL of them while the lightbox panel is out of the game.


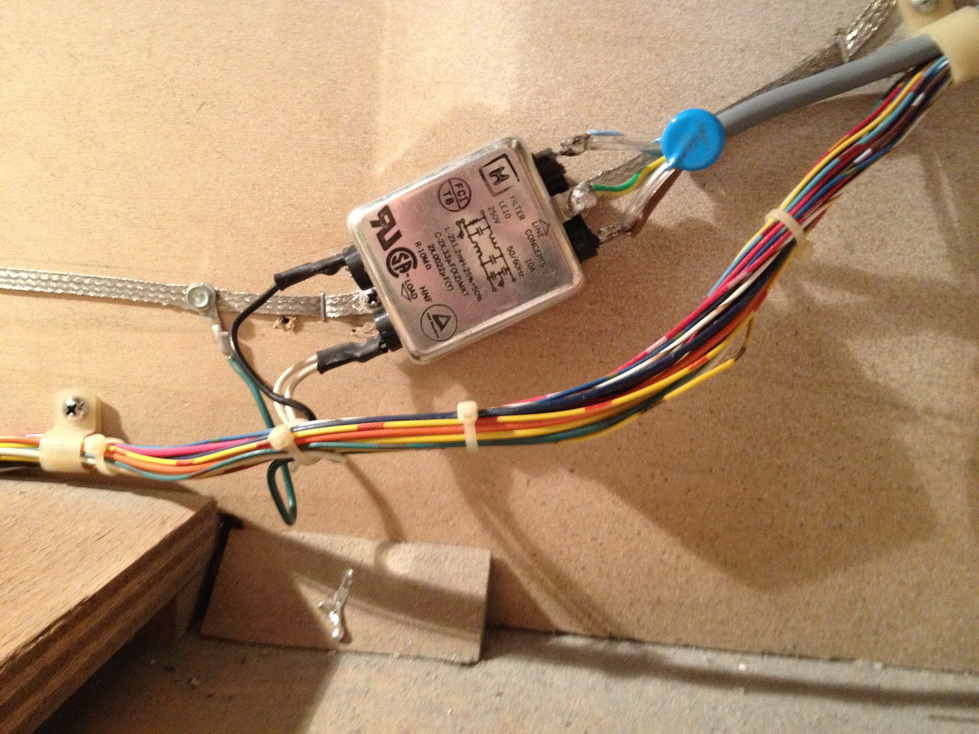
I always replace the noise filter when installing a new power cable. I've seen so many hack jobs recently with second hand machine sales. The "easy" and "cheap" method is to buy a $2 extension cable from bunnings and cut one end off and solder it into the game. This is electrically unsafe unless a professional Tag and Test is completed. I buy metal case noise filters as they are more robust and also retain the original look.


Repinning a SS Machine


All machines from this era need to be checked properly. No use in replacing the power supply headers and pins and claiming the game has been repinned. I have never seen corrosion om these connectors. They are always stressed, burnt or hacked. Replacing these connectors, housing and pins is mandatory. If it is not done, the buyer is looking for trouble !

What is often overlooked is the MPU board connectors and pins. Secondly, the Solenoid Driver needs to be repinned as well. Not just the obvious connectors. I replace ALL pins. This is time consuming, but this will ensure the game has trouble free operation for years to come. To do the job properly, it takes 3-4 hours. That's the ENTIRE machine. In this restoration, I've replaced all board connector pins and repinned all connectors. The housing are retained because they were all in excellent condition.

Here's an example of "why" this step needs to be done ;

Corrosion has traveled across the MPU to J3. Visually, you can see the old pins are tarnished, but you won't know how bad they are until you start to remove them. Then the full picture is that some of the pins are corroded and are green. ALL the pins need to be removed and checked. There's no use in simply checking them and then refitting them if they look good. I've seen "repinned" games, with brand new Alteks installed. Yet there is VISUAL evidence of corrosion on the pins (in the connectors). In time, this corrosion will travel to the Altek board. This is a common short cut with these games, and one of the biggest reasons they have intermittent problems.


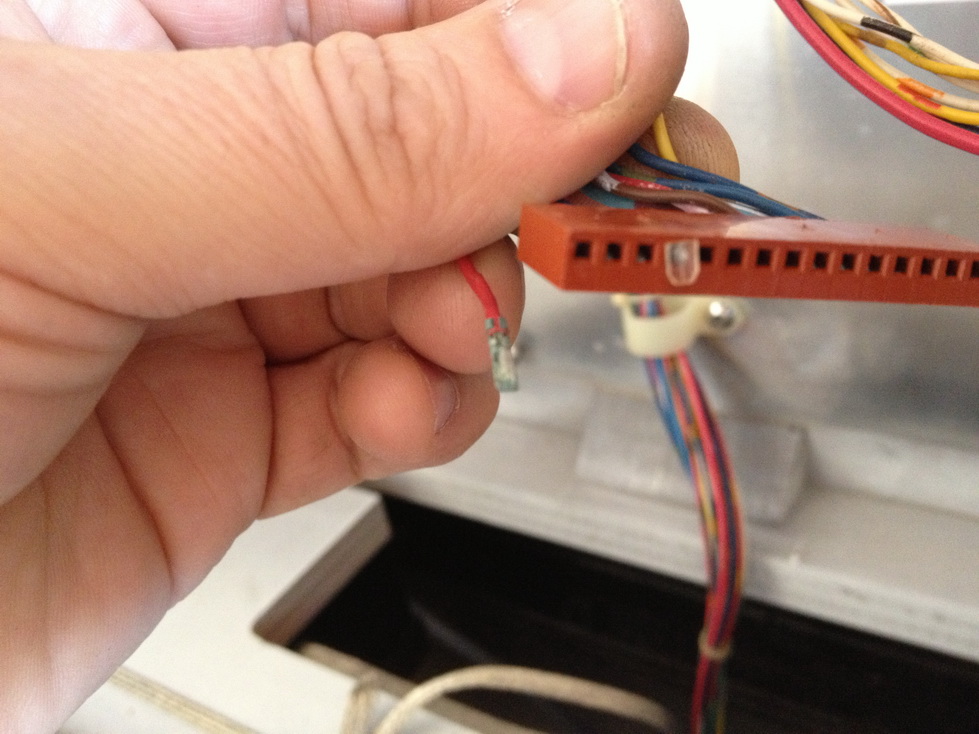
Sorry about the focus - but clearly this pin is GREEN and furry !


This game won't have any connector issues for another 25 years. Basically, the game is testing perfectly without the playfield - which is the next step in the restoration.

Aussie Pinball - Proud to be Australia's Premier Pinball Forum

http://www.australianpinballrestorations.com.au/

http://www.rtbb.com.au/catalog/

We carry the largest range of NEW Ramps in Australia