Author Topic: Star Trek: The Mirror Universe pinball  (Read 10888 times)

0 Members and 2 Guests are viewing this topic.

Offline elkor-alish

  • Trade Count: (0)
  • ******
  • Forum Posts:
  • Perth
Re: Star Trek: The Mirror Universe pinball
« Reply #45 on: April 15, 2013, 05:14:00 PM »
Love your new center decal but I think the original Bally logo looks pretty cool for the triangle pieces.
Also the man shape logo is already a mirror image (I think).
What about keeping the right side the same as the original and having a mirror image for the left?
« Last Edit: April 15, 2013, 05:15:40 PM by elkor-alish »
Pins: The Getaway, TotAN, WH2O, Pinball Magic, Banzai Run, Flintstones, Judge Dredd, Lord of the Rings LE, Metallica LE, Iron Man VE, The Walking Dead LE, Star Trek The Next Generation.

Offline zitt

  • Trade Count: (0)
  • ****
  • Forum Posts:
Re: Star Trek: The Mirror Universe pinball
« Reply #46 on: April 15, 2013, 05:20:29 PM »
honestly; not a huge fan of the bally man there. It's does pay omage to the original in some way tho.
Not off the table; but looking for other suggestions too.

Offline swinks

  • Trade Count: (+18)
  • ******
  • High Score Initials:
  • Forum Posts:
  • Lake Macquarie, NSW
Re: Star Trek: The Mirror Universe pinball
« Reply #47 on: April 15, 2013, 06:13:37 PM »
what about some beam me down scotty beams on the triangles that direct the focus to the game cards

or

just all black apron with some stars or warp speed effect

https://swinks.com.au

for pinball parts (reproduction & mods)
for pinball t-shirts

Offline zitt

  • Trade Count: (0)
  • ****
  • Forum Posts:
Re: Star Trek: The Mirror Universe pinball
« Reply #48 on: April 19, 2013, 05:25:00 PM »
Still haven't decided on what to do about the apron; so was hoping that work on the Shooter Scale would trigger some creativity.

Here's the old scale:


Because the PF has been mirrored; the shooter is on the opposite side of the PF. This means the existing scale cannot be used. Therefore my plan is to duplicate the scale and mirror it so it'll work on the correct side of the PF.

Once I had the measurements done in QCAD (DXF); the plan is to waterjet it at Techshop then then bend the piece on a metal break. Since I'm waterjetting a new piece; might as well make it Mirror universe:


I decide to replace the generic scale with a Terran dagger cutout and changed up the scale a little bit while still paying homage to the original. The plan will be to do some powercoating / laser etching to make this scale look correct.

Offline zitt

  • Trade Count: (0)
  • ****
  • Forum Posts:
Re: Star Trek: The Mirror Universe pinball
« Reply #49 on: April 25, 2013, 05:00:58 PM »
My Friends on the DFW Pinball list made a suggestion to improve the shooter scale by putting the scale as a warp factor. The result:


Inspired by TheAngryAngel’s TOS crew; I began working on the apron triangles. I started by changing the color of the insigna “frame” to red so it would match the background I picked in Rev0. After playing with Photoshop; I decided while it was an awesome piece of art... it didn’t really match the mirror universe; so I began the search for high rez mirror universe photos from the original episode.

Using his work as a “template”; I began to photoshop in the various mirror alternates. Dropping Chekov as he hadn’t join the crew yet. In his place; Marlena Moreau.

For the other triangle; I decided a “credits” listing would be appropriate.

Rev 1:


At the moment; I think I’m going to lay down the black and reds using powder coat; maybe even the outlines. As far as the pieces themselves; I’ll going to try to see how direct printing looks. If not; I’ll print them to plastics and bolt them down to the apron.

Thoughts / Comments?

Offline swinks

  • Trade Count: (+18)
  • ******
  • High Score Initials:
  • Forum Posts:
  • Lake Macquarie, NSW
Re: Star Trek: The Mirror Universe pinball
« Reply #50 on: April 25, 2013, 05:23:57 PM »
looks good, why not powdercoat the apron and then have the deals printed on vinyl
https://swinks.com.au

for pinball parts (reproduction & mods)
for pinball t-shirts

Offline zitt

  • Trade Count: (0)
  • ****
  • Forum Posts:
Re: Star Trek: The Mirror Universe pinball
« Reply #51 on: May 15, 2013, 04:02:11 PM »
I’ve completed assembly of FAB B of the NIXIE tube displays. The emulation and 7 digit native modes work as designed. I’ve posted a youtube video with it installed in the backglass.

http://www.youtube.com/watch?v=YcyABnz11KA
 
Obviously; the 7digit modes do not work “ideally” with a machine designed for 6digits. I may spend some time in the future to make a 6 digit “right angle” board if there is enough interest.
 
Need to confirm in a 7digit machine that it works properly. I already have a volunteer.

Next step is to write a blog post with schematics and pictures.
Need to send the boards out for Black PCB fabbing.

Also completed Rev0 of the Proximity sensor PCB. Got them back from oshpark today and they look good right now. Waiting for parts from Digikey before I can start assembly and debug.

Offline zitt

  • Trade Count: (0)
  • ****
  • Forum Posts:
Re: Star Trek: The Mirror Universe pinball
« Reply #52 on: July 27, 2013, 03:58:06 PM »
Things have been quiet here lately... why? Well; I had to put the ST:M project on hold so I could build a storage shed in the back yard. Public Storage was charging me nearly 400/mo to store my projects... that was money I could be spending on the Mirror Universe... or a ST:LE. Luckily, I completed that project last month.

I've been slowly working on the cabinet for this project. I'm reconditioning a fairly beat up Bally Star Trek cabinet. What've done is re-glued the front corners... and stripped the paint off 3 of the sides of the machine with CitriStrip.

Right now I'm experimenting with Cabinet prep. I've put the first coat of ebony wood stain on part of the cabinet. My goal is to get the wood dark enough to simulate the black of space. Then I'm going to do a custom stencil set to paint the ISS Enterprise firing on the Planet.

Has anyone done wood stain instead of regular black paint? Were there any Solid State machines with Stain instead of paint?

Worst case I'll just paint over the stain... but I'm kinda hoping I can get the wood dark enough with stain to make it look good.

Offline zitt

  • Trade Count: (0)
  • ****
  • Forum Posts:
Re: Star Trek: The Mirror Universe pinball
« Reply #53 on: July 29, 2013, 06:22:12 PM »
As I stated; been working on the cabinet for the Mirror universe project. I bought a couple of "project" Bally Star Treks from a fellow pinball collector out of Shertz a few years ago. These have been setting in storage for a while... and were very rough.

I took the cabinet with the most flaking and damage as the donor cabinet for this project. Here it is in all it glory:


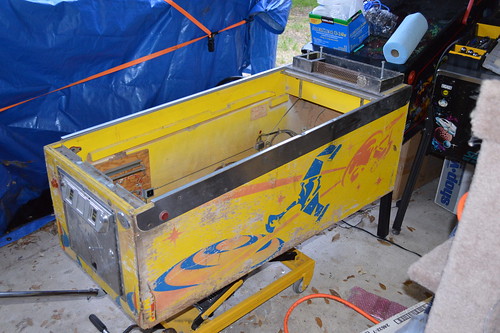
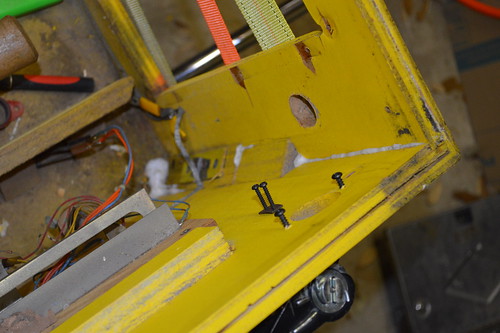
I began by stripping all the hardware (coindoor) and side rails off of the machine so I could access the state of the "bones" (ie wood) of the cabinet. I noticed that the front corners were beginning to separate.... also some of the plywood cores were starting to come apart.


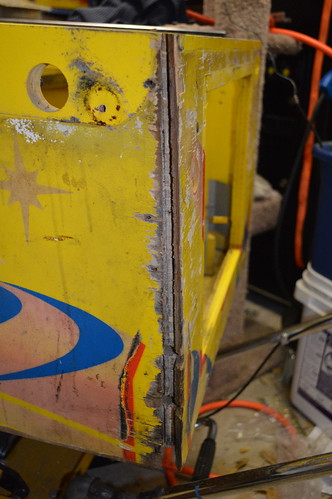
First I used some white gorilla glue to repair the plywood core:


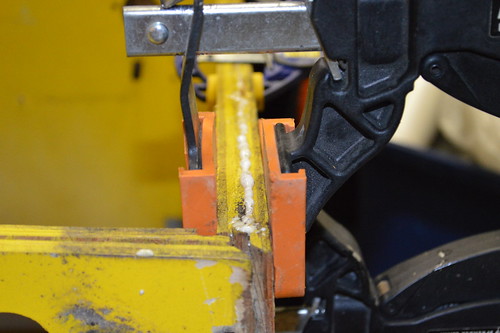
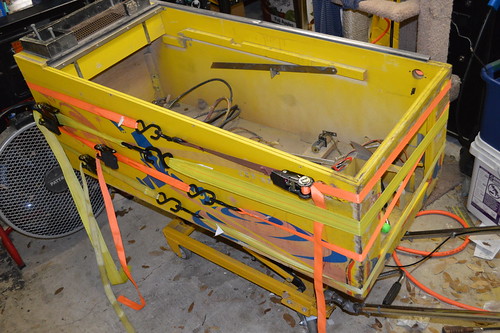
Then I used ratchet straps to re-glue both sides:


I CNCed a diamond shaped piece out of MDF and glue it in the old shooter hole:


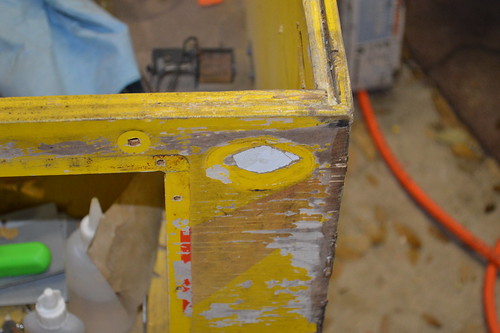
With that I began stripping the old flaking paint off with CitraStrip along the way I tried to save as much of the wood as I could. When possible; I reglued the laminate back to the plywood... or used some wood filler to fill in the rough areas.


I also repaired the bottom - not pictured. 3 of the four sides had lost the plywood under the grove... which means the bottom would probably fall out at some point. I fixed this by saving as much of the plywood core on the 1 "acceptable" side... then using quarter round pieces from Lowes.  The quarter round piece was secured with the same gorilla glue and some 18 gauge pin nails.

I bought some mill wax ebony oil stain as I wanted to stain the cabinet black instead of paint. I wanted something "different" looking. Here's one side stained with several coats. Looked like absolute trash...

That just would not do AT ALL.

The next day I went to our local WoodCraft store ... they seemed to have a better selection of stain.

Since I was in new territory on this project; I decided to get a couple of product. The first was a Ebony Wood Dye product and the second was a Black Water-based Stain. The guy at the store claimed the dye would dye the fibers of the wood in a "molecular" like fasion ... while the Stain is pigment based (and would act more like paint). I added the later. I figured I'd buy both and try it on the cabinet.

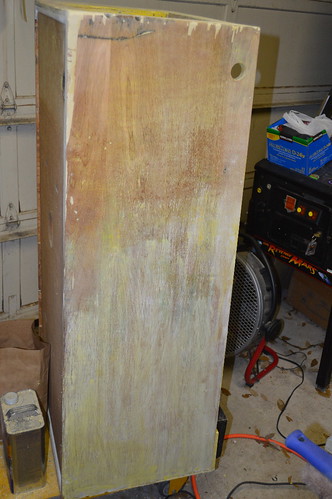
After I got home; I stripped the back of the cabinet and put down some test swatches:

Upper right hand: Ebony Dye
Upper LEft: Satin Black Stain
Lower Right: Stain over Dye
Lower left: 50/50% mix of both

I didn't like the ebony stain as is... as it still had a purple/blue hue to it.
The stain looked ok; but had a paint like view.
The Dye under Stain had what my mind thought was the best of the two. The Dye in effect raised the wood grain a little; and the stain still let the overall look like a satin look. The 50/50 worked; but wasn't as vibrant as the Stain over dye.

With this decision; I proceed to dye then stain the cabinet. The Outsides of the cabinet were stripped of all paint; then dyed then stained. The inside of the cabinet I decided to lightly sand the interior then spray it with a Satin Black spraypaint from Rustolem.  I also sprayed the bottom side with the same Satin black so it'd look more finished.

The results:


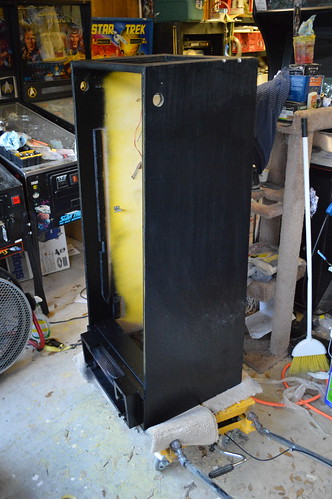
Yes... I proably could have save myself some more time by just painting the cabinet with some latex black... Or any black paint; but I kinda wanted to have the wood grains show thru the background. I may regret this decision later... but I'm currently very happy with the way it turned out.

Tonight I worked on the stencil design for the cabinet. Obviously; it's going to be a black background; however, I wanted to pay a nod to the original cabinet design. I traced the existing design and pulled it into Corel Draw. Given Black background; I still wanted to keep some of the same colors in the stencil. So the stars became Yellow. The planet Yellow/Red... and The Phasers became blue. I going to make the Enterprise BattleShip grey.
I removed the Klingons ... instead having the Enterprise fire on the planet. :D


Still need to work on the front design... and the Head. I'm thinking about keeping the Head design the same... but change the blue background to black.

Thoughts?

Offline swinks

  • Trade Count: (+18)
  • ******
  • High Score Initials:
  • Forum Posts:
  • Lake Macquarie, NSW
Re: Star Trek: The Mirror Universe pinball
« Reply #54 on: July 29, 2013, 07:04:02 PM »
looking good, how id the playfield going?
https://swinks.com.au

for pinball parts (reproduction & mods)
for pinball t-shirts

Offline elkor-alish

  • Trade Count: (0)
  • ******
  • Forum Posts:
  • Perth
Re: Star Trek: The Mirror Universe pinball
« Reply #55 on: July 30, 2013, 12:36:41 AM »
I love your dedication to this project.

I think your idea with the front art will look great.
I really like the black background. It makes the other colours stand out more, especially the blue phasers.
Pins: The Getaway, TotAN, WH2O, Pinball Magic, Banzai Run, Flintstones, Judge Dredd, Lord of the Rings LE, Metallica LE, Iron Man VE, The Walking Dead LE, Star Trek The Next Generation.

Offline zitt

  • Trade Count: (0)
  • ****
  • Forum Posts:
Re: Star Trek: The Mirror Universe pinball
« Reply #56 on: July 30, 2013, 01:21:13 PM »
looking good, how is the playfield going?
On hold. I've been trying to find a magnetic proximity detector design which would work to replace the switches... I haven't had a lot of success :(

Offline swinks

  • Trade Count: (+18)
  • ******
  • High Score Initials:
  • Forum Posts:
  • Lake Macquarie, NSW
Re: Star Trek: The Mirror Universe pinball
« Reply #57 on: July 30, 2013, 02:13:45 PM »
looking good, how is the playfield going?
On hold. I've been trying to find a magnetic proximity detector design which would work to replace the switches... I haven't had a lot of success :(


I use to use these on cnc machines, and wanted to apply them to a pinball
http://www.sick.com/group/en/home/products/product_portfolio/industrial_sensors/Pages/magnetic_proximity_sensors.aspx
https://swinks.com.au

for pinball parts (reproduction & mods)
for pinball t-shirts

Offline pinball god

  • Trade Count: (+1)
  • ******
  • High Score Initials:
  • Forum Posts:
  • Melbourne
  • Metallica is here to stay
Re: Star Trek: The Mirror Universe pinball
« Reply #58 on: July 30, 2013, 08:06:54 PM »
Sorry for the late reply, but I used a product called sikens (unsure of the spelling). I put 2 coats on 100+ cypress posts for my landscaping and they are very dark but still show the grain. It is very expensive compared to a lot of other stain brands. Its a German product.
Still loving my Metallica Premium

Offline zitt

  • Trade Count: (0)
  • ****
  • Forum Posts:
Re: Star Trek: The Mirror Universe pinball
« Reply #59 on: July 31, 2013, 04:46:45 PM »
Did some more work to the side art; terminating the phaser beams on the planet. Not ideal; but probably the best I can do with a stencil application.


I also worked on the front art; "inverting" the shooter location and making the color scheme similar to the sideart.


Not sure about the text at the bottom. Again limited by a stencil; but need to look at this further.