Author Topic: Twilight Zone restoration  (Read 2597 times)

0 Members and 1 Guest are viewing this topic.

Offline ktm450

  • Trade Count: (+1)
  • ******
  • High Score Initials:
  • Forum Posts:
  • Geelong, Victoria
Twilight Zone restoration
« on: December 15, 2008, 03:41:19 PM »
Here are a few photos of my TZ restoration.  Got it home played half a game to check everything was working then started stripping playfield down.  
Here are a few before photos:


« Last Edit: October 20, 2011, 09:48:12 PM by ktm450 »

Offline ktm450

  • Trade Count: (+1)
  • ******
  • High Score Initials:
  • Forum Posts:
  • Geelong, Victoria
Re: Twilight Zone restoration
« Reply #1 on: December 15, 2008, 04:09:48 PM »
Check out the clock housing!
Someone had gone to town on it with a can of black spray paint, there was a little bit of overspray on the playfield, plastics glass and metal bits !@#
It was fairly easy to remove.  Inside I found out why it was painted black, half a tub of wheel bearing grease had been poured inside to 'lubricate' the gears   @.@
It had been loved though there was polish splatter left everywhere a rag couldn't reach.
Unfortunately all the metal posts were corroded, looked like this pin was sitting on the ships deck rather than safely inside the container
Check out the last photo with the magnet, I'll tell you something very stupid I did a little later.  You can also see some of the corrosion I had to tackle in this photo.


« Last Edit: October 20, 2011, 09:49:03 PM by ktm450 »

Offline ktm450

  • Trade Count: (+1)
  • ******
  • High Score Initials:
  • Forum Posts:
  • Geelong, Victoria
Re: Twilight Zone restoration
« Reply #2 on: December 15, 2008, 04:12:37 PM »
So every thing was stripped off for the playfield clean up and polish
Before:


« Last Edit: October 20, 2011, 09:51:25 PM by ktm450 »

Offline ktm450

  • Trade Count: (+1)
  • ******
  • High Score Initials:
  • Forum Posts:
  • Geelong, Victoria
Re: Twilight Zone restoration
« Reply #3 on: December 15, 2008, 04:16:40 PM »
A bit of elbow grease, Nifti, ME, Novus2, Mothers hard carubana wax and here is the result
After:


« Last Edit: October 20, 2011, 09:56:27 PM by ktm450 »

Offline ktm450

  • Trade Count: (+1)
  • ******
  • High Score Initials:
  • Forum Posts:
  • Geelong, Victoria
Re: Twilight Zone restoration
« Reply #4 on: December 15, 2008, 04:22:58 PM »
So here is a list of what was done:

-replaced clock housing and lens
-replaced clock decal
-modified clock to LEDs
-replaced all coil sleves
-replaced all rubbers
-replaced all star posts
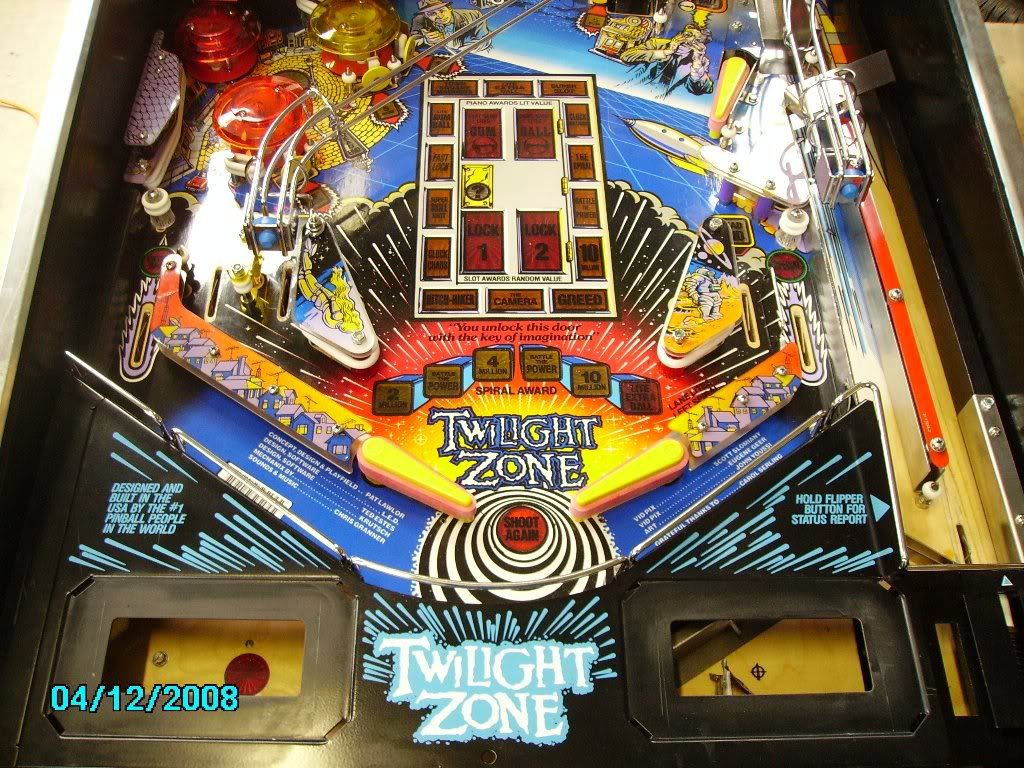
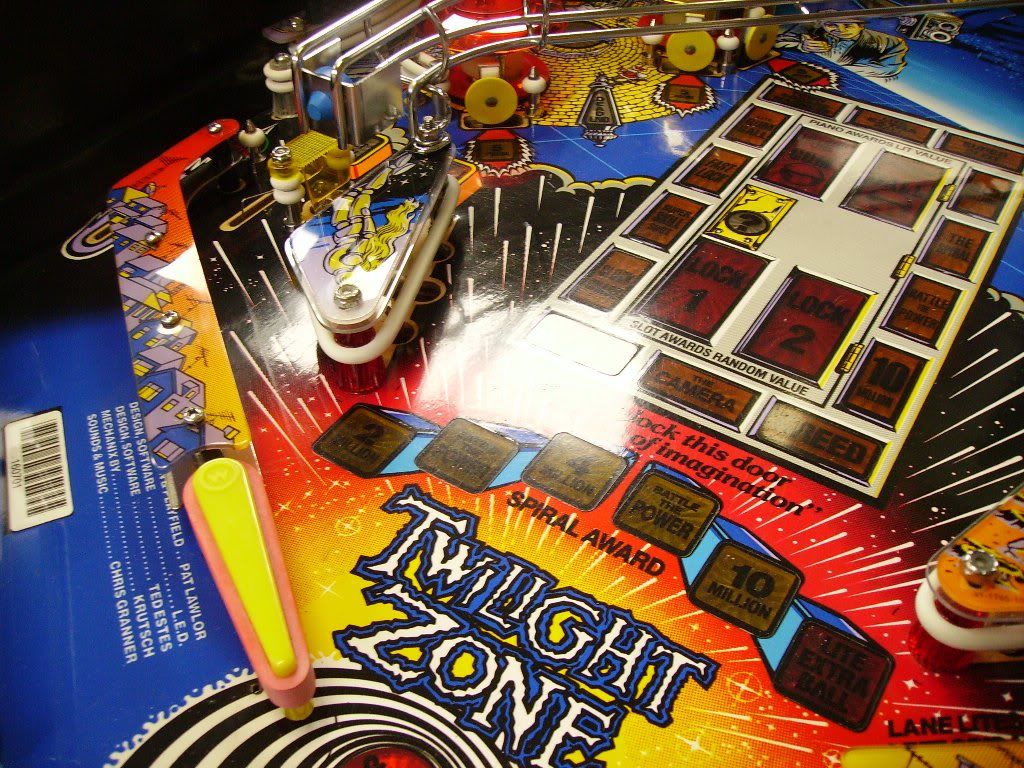
-flame polished ramp
-replaced decal under ramp
-replaced plastic above ramp
-replaced slingshot plastics
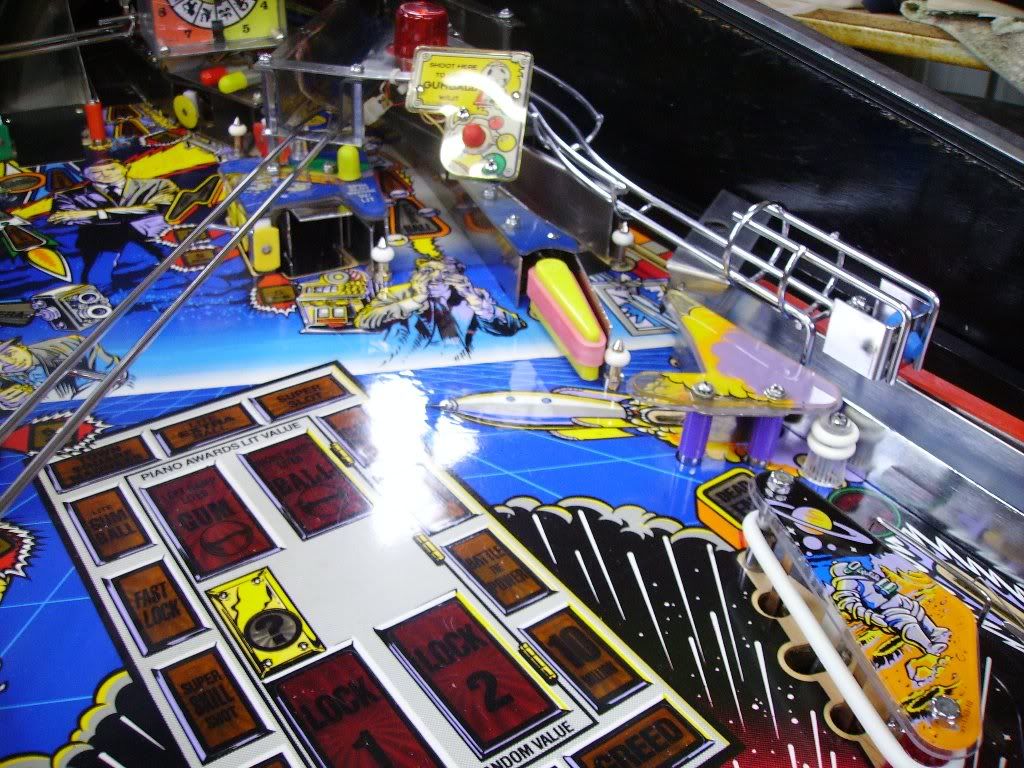
-made plastic protectors for slings, rocket, slot mach and piano
-removed and polished every post and every screw as all had surface corrosion
-a couple of small touchups
-PF completely stripped down cleaned polished and waxed
-new globes
-inserts cleaned from below playfield
-fixed a raised insert
-rebuilt all flippers, new bats, new plungers, links, and pawls. New coild sleeves and flipper bushings
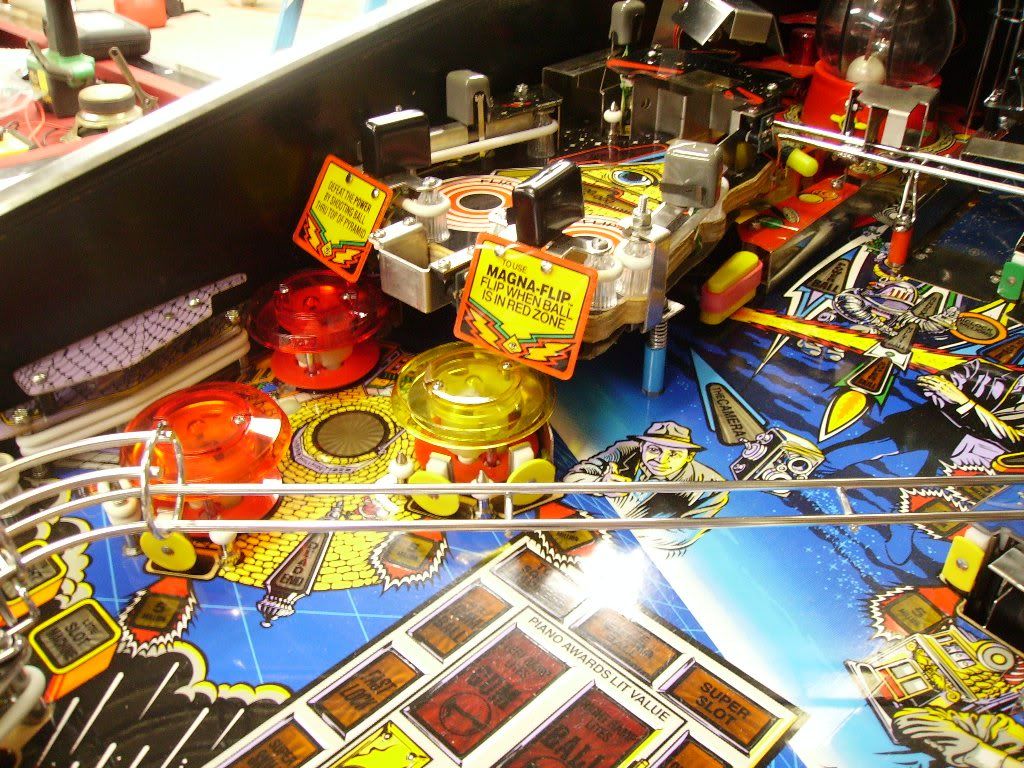
-rebuilt all targets, the back plates were all too coroded to fix, so I had to make new stronger ones from stainless steel, new foam backing
-Made a stronger target for the always hammered slotmachine target using stainless steel 10mm x 10mm square section, milled back off to make a 'u' shape then milled at an angle to finish off
-replaced pop bumper metal rings
-replaced pop bumper caps
-replaced pop bumper wafers
-replaced a few coils that were the incorrect ratings
-re-blued the spring steel flaps on the entrance to all ramps
-re-blued the one way gate flaps
-all new hex-screws
-replaced lane guide
-removed the magnets and machined the face that sits level with the PF (stupid idea, DO NOT do this, machining was ok and they look fantastic, BUT the windings of the magnet started to unwind with the cardboard removed and I started to get a bit of a birdsnest going on, had to take 5 before I flipped out and calmly put it all back together again!)
-new improved trough proximity sensor
-replaced leg bolts
-reproduction translight
-changed the wedge sockets to #47 sockets on the flashing globes in the backbox to accept the more commonly available #455 globes
-added the colour changing led on the '?' and 'clock millions' globes (this is the only mod I will do as I hate the gumballs and all the 'happy meal' mods that people go overboard with)
-cleaned powerball
-New leg bolts and levelers
-added 5 new mirror glazed balls
-replaced LHS backbox speaker
-removed factory mylar with new mylar

More after pics:


« Last Edit: October 20, 2011, 09:58:30 PM by ktm450 »

Offline ktm450

  • Trade Count: (+1)
  • ******
  • High Score Initials:
  • Forum Posts:
  • Geelong, Victoria
Re: Twilight Zone restoration
« Reply #5 on: December 15, 2008, 04:26:21 PM »
more:


« Last Edit: October 20, 2011, 10:03:05 PM by ktm450 »

Offline ktm450

  • Trade Count: (+1)
  • ******
  • High Score Initials:
  • Forum Posts:
  • Geelong, Victoria
Re: Twilight Zone restoration
« Reply #6 on: December 15, 2008, 04:28:10 PM »
a couple more:  (((  *)*


« Last Edit: October 20, 2011, 10:04:02 PM by ktm450 »

Offline ktm450

  • Trade Count: (+1)
  • ******
  • High Score Initials:
  • Forum Posts:
  • Geelong, Victoria
Re: Twilight Zone restoration
« Reply #7 on: December 15, 2008, 04:33:36 PM »
So these first two photos show the magnets turned out (no pun intended) after I machined them in the lathe.  DO NOT even thing about doing this, I was almost in tears when coils of copper started unwinding from the middle as the cardboard sandwiching it all together slipped apart  !!!  but the end result was worth it  *%*

the last pic show the reinforced target I machined up from a piece of 10mm x 10mm stainles steel square section tube.

Unbelieveable feeling playing that first game, could not wipe the smile off my face, all that hard work paid off  ()


« Last Edit: October 20, 2011, 10:08:12 PM by ktm450 »

Offline Strangeways

  • Pinball Restoration is my passion
  • Administrator
  • Trade Count: (+9)
  • *****
  • High Score Initials:
  • Forum Posts:
  • Melbourne
  • ABN 68 283 634 461
    • Ride The Boney Beast
Re: Twilight Zone restoration
« Reply #8 on: December 15, 2008, 04:42:31 PM »

OUTSTANDING !

That's one really nice restoration. I'll bet she plays like new..

 $%$


Roughly how many hours were involved (I'll bet you stopped counting)...
Aussie Pinball - Proud to be Australia's Premier Pinball Forum

http://www.australianpinballrestorations.com.au/

http://www.rtbb.com.au/catalog/

We carry the largest range of NEW Ramps in Australia

Offline felixthadog

  • Trade Count: (0)
  • ******
  • Forum Posts:
  • Melbourne
Re: Twilight Zone restoration
« Reply #9 on: December 15, 2008, 04:48:05 PM »
Farking hell, that is one outstanding restoration! Top effort, how much do you want for the machine?  !^!

 $%$]

Matthew

Offline vinito

  • Trade Count: (0)
  • *****
  • Forum Posts:
  • Kansas City, KS USA
Re: Twilight Zone restoration
« Reply #10 on: December 15, 2008, 05:00:36 PM »
Looks Great!!
You need these to finish it off: (shameless plug, though they are a free download)
http://i240.photobucket.com/albums/ff201/rgpimage/TZ/TZ5BFP.jpg
http://i240.photobucket.com/albums/ff201/rgpimage/TZ/TZ3BFP.jpg
http://i240.photobucket.com/albums/ff201/rgpimage/TZ/TZinstr.jpg

Here's a pic of them in my apron:


oops. The apron pic is a version from earlier that day. Links above are for a bit better version (IMO).
The scratchy-looking stuff is my beat up PF glass.


.
« Last Edit: December 15, 2008, 05:04:16 PM by vinito »
I feel more like I do now than I did when I first got here.

Offline ktm450

  • Trade Count: (+1)
  • ******
  • High Score Initials:
  • Forum Posts:
  • Geelong, Victoria
Re: Twilight Zone restoration
« Reply #11 on: December 15, 2008, 05:19:41 PM »

OUTSTANDING !

That's one really nice restoration. I'll bet she plays like new..

 $%$


Roughly how many hours were involved (I'll bet you stopped counting)...

I did stop counting mate, in between looking after my three young boys, i'd try to get out to the shed every now and then to do a little bit, I did a lot of polishing at work on the buff and rebuilt the whole Mini playfield at work. but other than that it took 4 months to complete.  I was toey as waiting for a game as I hadn't even played one full game before stripping down.

Offline ktm450

  • Trade Count: (+1)
  • ******
  • High Score Initials:
  • Forum Posts:
  • Geelong, Victoria
Re: Twilight Zone restoration
« Reply #12 on: December 15, 2008, 05:20:52 PM »
Farking hell, that is one outstanding restoration! Top effort, how much do you want for the machine?  !^!

 $%$]

Matthew

Thanks mate, not for sale  :lol took me too long to find one in need of a restoration without paying mega bucks

Offline ktm450

  • Trade Count: (+1)
  • ******
  • High Score Initials:
  • Forum Posts:
  • Geelong, Victoria
Re: Twilight Zone restoration
« Reply #13 on: December 15, 2008, 05:22:57 PM »
Looks Great!!
You need these to finish it off: (shameless plug, though they are a free download)
http://i240.photobucket.com/albums/ff201/rgpimage/TZ/TZ5BFP.jpg
http://i240.photobucket.com/albums/ff201/rgpimage/TZ/TZ3BFP.jpg
http://i240.photobucket.com/albums/ff201/rgpimage/TZ/TZinstr.jpg

oops. The apron pic is a version from earlier that day. Links above are for a bit better version (IMO).
The scratchy-looking stuff is my beat up PF glass.


.

Thanks Vinito, I do need some cards for it, they do look good mateĀ  ^^^
« Last Edit: December 15, 2008, 05:27:25 PM by ktm450 »

Offline felixthadog

  • Trade Count: (0)
  • ******
  • Forum Posts:
  • Melbourne
Re: Twilight Zone restoration
« Reply #14 on: December 15, 2008, 05:36:16 PM »
Farking hell, that is one outstanding restoration! Top effort, how much do you want for the machine?  !^!

 $%$]

Matthew

Thanks mate, not for sale  :lol took me too long to find one in need of a restoration without paying mega bucks

PM sent  %$%

Matthew