Author Topic: el_timbo's Funhouse Restoration...  (Read 4943 times)

0 Members and 1 Guest are viewing this topic.

Offline ktm450

  • Trade Count: (+1)
  • ******
  • High Score Initials:
  • Forum Posts:
  • Geelong, Victoria
Re: el_timbo's Funhouse Restoration...
« Reply #30 on: March 05, 2010, 09:59:58 AM »
Great work Tim, do you still have the file with the speaker template on it? I would love a copy if you do.
I have a speaker grill that has a knife wound through it obviously whilst on site. I had to replace the speaker when I got it as it had pierced through the cone. Some dickheads around  @.@
Gives the pin some character but I would love to make some replacement grilles like you have.  *%*

Offline Strangeways

  • Pinball Restoration is my passion
  • Administrator
  • Trade Count: (+9)
  • *****
  • High Score Initials:
  • Forum Posts:
  • Melbourne
  • ABN 68 283 634 461
    • Ride The Boney Beast
Re: el_timbo's Funhouse Restoration...
« Reply #31 on: March 05, 2010, 10:19:47 AM »

Great Update !

Love the DOOM poster - actually played all Doom, Doom II and Doom Ultimate from start to finish last year..

Looks like I will be investing in some sys11 siderails for my restore - they look awesome !
Aussie Pinball - Proud to be Australia's Premier Pinball Forum

http://www.australianpinballrestorations.com.au/

http://www.rtbb.com.au/catalog/

We carry the largest range of NEW Ramps in Australia

Offline d3vlin

  • Trade Count: (0)
  • ***
  • Forum Posts:
  • geelong
Re: el_timbo's Funhouse Restoration...
« Reply #32 on: March 06, 2010, 06:05:23 PM »
great job mate looking unreal keep it up.

Offline el_timbo86

  • Trade Count: (+1)
  • *****
  • High Score Initials:
  • Forum Posts:
  • Geelong, Victoria
    • Hot Rodded Pins
Re: el_timbo's Funhouse Restoration...
« Reply #33 on: March 06, 2010, 09:58:11 PM »
Great work Tim, do you still have the file with the speaker template on it? I would love a copy if you do.
I have a speaker grill that has a knife wound through it obviously whilst on site. I had to replace the speaker when I got it as it had pierced through the cone. Some dickheads around  @.@
Gives the pin some character but I would love to make some replacement grilles like you have.  *%*

No dramas at all, still have the stencil i made.

I'll upload it on this thread tomorrow...check back soon

Offline johnwartjr

  • Trade Count: (0)
  • ******
  • Forum Posts:
  • Columbus, Indiana USA
  • It's ALIVEEEEEE!
    • My Home Gameroom . com
Re: el_timbo's Funhouse Restoration...
« Reply #34 on: March 07, 2010, 07:02:03 PM »
Awesome work as expected based on the previous posts!

I wish I had the graphic arts talents, I'd make some labels too. I did custom speakers in my current project, and the manufacturer's labeling sticks out like a sore thumb!

Offline el_timbo86

  • Trade Count: (+1)
  • *****
  • High Score Initials:
  • Forum Posts:
  • Geelong, Victoria
    • Hot Rodded Pins
Re: el_timbo's Funhouse Restoration...
« Reply #35 on: March 08, 2010, 12:33:16 AM »
Awesome work as expected based on the previous posts!

I wish I had the graphic arts talents, I'd make some labels too. I did custom speakers in my current project, and the manufacturer's labeling sticks out like a sore thumb!

Thanks John,

If there is anything i can help you out with in terms of design/custom labels etc, just shout.

Tim

Offline el_timbo86

  • Trade Count: (+1)
  • *****
  • High Score Initials:
  • Forum Posts:
  • Geelong, Victoria
    • Hot Rodded Pins
Re: el_timbo's Funhouse Restoration...
« Reply #36 on: March 08, 2010, 02:08:54 PM »
Had a free day to get get a few things done...

Looking at the backbox lighting panel - it was FILTHY.


After a light rub back with some fine grit sandpaper (and masking the globe holders and back of the panel) i gave the timber a blast with a white undercoat.
While that was drying, i degreased all metal parts belonging to the insert assy. and regrained them too.


After the panel had dried, i applied a white matt over that again, a couple of times over. It really brought the panel back to life. I also started to re-install the renewed metal parts.


With the panel back home again...


I was really happy with the results of the plasti-dip on my lockdown bar lever and prop rod (thanks John); so i figured i may as well detail the back box hinge/latch with it too.


And once installed...


So thats where i'm at today, also i think it was KTM?! who wanted the Williams logo...here it is.


Thanks guys,

el_timbo


« Last Edit: March 08, 2010, 02:11:02 PM by el_timbo86 »

Offline ktm450

  • Trade Count: (+1)
  • ******
  • High Score Initials:
  • Forum Posts:
  • Geelong, Victoria
Re: el_timbo's Funhouse Restoration...
« Reply #37 on: March 09, 2010, 11:06:30 AM »
Yep, twaz me, thanks for that mate  *%*

Offline Pinfan

  • Trade Count: (+2)
  • ******
  • Forum Posts:
  • Melbourne
Re: el_timbo's Funhouse Restoration...
« Reply #38 on: March 09, 2010, 12:53:21 PM »
Very Nice work mate....  @@*

Funhouse is a great game and worthy of a restore like this.

Thanks for the updates.  ^^^
Some people have big HEADS !

Offline silverball

  • Trade Count: (0)
  • ******
  • Forum Posts:
Re: el_timbo's Funhouse Restoration...
« Reply #39 on: March 10, 2010, 02:27:42 PM »
FANTASTIC work. @@* #*#

Offline el_timbo86

  • Trade Count: (+1)
  • *****
  • High Score Initials:
  • Forum Posts:
  • Geelong, Victoria
    • Hot Rodded Pins
Re: el_timbo's Funhouse Restoration...
« Reply #40 on: March 10, 2010, 06:44:17 PM »
Thanks guys for the kind words,

I've been working hard to get the cabinet finished, so i can stop thinking about it - and focus 110% on the playfield. I'll have started airbrushing in a day or two - so ill have a big write up to do on that.

Timbo

Offline Pinfan

  • Trade Count: (+2)
  • ******
  • Forum Posts:
  • Melbourne
Re: el_timbo's Funhouse Restoration...
« Reply #41 on: March 10, 2010, 08:47:45 PM »
Looking forward to the airbrushing write up..

The only part i have not attempted to do on a restore!  !@#
« Last Edit: March 20, 2010, 11:06:58 PM by Pinfan »
Some people have big HEADS !

Offline el_timbo86

  • Trade Count: (+1)
  • *****
  • High Score Initials:
  • Forum Posts:
  • Geelong, Victoria
    • Hot Rodded Pins
Re: el_timbo's Funhouse Restoration...
« Reply #42 on: March 20, 2010, 08:10:19 PM »
Hey guys,

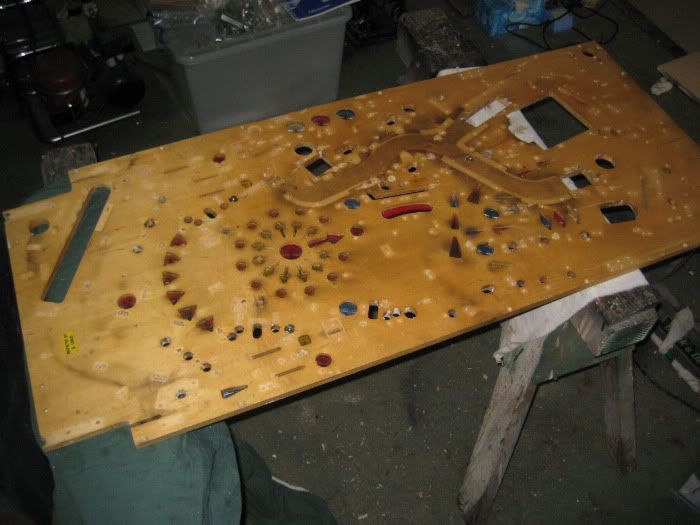
I've been working hard this week labelling, photographing and documenting the dis-assembly of the underside of the playfield.

With this completed, i was able to have a really good look at what needed to be done with the playfield in terms of bringing it back to life.

The underside of the playfield was filthy, so my first step was to sand back all the grime and give the underside a new lease on life (This photo shows the t-nuts still installed, but these were removed before the sanding occured). I also used an air gun to get in and remove any sawdust/particles from the lamp inserts, followed by cotton buds with a little windex to pick up/clean the remainder.

Before sanding...


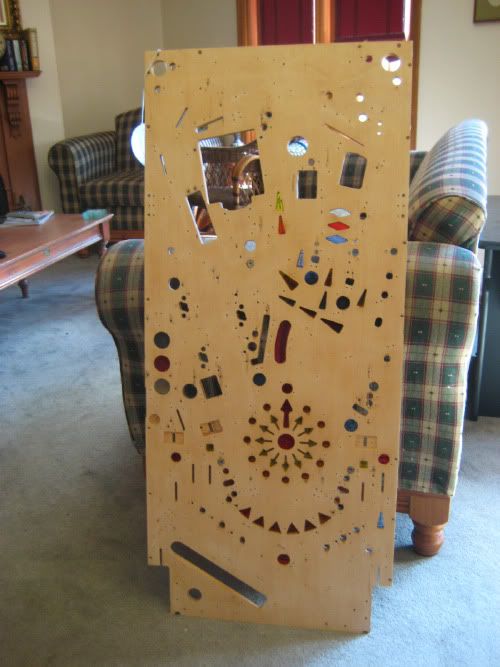
Much nicer appearance now...


To remove the mylar, i used De-Solve-It coupled with a hairdrier to heat the adhesive just enough that it let me pull it back VERY gradually, while keeping the De-Solve-It right in there with a plastic scraper. Its a slow process, but one that seems to work very well.

With the mylar removed, i went through a few magic erasers with the smallest amount of De-Solve-It getting rid of all the left over glue. I cant stress enough the whole 'less is more approach' with the Magic Erasers. Scrubbing at the playfield will only start to remove paint, while keeping a firm but progressive swirling motion going will take the glue off just the same, leaving your artwork where it is.
With the glue removed from the playfield, I used another magic eraser with a few drops of water and went over the whole playfield. I didnt soak the pad as water an PF's dont mix well, but a small amount to make the Magic Eraser effective is fine.

At this point, i also re-levelled the ever common raised clock inserts, and used a loc-tight brand superglue gel which seemed to work quite well.

As a final step, rub down the whole playfield with an automotive wax and grease remover. This really is effective, and i think it cost me six dollars from AutoPro. I dont know if this product just neutralises or physically removes the waxes/chemicals on the playfield, but it is VITAL you use a similar product as chemicals and wax will push the clear away.

When it comes to clearcoating, preparation, preparation PREPARATION is the key factor!!

My playfield is now ready to have its first clear layed down...


The clear i used certaintly isnt anything special. It is a generic brand, but i wanted to see the finish of the product. I used the same generic SLOW hardener, and about 5% thinners.

Before i mixed my clear, i released the valve at the bottom of the compressor, and cleared the tank. I also released the water trap valve as well - and refilled the tank with new (and hopefully moisture free) air.

I cleaned the gun, and made the correct adjustments based on the air/paint ratio, as well as the guns spray shape.

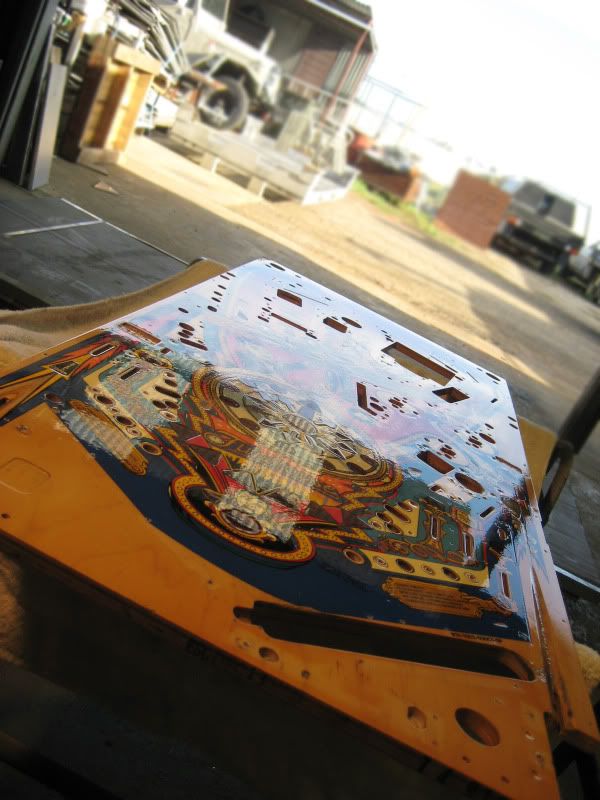
With my 2 part clear mixed, i layed down my first two coats, leaving a 15 minute gap between for the first clear to flash off.

I am really happy with the results so far, and these photos were taken five minutes after the second coat so hopefully it will level out alot more as time goes on...

A nice level surface...


Dont get lost in your moment of accomplishment either and forget about your gun, it has served you well - SO GO AND CLEAN IT!! haha.

I now have a nice surface to begin my airbrushing, for which i will be doing quite a big write-up for everyone who is interested in seeing how its done from start to finish.

Hope you like the results, i must say im really proud of my first attempt!!

A final glamour shot...


Have a great weekend guys.

el_timbo


Offline MartyJ

  • Trade Count: (+4)
  • ******
  • High Score Initials:
  • Forum Posts:
  • Melbourne
Re: el_timbo's Funhouse Restoration...
« Reply #43 on: March 20, 2010, 08:26:35 PM »
Great work Timbo.

Looking very very good.  Can't wait to see your airbrush results.

Offline el_timbo86

  • Trade Count: (+1)
  • *****
  • High Score Initials:
  • Forum Posts:
  • Geelong, Victoria
    • Hot Rodded Pins
Re: el_timbo's Funhouse Restoration...
« Reply #44 on: March 20, 2010, 08:30:58 PM »
Thanks Marty!

And thanks for your prep tips too, sorry i forgot to mention that in my post. I really do appriciate you taking the time to help me get over the nerves of my first clear.

Timbo