Author Topic: Star Trek: The Mirror Universe pinball  (Read 11006 times)

0 Members and 3 Guests are viewing this topic.

Offline zitt

  • Trade Count: (0)
  • ****
  • Forum Posts:
Re: Star Trek: The Mirror Universe pinball
« Reply #150 on: February 10, 2014, 05:28:48 PM »
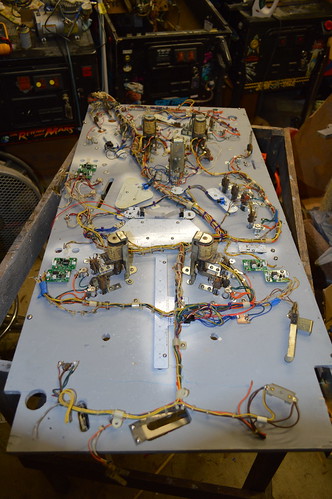
It's was an awesomely mild weekend here in Austin; so I spent quite a bit of time in the garage working on the underside of the Playfield.
Thru the cold snap earlier in the week; I sent an internal goal of wiring the GI circuits/Lamps with color coded wire - A color a night. Rather than wiring each lamp with a bare stapled wire - I point-to-pointed each in it's specific color. IE Green, orange, red, and white. With the GI squared away during the week; I spend this weekend tackling the Hot common of the switch illumination (Blue). I also crimped my fingers swore; as I completed the Inserts wiring.

For the top GI connection; the original harness had two blue wires which were soldered to the "Common" of the lamp matrix. Instead I made a custom harness out of some 22gauge blue wire. Each one of these lamp boards had to be wired into that common.

I tinned a piece of raw copper clad (blank circuit board material) and used it as a common tie point for the upper playfield's common hot. Each board was crimped to a length of blue wire and it was soldered to this tie point. The inserts were then crimped and installed on the connectors. Each LED board has a header so it can be uninstalled and fixed if necessary. For the upper playfield; A chain of 22awg blue wire moves between each led board in a circle; so in effect - each board has two 22AWG paths to hot. This should help with redundancy and supply more than enough current flow to lite the leds on the board.  In the case of the upper two boards; they have 4pin connectors ... with 2 Anodes and the 2 signal wires.

And yes; for the most part; each LED board has a little Terran Empire logo in copper and/or silkscreen. :D

For the middle of the PF; I tapped into the blue wire harness and used a rounded barrel terminal to house the common hot. This common point feed the Klingon LED board as well as the center Enterprise inserts.


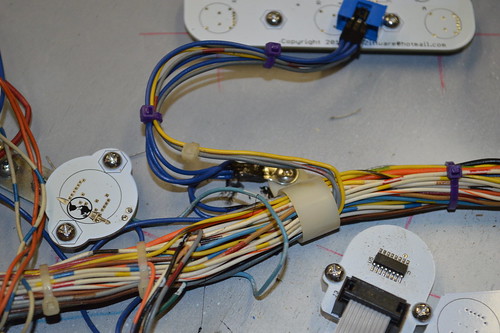
2 qty 22AWG blue wires feed the center inserts common point:

I had to cut the tie wraps for the middle of the harness and feed some of the shorter wires between the drop target inserts and the led nacelle boards. With this new route; I had enough slack to make it to the large center insert connector for all signals.

Finally; I added another common hot tie point for the center Xk's  inserts:

I'm not real happy with the way this turned out... the wiring harness and connector are in the way of each other. Can't really be helped at this point; but you can still disconnect the board with minimal effort so it's still a win.

At this point; I'm about 80ish-% complete on the bottom side of the PF:


What's left to do on the bottom side?
1) Still need to wire in proximity sensors.
2) Flippers
3) Slingshot switches
4) Drop target assembly
5) Wire GI to nacelle boards; need to double confirm PSU board outputs the polarity I think it does for the GI so I don't hook it backwards.
6) Mount outhole switch and inlane switches.

My only question for you guys; is there typically a suggested method to refurbing the drop target assembly? I already have some new drop targets; but I'm wondering if I should try to source some new springs for assembly. Thoughts?

Offline Retropin

  • Trade Count: (+4)
  • ******
  • Forum Posts:
Re: Star Trek: The Mirror Universe pinball
« Reply #151 on: February 10, 2014, 08:17:03 PM »
Drop target assemblies... groan. Probably the worst job of them all. First rule is to NEVER take it apart unless you really really have to... and I mean really really.
I have some looong screws that I use.. take the old ones out ONE at a time and replace with the longer ones.. if you take them all out and it falls apart you will regret it.
Longer screws allow you to loosen  the plates enough to swap over the drop target and change the spring if necessary... plates are loose but not separated.. longer screws.. remember.. longer screws.. don't let it fall apart

Offline zitt

  • Trade Count: (0)
  • ****
  • Forum Posts:
Re: Star Trek: The Mirror Universe pinball
« Reply #152 on: February 12, 2014, 04:05:47 PM »
Need help:
Can someone with a 7digit Bally machine measure the clear opening in the artwork over the displays?

I need this measurement to adjust the Mirror Universe BG openings by the proper amount to allow for the 7digit Nixies.

Thanks

Offline zitt

  • Trade Count: (0)
  • ****
  • Forum Posts:
Re: Star Trek: The Mirror Universe pinball
« Reply #153 on: February 19, 2014, 07:39:29 PM »
Tonight I put the near finishing touches on the underside of the Playfield. I ran out of Butane for my cordless soldering iron; so I couldn't solder in the new fuse block for the solenoids. I tried in vane this weekend to source some butane from both Lowes (was out) and Walmart (doesn't carry?!)... so; meh.

Anyway; the red star posts from the donor playfield are already in the ultrasonic cleaner... so hopefully; I can start assembling the top of the PF tomorrow night.

Here's detail pictures of the 99.9% PF all wired up:


Offline zitt

  • Trade Count: (0)
  • ****
  • Forum Posts:
Re: Star Trek: The Mirror Universe pinball
« Reply #154 on: February 20, 2014, 06:11:07 PM »
Tonight I finished soldering in the Fuse holder for the Solenoids and began installing the Posts. I wanted to do something a little different for the upper PF... matching the Posts to the Art where possible. As a result I decided to put Blue transparent Lane guides instead of the red Bally opaque lane guides. Since guides and the posts were blue; I figured I'd need some blue LEDs to accent the guides from a GI perspective.

Here's a Day/Flash shot showing the installation:


I worked with Art @ CometPinball.com to get a sampling of his LEDs. I went thru several iterations focusing on the blue variety to see what lit the area the best. I wasn't very scientific about the installation; kinda moving them somewhat systematically to see what popped.
http://www.flickr.com/photos/52968060@N00/12649112605/

Yeap; Even tried white LEDs. Didn't like that I could see the white bulb thru the lane guides.


And finally settling on the 1st & 2nd blue LEDs I liked (no ambient light, no flash):


If I were to grade the Blue Comet LEDs for this application (according to my minds-eye):
1) 2 SMD 6.3V AC/DC SUPREME BRIGHTNESS with FACETED LENS
2) Optix Maximus Blue
3) 4+1 SMD Tower Blue

I really like the pattern the Faceted Lens puts out; especially the Warm White. If I were an LED designer; I might try combining the Optix Maximus lens with a facetted ring; so as to combine the "flood" in the vertical direction and the pattern spread in the horiztonal direction.

The PopBumpers contain Comet's 6 crystal FAN LEDs; which I think fits the pop bumpers perfectly.

Phase 2 of the LED tests will comprise of the White versions of Comet Pinball's against the Star Trek: Mirror Universe plastics... but I need to get them printed first. :D

Offline swinks

  • Trade Count: (+18)
  • ******
  • High Score Initials:
  • Forum Posts:
  • Lake Macquarie, NSW
Re: Star Trek: The Mirror Universe pinball
« Reply #155 on: February 20, 2014, 06:29:59 PM »
very nice work, like the leds used  ^^^
https://swinks.com.au

for pinball parts (reproduction & mods)
for pinball t-shirts

Offline zitt

  • Trade Count: (0)
  • ****
  • Forum Posts:
Re: Star Trek: The Mirror Universe pinball
« Reply #156 on: February 21, 2014, 05:43:34 PM »
Received the Star Trek: Mirror Universe translite from GameOnGrafix.com today... Overall I think it looks pretty damn sweet.

This weekend I hope to start cutting out the windows for the nixie tube displays and begin mounting it to the Acrylic I hope to get tomorrow from RegalPlastics.

Offline swinks

  • Trade Count: (+18)
  • ******
  • High Score Initials:
  • Forum Posts:
  • Lake Macquarie, NSW
Re: Star Trek: The Mirror Universe pinball
« Reply #157 on: February 21, 2014, 09:20:19 PM »
well done, looks great
https://swinks.com.au

for pinball parts (reproduction & mods)
for pinball t-shirts

Offline Slash

  • Trade Count: (+1)
  • *****
  • Forum Posts:
Re: Star Trek: The Mirror Universe pinball
« Reply #158 on: February 21, 2014, 09:53:39 PM »
I think it looks awesome  ^^^

Offline vinito

  • Trade Count: (0)
  • *****
  • Forum Posts:
  • Kansas City, KS USA
Re: Star Trek: The Mirror Universe pinball
« Reply #159 on: February 23, 2014, 06:02:44 AM »
Sweet!

I am glad I whined about the nipples. Maybe it's just me but that is the first thing I notice when I look at it. Kind of like the camel toe on Strikes 'n Spares. Every backglass should have something like that in my opinion.

All the other areas look great too. Lots of work went into it and it all flows nicely. Great job.
I feel more like I do now than I did when I first got here.

Offline studley67

  • Trade Count: (+7)
  • ******
  • Forum Posts:
  • adelaide hills
    • facebook
Re: Star Trek: The Mirror Universe pinball
« Reply #160 on: February 23, 2014, 06:17:12 AM »
Need help:
Can someone with a 7digit Bally machine measure the clear opening in the artwork over the displays?

I need this measurement to adjust the Mirror Universe BG openings by the proper amount to allow for the 7digit Nixies.

Thanks

it measures 140mm same as 6 digit well mine does(gold ball)
Life is too short to spend time with people who suck the happiness out of you

Offline zitt

  • Trade Count: (0)
  • ****
  • Forum Posts:
Re: Star Trek: The Mirror Universe pinball
« Reply #161 on: February 24, 2014, 05:29:40 PM »
I am glad I whined about the nipples. Maybe it's just me but that is the first thing I notice when I look at it. Kind of like the camel toe on Strikes 'n Spares. Every backglass should have something like that in my opinion.

I agree. Others have made references to the feature. so yeah; thumbs up. :D
-------
Right now; the artwork is a translite - as a result; I want to make sure the lamps behind it don't wash out the colors and I need to provide a mechanism to enable the hidden text which is illuminated by said lamps. So I used a black layer to create a "lite blocker" layer which if successful will be sent to the vynil cutter at Techshop where it can be use to create the dark silver layer necessary to "block" said lamp light.

I took the ipdb.org picture, straighten and scaled it in photoshop then used it as a template to enable the custom "silver layer" for the mirror universe:


I wanted:
1) the yellow part of the sky to "glow" and contrast the dark planet side features.
2) the pants of the crew to be dark (unlike the original).
3) Artists signatures to glow.
4) Hidden text is an Original Series font.
5) Gold parts of logo glow... as does some shading on the red part of earth.
6) Primitive ruins glow.

Here's a rendering of what it should look like if the lite block comes out like I hope:

The hardest part is going to be getting the dark to register closely to the translite.

Now it's time to turn back to the backbox ... namely to install the ATX powersupply and PSU board to enable the LED test Phase2.
SteveC came to the rescue and 3d-Printed a set of ATX psu brackets I designed a couple of months ago. The design is based on a 3dprinter psu bracket I downloaded off thingaverse IIRC.


Once I had the brackets mounted; the PSU just slides right in an attaches via the atx mounting screws:


Now to figure how where to mount the PSU board... I could have mounted it above the ATX PSU... but I thought the original wireing harness may have trouble reaching up there; so I decided to mount the PSU on top of the PSU fan... that way the airflow cools the linear regulator used for the GI lamps. I center promptly voided the warranty of the PSU; but drilling #6-32 holes for the nylon standoffs. With the standoffs in place; the board was mounted to the psu:


After mounting everything; I notices the psu may be a little high... to high and it'll smack the credit/ball display. To low and it'll smack the player 3 display. I'm working on the light board right now... so should have an idea if I need to make an adjustment early this week.

That's about all there is to report from this weekend... got a lot of irons in the fire... controlled chaos keeping them all in check. Stay tuned.

BTW: Is anyone else having issues with Flickr uploads? I Keep getting "reconnect" messages on uploading batches of pictures.

Offline swinks

  • Trade Count: (+18)
  • ******
  • High Score Initials:
  • Forum Posts:
  • Lake Macquarie, NSW
Re: Star Trek: The Mirror Universe pinball
« Reply #162 on: February 24, 2014, 06:38:13 PM »
good to see you added your signature to the translite

looking forward to seeing this lit up as well as the nixie tubes.
https://swinks.com.au

for pinball parts (reproduction & mods)
for pinball t-shirts

Offline vinito

  • Trade Count: (0)
  • *****
  • Forum Posts:
  • Kansas City, KS USA
Re: Star Trek: The Mirror Universe pinball
« Reply #163 on: February 25, 2014, 02:14:19 PM »
good to see you added your signature to the translite
+1
That was a lot of work & no doubt a ton of time and you definitely earned your mark there (as well as other places on the game!).
I'm looking forward to seeing those nixie tubes too.
I feel more like I do now than I did when I first got here.

Offline zitt

  • Trade Count: (0)
  • ****
  • Forum Posts:
Re: Star Trek: The Mirror Universe pinball
« Reply #164 on: February 25, 2014, 04:08:59 PM »
Phase 2 of the LED test begins now that I have the PSU board installed.

Here's the Orbit with a donor plastic from the donor PF. Bullet style:
  • Warm White Faceted

  • "W" OptiMax

  • "N" OptiMax

  • "S" OptiMax 

  • Natural White 5 SMD Tower

  • WWhite 4 SMD 

  • Natural White 5 SMD

  • WWhite 1 SMD 

  • WWhite Frosted 1 SMD 

  • NWhite 6 LED Crystal Fan 661

[/list]

Truth be told; I'm just not "feeling" any color other than  Warm White. Yeah; my sample size was heavily weighted to WW to begin with; but that was on purpose given I feel Warm White is closer to the incandescent light bulbs of the era. None of the LEDs were "ideal".  Some washed out the plastics with bright spots. Most can seen in the orbits... making the "look" of the bulb somewhat important.

I think once again; the Facetted lens style appealed to me most. I really like the light pattern it throws on the surface of the wood.