Author Topic: Bally Star Trek  (Read 1167 times)

0 Members and 1 Guest are viewing this topic.

Offline Strangeways

  • Pinball Restoration is my passion
  • Administrator
  • Trade Count: (+9)
  • *****
  • High Score Initials:
  • Forum Posts:
  • Melbourne
  • ABN 68 283 634 461
    • Ride The Boney Beast
Re: Bally Star Trek
« Reply #15 on: February 04, 2014, 12:07:10 AM »
Looking good Steve !
Aussie Pinball - Proud to be Australia's Premier Pinball Forum

http://www.australianpinballrestorations.com.au/

http://www.rtbb.com.au/catalog/

We carry the largest range of NEW Ramps in Australia

Offline Steve2010

  • Trade Count: (+11)
  • *****
  • Forum Posts:
  • Sydney
Re: Bally Star Trek
« Reply #16 on: February 04, 2014, 08:00:02 PM »
Thanks for the comments and kind words guys.

Do you have any issues with it sticking to the paint and having to be removed after the stencil is taken off??

Sometimes yes.  I let the paint dry before I remove the stencil, and using the lacquers I can usually do this about 10-15 minutes after painting.  Most of the times the stencil comes off nicely, but sometimes there can be some residue left.  If that's the case, I let the paintwork really dry out for at least 3+ days (a week is even better), then use some of that citrus cleaner stuff (De-Solv-It) to remove the residue.  A bit of work, but comes off very, very easily.


With the backbox complete, it was time to focus on the main cabinet.  The image below shows the translucent nature of the freezer paper.  Even as this image was taken from a distance and with ambient lighting, you can still easily see the original artwork through it for tracing purposes.

When I do trace, I usually use a bright incandescent lamp nearby to illuminate the area for ease of seeing the artwork below to maximise my ability to see it. 


Below is the completion of the cut stencil.  I trace artwork once on one piece paper.  When that is finished, I place that paper together with another blank sheet of freezer paper back to back, and tape them against a large MDF board.  I then use a sharp xacto knife to cut out the artwork.  With one cut, both stencils are created for the left and right sides of the cabinet.  The freezer paper is extremely easy to work with in terms of cutting it.  The laborious part is the time put into the tracing and the cutting needed to complete the 10 stencils.


The cabinet complete.  I also give the cabinet neck (I think that’s what it’s called) a fresh paint of satin black.


Offline Mr Pinbologist

  • Trade Count: (+5)
  • ******
  • High Score Initials:
  • Forum Posts:
  • Wauchope NSW
Re: Bally Star Trek
« Reply #17 on: February 04, 2014, 08:55:46 PM »
WOW... VERY nice indeed   @@* @@*

And thanks for your reply re removing any residue left by the Easy-Tack  ^^^
I have a can on order and will do a few experiments with it when it arrives  *%*

Offline Steve2010

  • Trade Count: (+11)
  • *****
  • Forum Posts:
  • Sydney
Re: Bally Star Trek
« Reply #18 on: February 08, 2014, 12:15:37 AM »
As I mentioned earlier, I was very fortunate to source a NOS playfield.  Here it is …..


It is in excellent condition, no warping and the surface was very smooth to begin with.  I begin by first applying the thumper bumper mylar rings, and now is then an excellent time to wax the playfield.  I put two coats of wax on.


With the original playfield removed from the cabinet, the playfield swap commences.  I decided, as I have done now on all my playfield swaps, to retain the original illumination wire.  I did a bit of web searching on this, and found enough evidence (at least on the web) that using the original braid is just fine.  I see people from time to time refer to this as “ground” braid, but this is incorrect.  For the switched illumination braid, the braid of course is +5V, and the grounding is done by the shielded wire connected to the light.

Anyway, back to the restore.  The upside to re-using the braid is minimal work since no re-soldering of braid to sockets is needed (as well as the laying of new braid).  The potential downside is losing some current due to damaged braid, as well as dealing with those lovely 30+ year old Bally sockets that tend to be intermittent.  My experience was that I had to solder a few parts of the braid to restore continuity of a few strands, and if a lamp socket was dodgy I simply replaced it.  I have now done 4 playfield swaps (yes, more restoration threads to document on the forum), but having played these machines and operated them since then, I can say I am more than happy with the lamp operation and really don’t see a need to replace the braid – just my experience.

I remove all the braid staples with a small chisel, and all the screws holding down everything come out.  I use masking tape to tape the wire harness clamps and their screws to the wire harness – this maintains the same position of the clamps on the new playfield.


Before transferring over to the new playfield, the new playfield has all of its new tee nuts installed.  Here are the two playfields just before transfer.


Once everything is free to move on the original playfield, I begin the process of slowly inserting a large, playfield-size piece of cardboard at one side of the playfield.  This is pushed slowly across the playfield, and it is an iterative process of pushing a bit, placing some of the under-playfield components on top of the cardboard, pushing it a bit again, place some more components, etc, etc.  All until the entire under-playfield components are sitting on the cardboard, as per the following image.


The new playfield is then placed next to the cardboard, and it is quite easy to literally slide all of this onto the top of the underside of the new playfield.


Now begins the task of fastening everything down to the new playfield.  The wooden playfield rails were resprayed with a fresh coat of paint, and fastened onto the playfield.  Here are the two playfield side by side.


Offline Retropin

  • Trade Count: (+4)
  • ******
  • Forum Posts:
Re: Bally Star Trek
« Reply #19 on: February 08, 2014, 10:00:05 AM »
I cant believe you cut a STERN box up... what if you wanted to look at it again or even repack your STERN machine to relive the NIB moment??... Crazy stuff Steve..

Aside from that... transfer is looking pretty good. Believe it or not, ive never done a PF swap.. I do have one to do for Capt Fant ( when I can get to it in the shed) so am picking up tips as I go through your thread.
NOS playfield??? Wow-- that is a rare find and how good does it look?

Offline Steve2010

  • Trade Count: (+11)
  • *****
  • Forum Posts:
  • Sydney
Re: Bally Star Trek
« Reply #20 on: February 08, 2014, 07:13:39 PM »
I cant believe you cut a STERN box up... what if you wanted to look at it again or even repack your STERN machine to relive the NIB moment??... Crazy stuff Steve..

Hey Gav, the stern cardboard was from the packing material for a machine I received.  So, I have never had the "joy" of unpacking an NIB machine.  Somehow me thinks a Stern and I will never cross paths ...... wrong era for me.

Offline Retropin

  • Trade Count: (+4)
  • ******
  • Forum Posts:
Re: Bally Star Trek
« Reply #21 on: February 08, 2014, 08:10:59 PM »
I cant believe you cut a STERN box up... what if you wanted to look at it again or even repack your STERN machine to relive the NIB moment??... Crazy stuff Steve..

Hey Gav, the stern cardboard was from the packing material for a machine I received.  So, I have never had the "joy" of unpacking an NIB machine.  Somehow me thinks a Stern and I will never cross paths ...... wrong era for me.

Phew!!!.. ultimate sin in some circles && &&

Offline Steve2010

  • Trade Count: (+11)
  • *****
  • Forum Posts:
  • Sydney
Re: Bally Star Trek
« Reply #22 on: February 17, 2014, 12:00:28 AM »
Here is the final installment of this resto.  I didn’t cover every aspect with accompanying images, but here goes.

The apron was in pretty good condition, but was missing a bit of paint, and the shooter gauge was wrong for Star Trek (I believe this is a shooter gauge from Kiss.  So I decided to redo it with a Pinrescue apron decal (those guys are a great asset to the hobby!).  Here are the apron and shooter gauge in their original state.


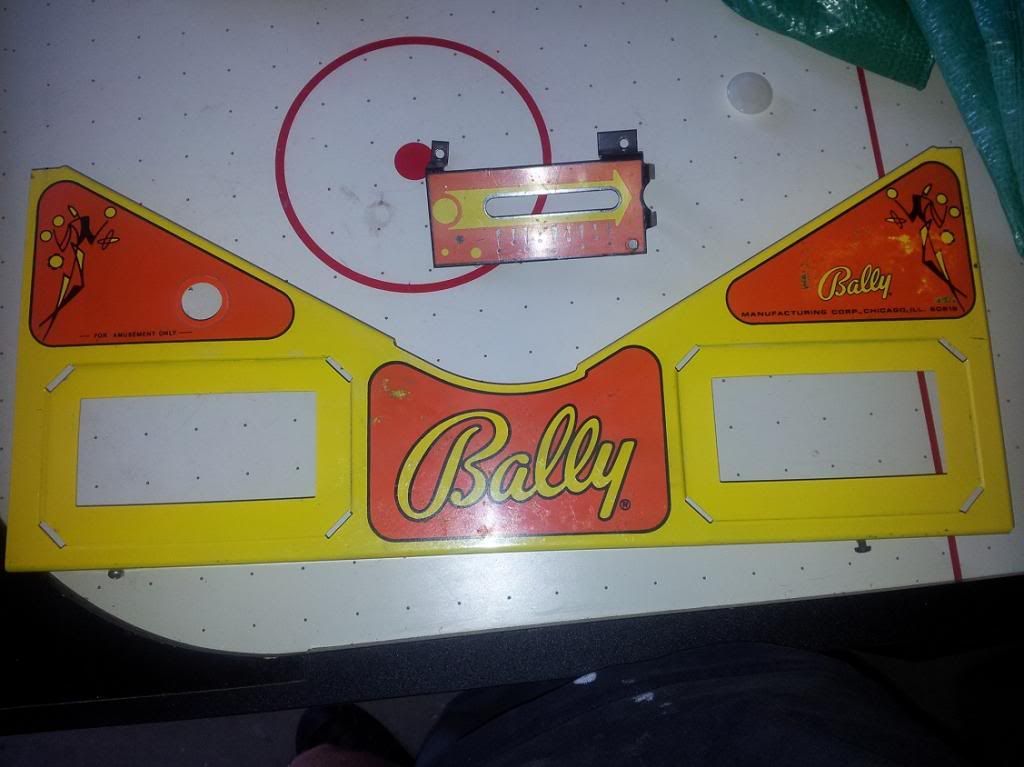
They were sanded backed, primed, and sprayed and left to cure for a number of days.  Then the decals applied.  Very happy with the outcome – forgot to take an image of the after effect of just the apron, but the following image will suffice.


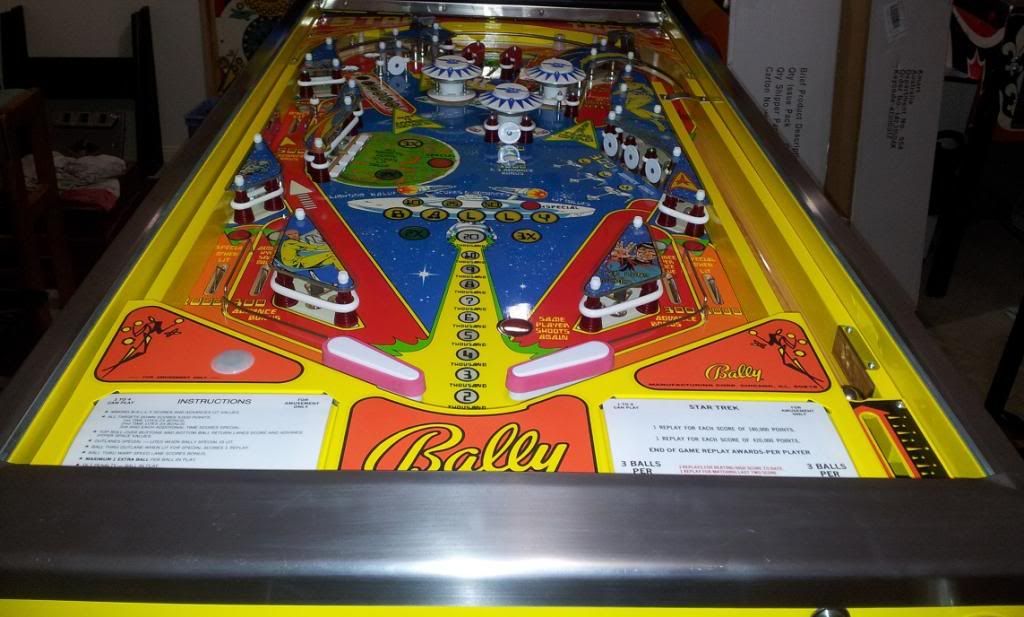
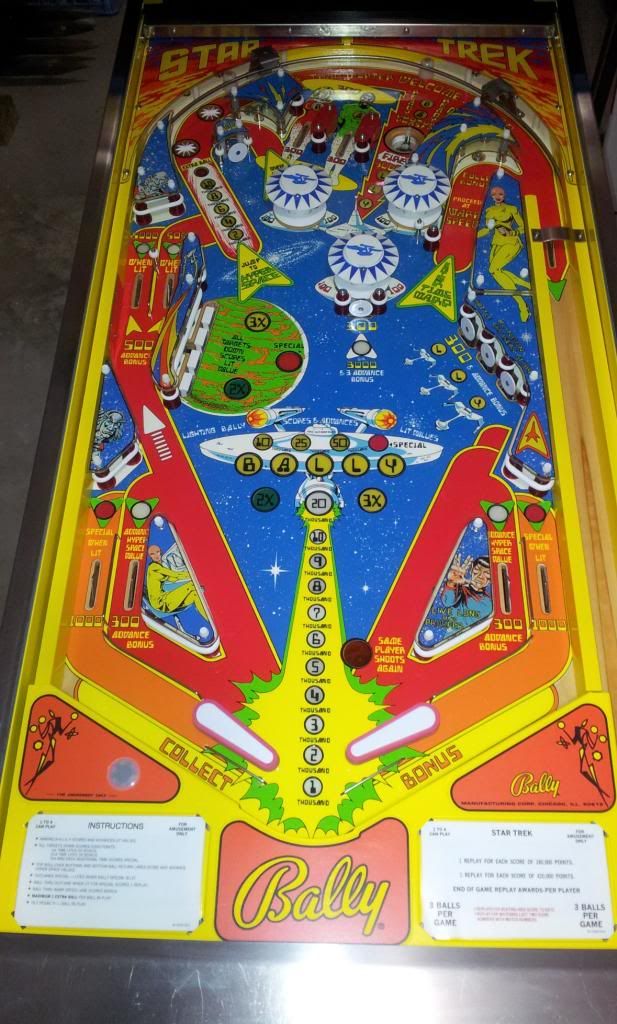
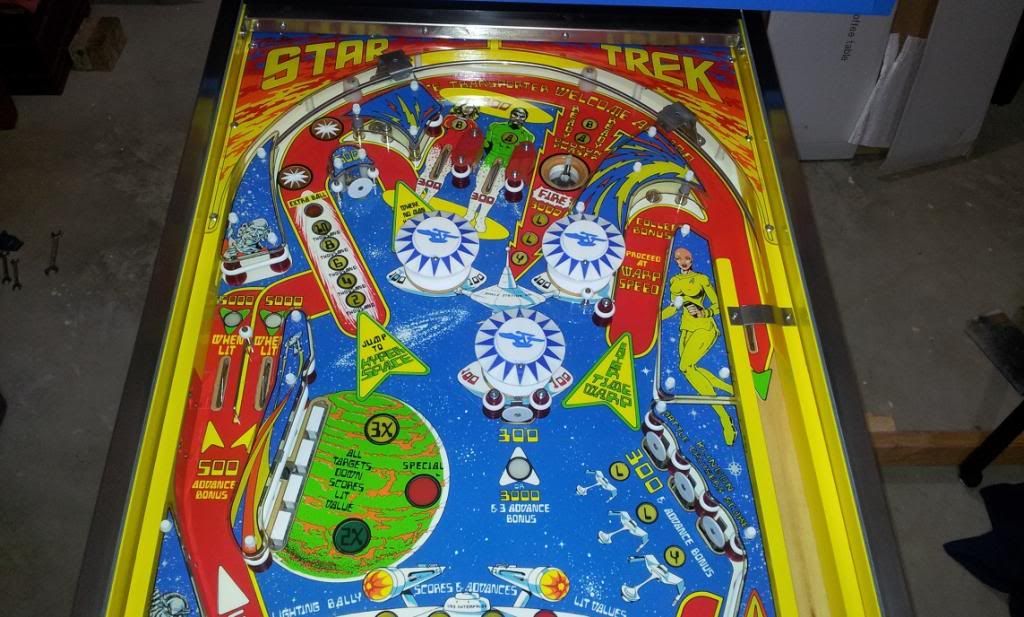
The following images cover the playfield itself.  Lots of new parts – all plastic pop bumper parts, posts, post caps, slingshot kicker heads, flippers (and complete flipper rebuilds), drop targets, standup targets, star rollovers, lane guides, flipper buttons, locks, leg bolts, etc.

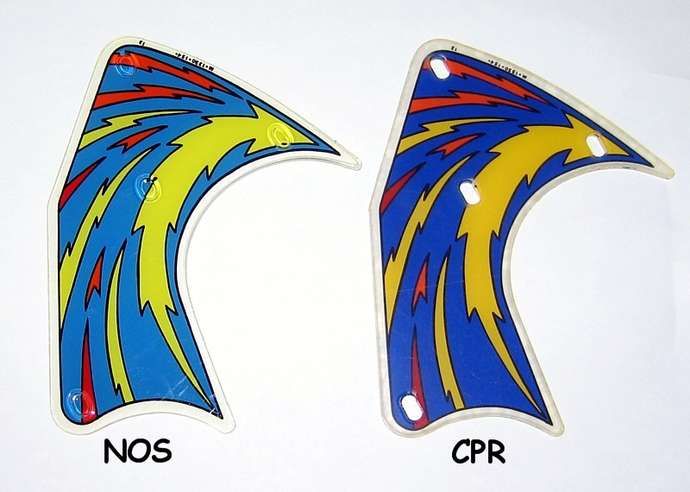
I did purchase replacement playfield plastics from CPR, but in my opinion the colours of the CPR set were way off original and decided not to install these.  The original set did have some broken plastics, but I was fortunate to source a second original set to make a complete set.


The following image shows a comparison of a NOS plastic and the CPR one (this image is from a thread on Pinside - http://pinside.com/pinball/forum/topic/announce-star-trek-backglass-now-available-at-cpr#post-745086).  The blue in the CPR plastic was just too dark compared to the blue in the NOS playfield (and the reds were too dark as well).  Whilst I didn’t have NOS plastics, the ones I did have were very nice and very much complimented the colours in the playfield.


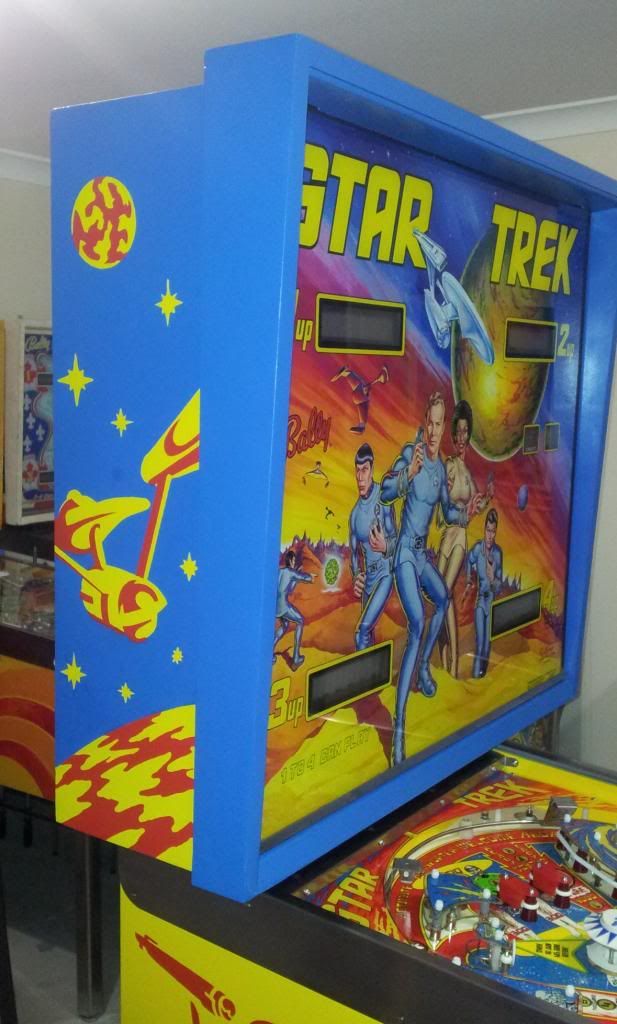
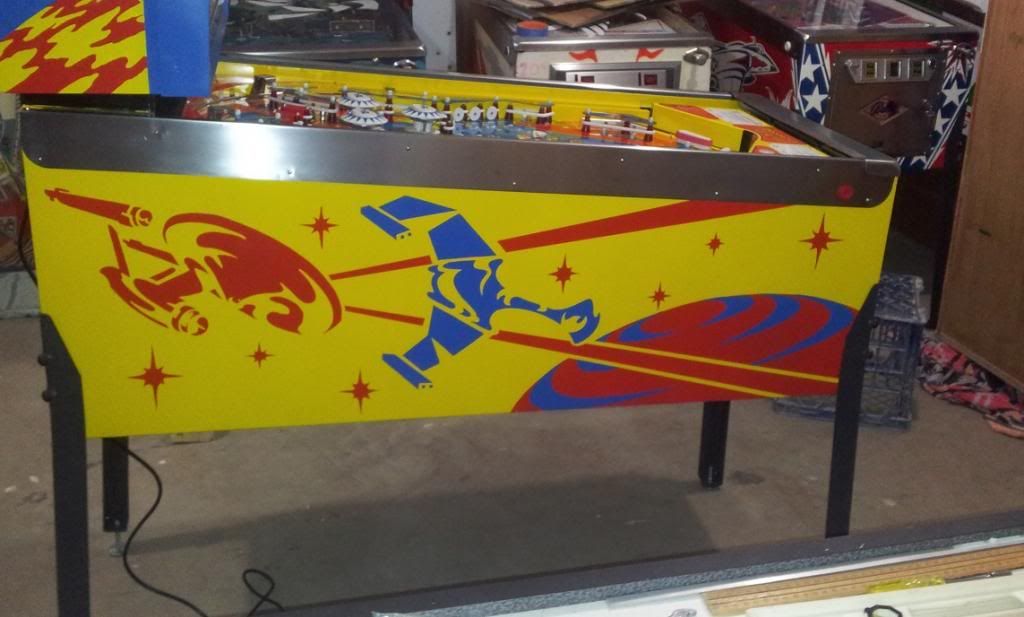
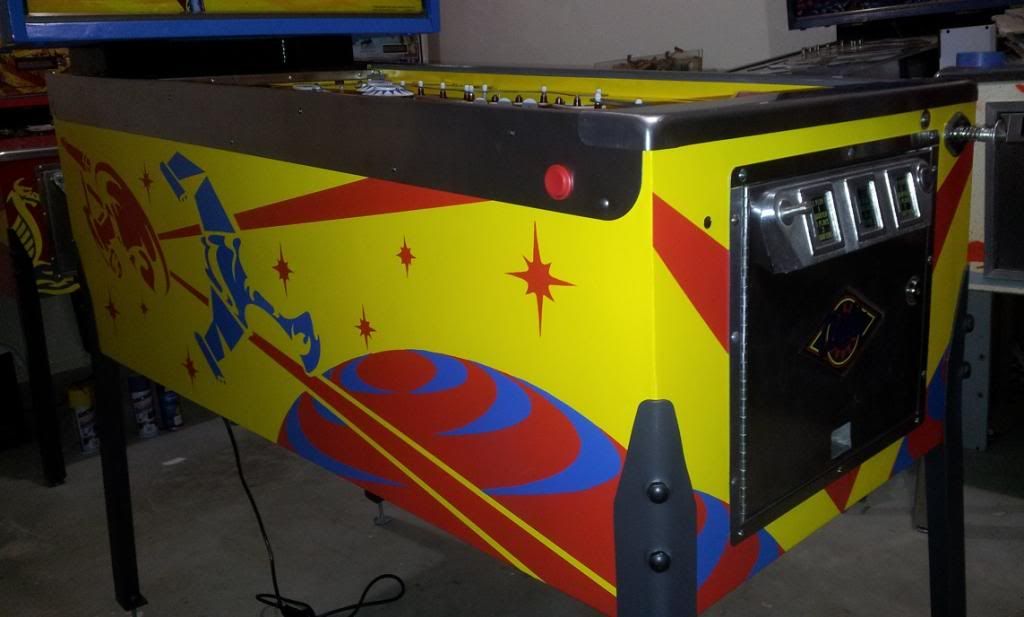
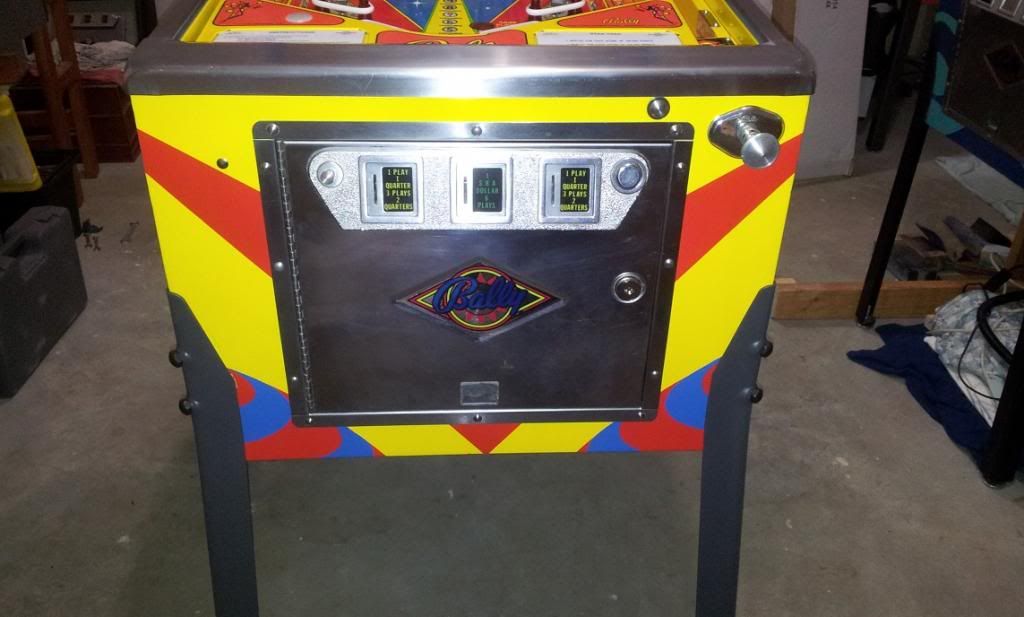
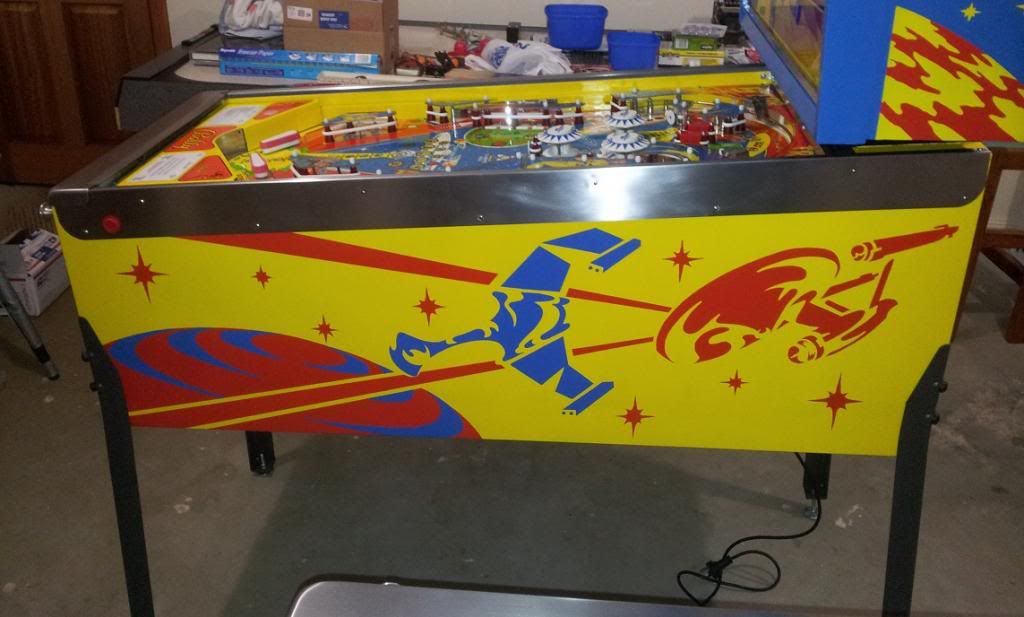
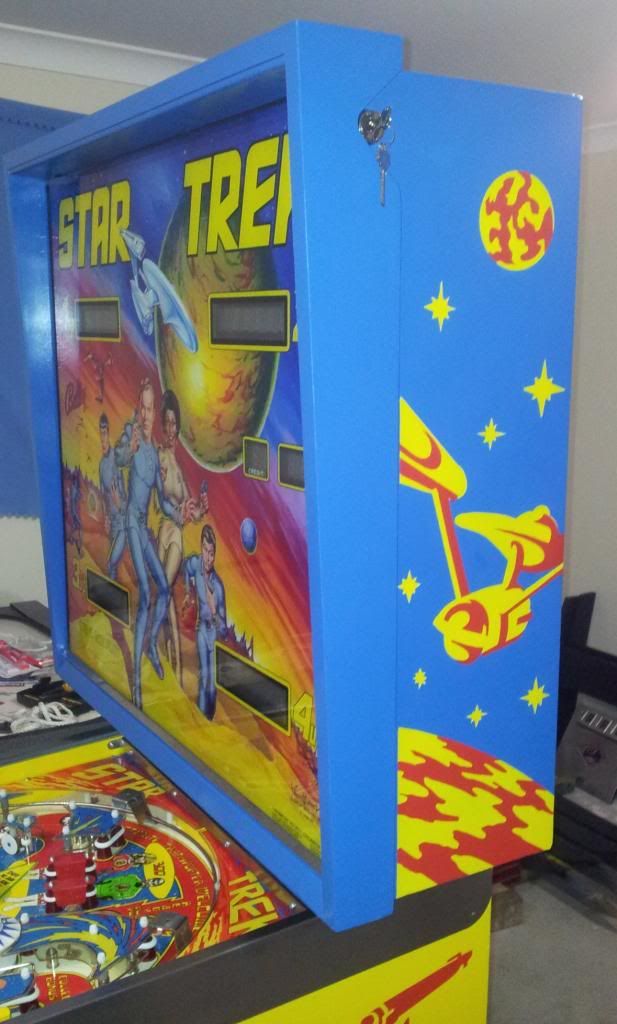
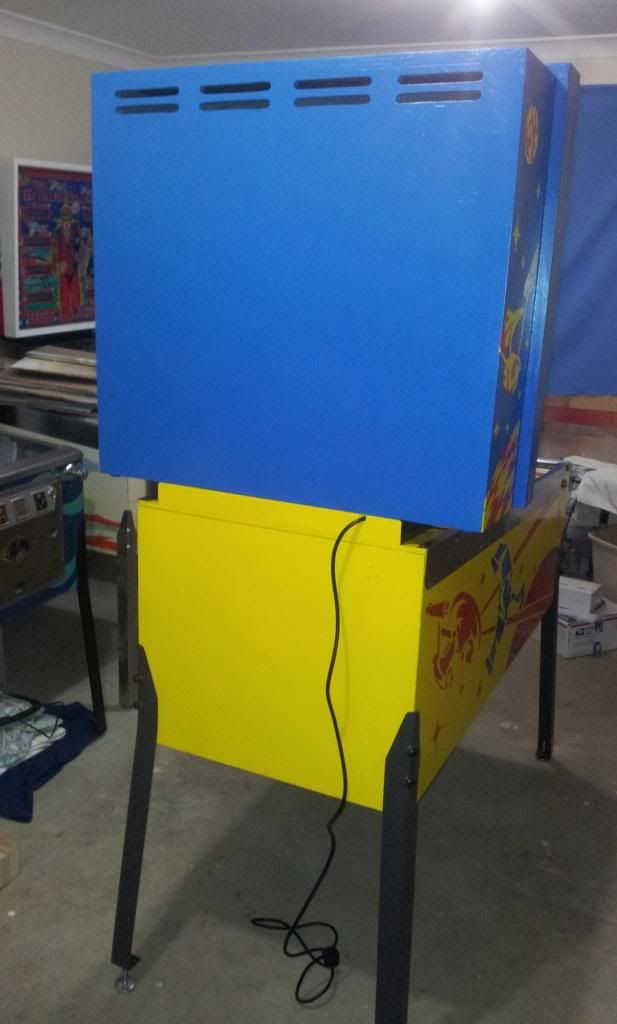
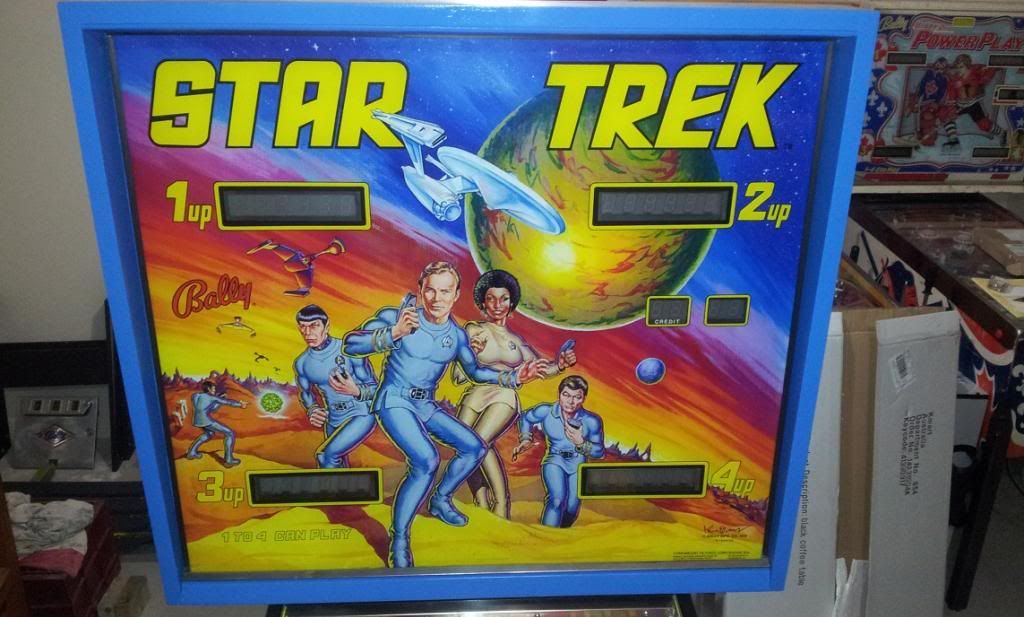
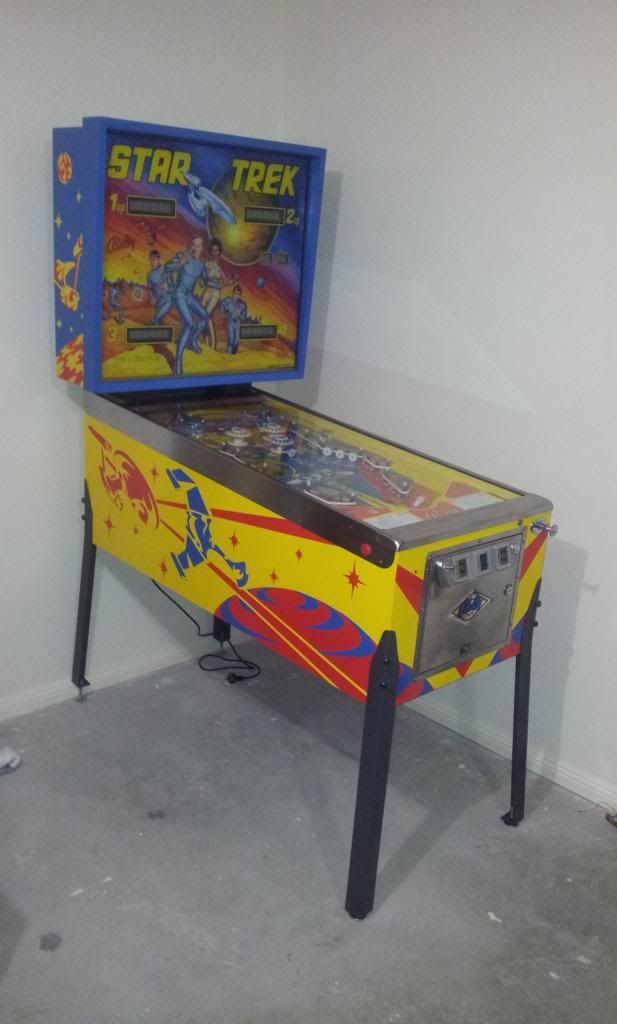
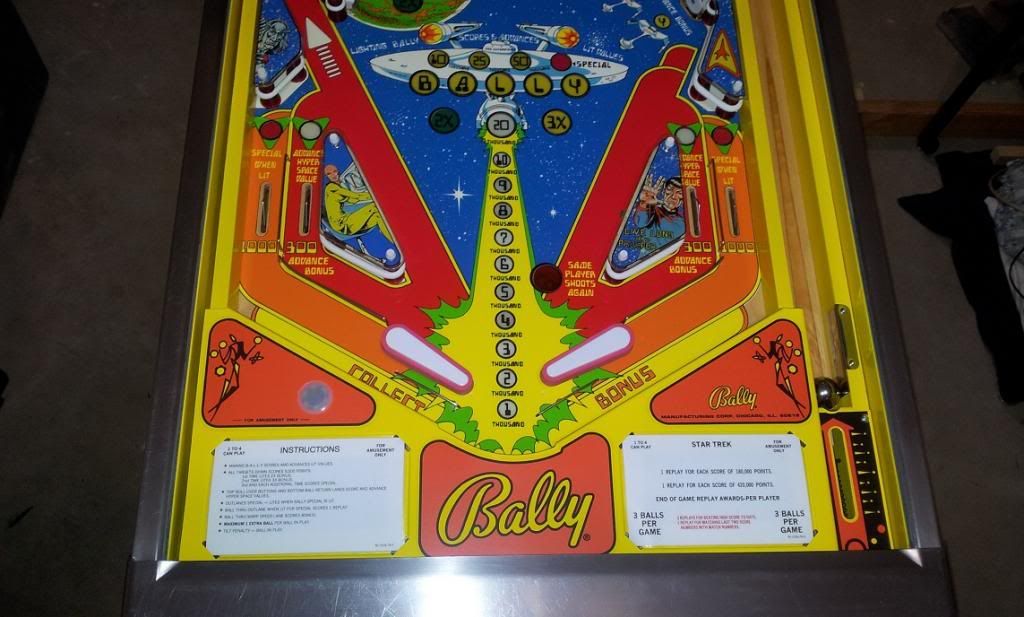
And following are images of the completed machine.

Legs were sanded backed, primed with etch primer, and painted gun metal grey.

Siderails of cabinet were regrained using scotchbrite, with new nails installed.  I can tell you how fun it is removing the old, rusty nails from the siderails.  Sometimes you can get them all out within an hour or so.  But if they are really rusty, the heads usually just break off and make more work for you.  For me there is never a choice, the old nails have to go.  Plus once the siderails are removed, this provides a real opportunity to clean it up and regrain it.

That will do it.  A heck of a lot of work, but I am very happy with the result.  A joy to look at, but better yet, alot of fun to play.


Offline pinball god

  • Trade Count: (+1)
  • ******
  • High Score Initials:
  • Forum Posts:
  • Melbourne
  • Metallica is here to stay
Re: Bally Star Trek
« Reply #23 on: February 17, 2014, 08:57:48 AM »
And the correct legs I think. I'm trying to learn all the nuances as I go along.

Look fantastic and you should be proud.
Still loving my Metallica Premium

Offline Strangeways

  • Pinball Restoration is my passion
  • Administrator
  • Trade Count: (+9)
  • *****
  • High Score Initials:
  • Forum Posts:
  • Melbourne
  • ABN 68 283 634 461
    • Ride The Boney Beast
Re: Bally Star Trek
« Reply #24 on: February 17, 2014, 09:55:16 AM »
Very Nice work, Steve.

Regarding the plastics, that is indeed strange. I had 6 Star Treks lined up in the storage building and one of them had a set of VERY dark plastics. Not just one, but the entire set. I assumed that they were a proto set of plastics, although the game had nothing else to suggest it was a proto.
Aussie Pinball - Proud to be Australia's Premier Pinball Forum

http://www.australianpinballrestorations.com.au/

http://www.rtbb.com.au/catalog/

We carry the largest range of NEW Ramps in Australia

Offline goodolddays

  • Trade Count: (0)
  • ******
  • Forum Posts:
  • Riverstone NSW
Re: Bally Star Trek
« Reply #25 on: February 17, 2014, 03:44:16 PM »
Superrb result there Steve  ^^^.

Wish it was mine

Cheers
Dave
I need more room ! and more $$$

Offline Retropin

  • Trade Count: (+4)
  • ******
  • Forum Posts:
Re: Bally Star Trek
« Reply #26 on: February 18, 2014, 12:06:57 AM »
Looks sensational... Very very nice Star Trek you have there!

Offline oldskool1969

  • Trade Count: (0)
  • ******
  • High Score Initials:
  • Forum Posts:
  • perth
Re: Bally Star Trek
« Reply #27 on: February 18, 2014, 12:04:00 PM »
Almost a shame to play it! looks really crispy dude, nice thread.
If it isn't broke, it isn't pinball.

Offline The Silence

  • Trade Count: (0)
  • **
  • Forum Posts:
Re: Bally Star Trek
« Reply #28 on: February 19, 2014, 12:12:11 AM »
One of the best Star Treks in Australia, excellent work there.

Offline Steve2010

  • Trade Count: (+11)
  • *****
  • Forum Posts:
  • Sydney
Re: Bally Star Trek
« Reply #29 on: February 19, 2014, 02:33:42 PM »
Thanks for the kind words guys.