Author Topic: Williams Pinbot Restoration  (Read 2535 times)

0 Members and 1 Guest are viewing this topic.

Offline ddstoys

  • Trade Count: (+23)
  • ******
  • High Score Initials:
  • Forum Posts:
  • Geelong
Re: Williams Pinbot Restoration
« Reply #15 on: November 14, 2009, 11:51:22 PM »
Looking good mate.  But how long was this container meant to last???  At this rate they will all be in mint condition by early next year ^^^

Offline Strangeways

  • Pinball Restoration is my passion
  • Administrator
  • Trade Count: (+9)
  • *****
  • High Score Initials:
  • Forum Posts:
  • Melbourne
  • ABN 68 283 634 461
    • Ride The Boney Beast
Re: Williams Pinbot Restoration
« Reply #16 on: November 14, 2009, 11:55:32 PM »
Looking good mate.  But how long was this container meant to last???  At this rate they will all be in mint condition by early next year ^^^

Nahh mate !

I'm having "a ball" so far  %.%

I'm ITCHING to do a few EMs. Never done a Williams System11 - Thats why I picked this game out after the Addams.
Aussie Pinball - Proud to be Australia's Premier Pinball Forum

http://www.australianpinballrestorations.com.au/

http://www.rtbb.com.au/catalog/

We carry the largest range of NEW Ramps in Australia

Offline ddstoys

  • Trade Count: (+23)
  • ******
  • High Score Initials:
  • Forum Posts:
  • Geelong
Re: Williams Pinbot Restoration
« Reply #17 on: November 14, 2009, 11:59:02 PM »
LIVING THE DREAM NINO LIVING THE DREAM ^^^

Offline Strangeways

  • Pinball Restoration is my passion
  • Administrator
  • Trade Count: (+9)
  • *****
  • High Score Initials:
  • Forum Posts:
  • Melbourne
  • ABN 68 283 634 461
    • Ride The Boney Beast
Re: Williams Pinbot Restoration
« Reply #18 on: November 15, 2009, 12:00:44 AM »
LIVING THE DREAM NINO LIVING THE DREAM ^^^

.. only live once..

 ^^^
Aussie Pinball - Proud to be Australia's Premier Pinball Forum

http://www.australianpinballrestorations.com.au/

http://www.rtbb.com.au/catalog/

We carry the largest range of NEW Ramps in Australia

Offline johnwartjr

  • Trade Count: (0)
  • ******
  • Forum Posts:
  • Columbus, Indiana USA
  • It's ALIVEEEEEE!
    • My Home Gameroom . com
Re: Williams Pinbot Restoration
« Reply #19 on: November 15, 2009, 02:14:24 AM »
Looks like you're having a great time!

Offline beaky

  • Trade Count: (+7)
  • ******
  • Forum Posts:
  • Melbourne, Vic
Re: Williams Pinbot Restoration
« Reply #20 on: November 15, 2009, 08:52:27 PM »
looking good strangeways
system 11 pins are great to work on.
so many variations from 5 separate displays down to 2 on the later ones. then you find them in wms and bally.
only down fall is they are not backward compatible (can't use a system 11c in a system 11a) but they are foward compatible ( you can use a 11a in 11c).

i remember when pinbot was first released. it was in nearly every pinnie parlor around.
looking foward to the rest of the resto.

keep up the great work ^^^
On site pinball repairs in MELBOURNE NTH SUBURBS  : Circuit board repairs and refurbishing Australia wide (via Aust post)

Offline Strangeways

  • Pinball Restoration is my passion
  • Administrator
  • Trade Count: (+9)
  • *****
  • High Score Initials:
  • Forum Posts:
  • Melbourne
  • ABN 68 283 634 461
    • Ride The Boney Beast
Re: Williams Pinbot Restoration
« Reply #21 on: November 15, 2009, 11:30:22 PM »

Checking over the cabinet, I found that the clip that holds the head was loose and the panel that is nailed to the lover cabinet had separated. So the end result was that the head could be pushed "forward" and the lower cabinet timber frame (or neck) lifted. There was a poor earlier attempt at a repair, and a replacement clip may have been used. Regardless, it needed to be addressed.

Here's what it looks like ;


Removal of the lower clip bracket highlights the damage ;


Solution is simple. The "neck" timber section must be glued and then 4 long woodscrews are screwed in and I'm done. I dre drilled the holes through the neck, then used some wood glue in the gap. All four screws are then screwed in and the two braces are affixed to the cabinet. Leave for 24 hours, and the job is done.

The old holes where the clip was installed needed to be filled, so I used Bondo (or equivalent) to fill it in. After it dried, I sanded down the section, and created the "lip" where the clip is mounted. I will paint the rear of the machine tomorrow !


 <.> <.>
Aussie Pinball - Proud to be Australia's Premier Pinball Forum

http://www.australianpinballrestorations.com.au/

http://www.rtbb.com.au/catalog/

We carry the largest range of NEW Ramps in Australia

Offline johnwartjr

  • Trade Count: (0)
  • ******
  • Forum Posts:
  • Columbus, Indiana USA
  • It's ALIVEEEEEE!
    • My Home Gameroom . com
Re: Williams Pinbot Restoration
« Reply #22 on: November 16, 2009, 12:50:10 AM »
I've had this problem in the past.

Does the bondo hold well enough? I always wondered if it would just chip out.

I usually remove the BB latches and toss them in the cashbox, and bolt the heads up in my gameroom. I have a narrow, steep flight of stairs all games have to go down to get in my basement, and the BB latch is right at addams apple level and can do a number on you if you aren't careful...

Offline Strangeways

  • Pinball Restoration is my passion
  • Administrator
  • Trade Count: (+9)
  • *****
  • High Score Initials:
  • Forum Posts:
  • Melbourne
  • ABN 68 283 634 461
    • Ride The Boney Beast
Re: Williams Pinbot Restoration
« Reply #23 on: November 16, 2009, 09:14:22 AM »
I've had this problem in the past.

Does the bondo hold well enough? I always wondered if it would just chip out.

I usually remove the BB latches and toss them in the cashbox, and bolt the heads up in my gameroom. I have a narrow, steep flight of stairs all games have to go down to get in my basement, and the BB latch is right at addams apple level and can do a number on you if you aren't careful...

I'm going to find that out, John. I might buy a new latch and see if the holes can bite into wood rather than the enlarged former holes. I find that the latch is a "necessary accessory" because many people don't install the headbolts. They just "latch" the machine and that's it !

Aussie Pinball - Proud to be Australia's Premier Pinball Forum

http://www.australianpinballrestorations.com.au/

http://www.rtbb.com.au/catalog/

We carry the largest range of NEW Ramps in Australia

Offline ajlaird

  • Trade Count: (0)
  • ******
  • Forum Posts:
  • Greensborough, Melbourne
  • Go Ahead, Make My Day
Re: Williams Pinbot Restoration
« Reply #24 on: November 16, 2009, 09:49:28 AM »
I've had this problem in the past.

Does the bondo hold well enough? I always wondered if it would just chip out.

I usually remove the BB latches and toss them in the cashbox, and bolt the heads up in my gameroom. I have a narrow, steep flight of stairs all games have to go down to get in my basement, and the BB latch is right at addams apple level and can do a number on you if you aren't careful...

I'm going to find that out, John. I might buy a new latch and see if the holes can bite into wood rather than the enlarged former holes. I find that the latch is a "necessary accessory" because many people don't install the headbolts. They just "latch" the machine and that's it !

I am surprised how many people just use the latch to hold the headbox up! After reading the warning on the back of the headbox you would think people would use at least one bolt.

Offline beaky

  • Trade Count: (+7)
  • ******
  • Forum Posts:
  • Melbourne, Vic
Re: Williams Pinbot Restoration
« Reply #25 on: November 16, 2009, 10:16:11 AM »
one person told me thats the only way they hold their back boxes up. i told him didn't you read the big yellow writing on the back of the back box.

i wont go calling this fellow any names as he is on the forum. i just thought i would give him a bit of a stir.
lol
On site pinball repairs in MELBOURNE NTH SUBURBS  : Circuit board repairs and refurbishing Australia wide (via Aust post)

Offline ajlaird

  • Trade Count: (0)
  • ******
  • Forum Posts:
  • Greensborough, Melbourne
  • Go Ahead, Make My Day
Re: Williams Pinbot Restoration
« Reply #26 on: November 16, 2009, 12:17:35 PM »
My first trip to MarkC's involved the purchase of some headbox bolts.

Offline Strangeways

  • Pinball Restoration is my passion
  • Administrator
  • Trade Count: (+9)
  • *****
  • High Score Initials:
  • Forum Posts:
  • Melbourne
  • ABN 68 283 634 461
    • Ride The Boney Beast
Re: Williams Pinbot Restoration
« Reply #27 on: November 19, 2009, 11:21:11 PM »

After some tumbling, most of the hardware was looking really good. I'll buff the heads on the playfield screws etc, but for the most part, the tumbler has done all the work for me !


Bit "overboard" - but the plungers are nice a smooth now - and with new coil sleeves, there will be "stuff all" friction. These pop bumpers will "pop"


I usually sort out all the parts from the tumbler and place them into small containers like these. They are easier to find later on when I do the playfield. The containers were bought from Bunnings - $14 for assorted sizes.


Flipper Rebuilds


System11 use a flipper system with Serial coils. FL-23/600 30/2600 50V (or SFL-23/600 30/2600 50V). This machine has two different coils, so I would need one to make them the same. There is a replacement alternative which involves using standard FL-11629 coils - suited to this game. The recommendation from clay's guides is to use this alternative system if you need to replace one or more coils. I'll cover htis a little later on - but here's a picture of the two coils ;


Flipper Assemblies

Time to strip these assemblies and prepare them according to clay's recommendation in his guide. They were filthy and needed a good clean.


I stripped them completely and scrubbed with Nifti and a green scotchbrite. I installed flipper kits and two new FL-11629 coils. Ready to go back into the machine.


Drop Target Assembly


The drop target assembly was working fine, but it needed to be rebuilt and I wanted to replace the decals. Here's the "before picture;


The old decals - slightly faded. The targets have been cleaned - along with the rest of the assembly.


New Targets ;


Re assembled target assembly ;


Ready for both flipper assemblies and the drop target assembly to be re installed into the machine


Aussie Pinball - Proud to be Australia's Premier Pinball Forum

http://www.australianpinballrestorations.com.au/

http://www.rtbb.com.au/catalog/

We carry the largest range of NEW Ramps in Australia

Offline Strangeways

  • Pinball Restoration is my passion
  • Administrator
  • Trade Count: (+9)
  • *****
  • High Score Initials:
  • Forum Posts:
  • Melbourne
  • ABN 68 283 634 461
    • Ride The Boney Beast
Re: Williams Pinbot Restoration
« Reply #28 on: November 22, 2009, 11:12:46 PM »

Back to the rear of the cabinet. The clamps are removed the repairs worked very well. Before attempting to refit the old clamp, I just HAD to repaint the back section. It was really rough. I quickly sanded it down a little and taped up the sides and topper and give it a quick repaint.

Probably looks better int his picture than it really is.. But I didn't like it.


I covered up the stickers, the plastic gliders and gave it a quick coat, then a couple of thicker coats. Don't have to be too artist here - This part of the machine is not really seen ! Still a bit wet..


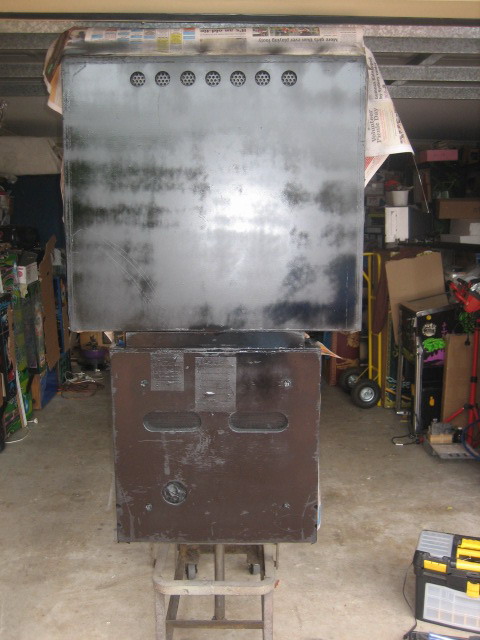
Remove the masking and let it dry. Shame they don't make a "semi gloss black" in cans anymore. Gloss looks stupid, so I went with the Flat Black.


Playfield Damage touch ups


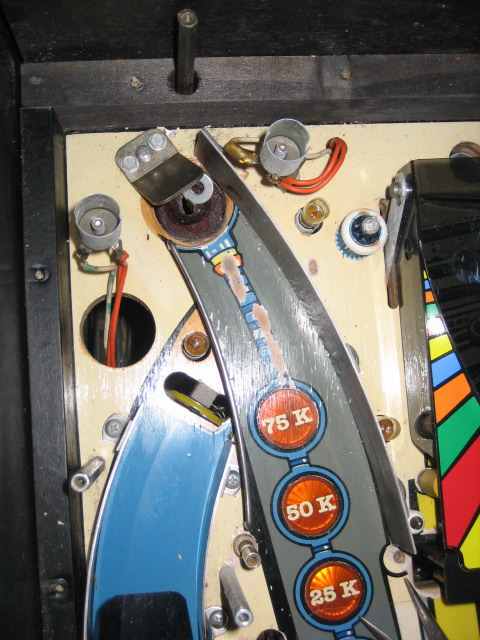
I know all too well that Decals are the "easy way out". I cannot even color match my shirt with my tie, so I have to rely on decals until either I learn how to do it properly, or I get some glasses ! I contacted our resident "decal man" - Wotto - Just to whip up some decals for me to finish off the playfield. It has wear spots around all the outholes, and there are "divots" in the wood. Here's what I started out with ;


This section was pretty simple. I filled and levelled the divot. Wotto made me a decal from a photo I sent him - just the Blue color needed to be covered, so I printed out the decal on adhesive white paper, cut it into shape, applied the decal to the playfield and covered it with mylar.


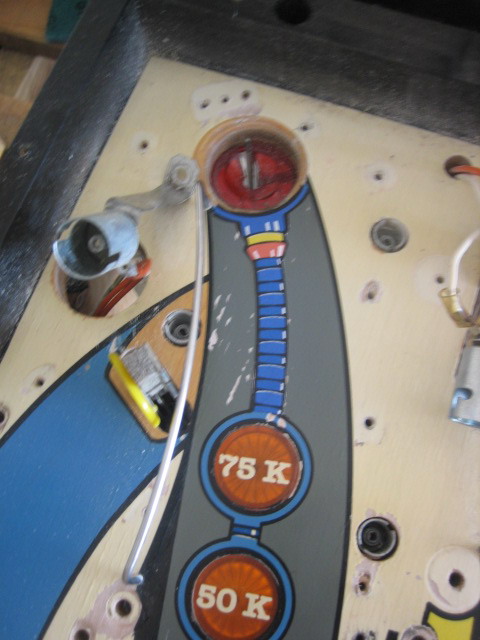
I didn't really bother with the Grey to the left of the repair - it was not as bad.


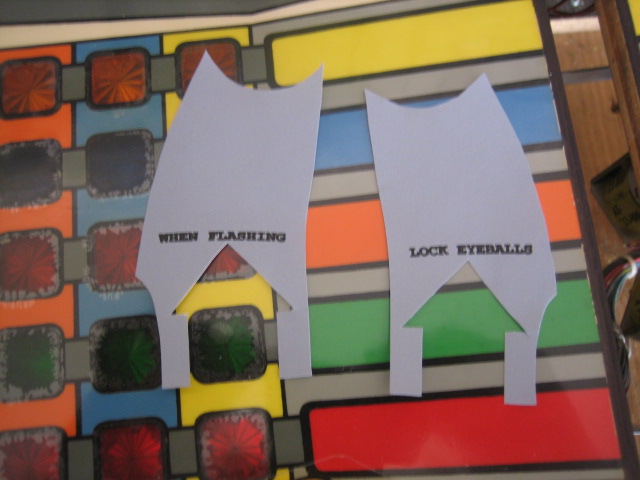
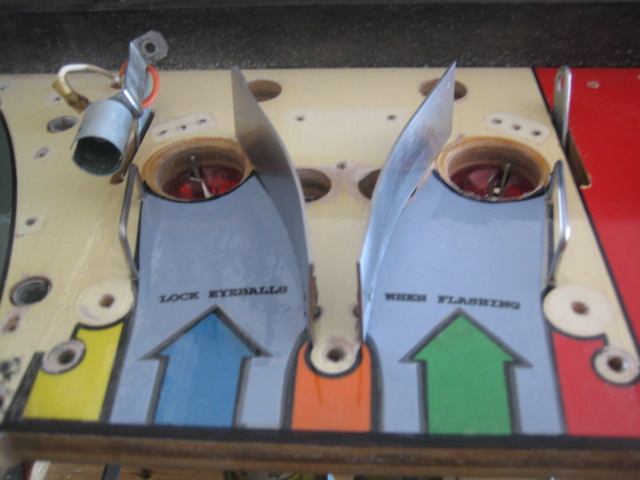
The "Eyeballs" - Were REALLY bad ;


This time Wotto just supplied me with the writing on a Grey backing - a very close match. I used some tracing paper to cut out the grey areas, and transposed that onto the adhesive grey paper. Then cut that into shape - They look like this ;


Then I applied to the area affected, and went around the edges with a sharpie - where needed ;


Apply a sheet of mylar, and I'm done !


So thanks to Wotto - The playfield looks a whole lot better  ^^^


Next update will be a picture of the playfield AFTER I used Marty's Treasurecove polishing kit  ^^^ ^^^


Aussie Pinball - Proud to be Australia's Premier Pinball Forum

http://www.australianpinballrestorations.com.au/

http://www.rtbb.com.au/catalog/

We carry the largest range of NEW Ramps in Australia

Offline Supremicus

  • Trade Count: (0)
  • ***
  • Forum Posts:
  • Emerald, QLD
Re: Williams Pinbot Restoration
« Reply #29 on: November 23, 2009, 01:42:27 AM »
Quote
Shame they don't make a "semi gloss black" in cans anymore.

 !@# It's what i painted mine with, both home hardware and mitre 10 had plenty in stock.