Author Topic: High Speed 2 - The Getaway Restoration Complete  (Read 1158 times)

0 Members and 1 Guest are viewing this topic.

Offline ktm450

  • Trade Count: (+1)
  • ******
  • High Score Initials:
  • Forum Posts:
  • Geelong, Victoria
High Speed 2 - The Getaway Restoration Complete
« on: December 30, 2009, 11:15:24 AM »
Well, its a bit flavour of the month so I wont bore you with a step by step on this one, but here is a little background on the machine.  

I have owned this machine for about 7 years, it was the second machine I owned, I purchased it from a small business just around the corner from where I used to live, who sited pins locally.  I was in there to buy a couple of rubber rings to finish off a restoration of my first pin a 1978 Gottlieb Dragon, I asked if they had any machines for sale and he pointed me in the direction of the HS2, it was the only pin he had double of so he had it for sale  !@#  anyway a deal was done and I owned my second pin.

So after many years of reliable play it was overdue for a restoration, a couple of other pins pushed thier way into the line first  %.%  Oh well, after TZ and WH20, HS2 was a piece of piss to shop

So after 7 years it was time for a full strip down....

BEFORE:
As you can see it was in fairly good condition before I started as I had given it a good clean up a few years back, but it was time for the black rubber to go  *%*


« Last Edit: October 20, 2011, 08:46:55 PM by ktm450 »

Offline ktm450

  • Trade Count: (+1)
  • ******
  • High Score Initials:
  • Forum Posts:
  • Geelong, Victoria
Re: High Speed 2 - The Getaway Restoration Complete
« Reply #1 on: December 30, 2009, 11:16:44 AM »
This is the most commonly broken plastic on a HS2, I have came up for a solution for it shown later.

« Last Edit: October 20, 2011, 08:47:28 PM by ktm450 »

Offline ktm450

  • Trade Count: (+1)
  • ******
  • High Score Initials:
  • Forum Posts:
  • Geelong, Victoria
Re: High Speed 2 - The Getaway Restoration Complete
« Reply #2 on: December 30, 2009, 11:17:58 AM »
The factory mylar around my pop bumper area was not quite in the correct position when assembled leading to the wear you can see in this pic.

« Last Edit: October 20, 2011, 08:49:03 PM by ktm450 »

Offline ktm450

  • Trade Count: (+1)
  • ******
  • High Score Initials:
  • Forum Posts:
  • Geelong, Victoria
Re: High Speed 2 - The Getaway Restoration Complete
« Reply #3 on: December 30, 2009, 11:20:02 AM »
STRIPPED:


« Last Edit: October 20, 2011, 08:50:04 PM by ktm450 »

Offline ktm450

  • Trade Count: (+1)
  • ******
  • High Score Initials:
  • Forum Posts:
  • Geelong, Victoria
Re: High Speed 2 - The Getaway Restoration Complete
« Reply #4 on: December 30, 2009, 11:21:56 AM »
Around the pop bumper area I use Magic eraser to remove most of the ball swirl then some very small touch ups, I then lay down some new mylar, same profile as factory but right in closer to the pop bumper body, to prevent any further wear.
The result was not perfect but not noticable standing in front of the machine.

« Last Edit: October 20, 2011, 08:52:40 PM by ktm450 »

Offline ktm450

  • Trade Count: (+1)
  • ******
  • High Score Initials:
  • Forum Posts:
  • Geelong, Victoria
Re: High Speed 2 - The Getaway Restoration Complete
« Reply #5 on: December 30, 2009, 11:23:40 AM »
After a good clean, a few touchups and a good polish...


« Last Edit: October 20, 2011, 08:53:43 PM by ktm450 »

Offline ktm450

  • Trade Count: (+1)
  • ******
  • High Score Initials:
  • Forum Posts:
  • Geelong, Victoria
Re: High Speed 2 - The Getaway Restoration Complete
« Reply #6 on: December 30, 2009, 11:24:26 AM »
For the supercharger entrance plastic, I decided to make a new one from stainless steel, for one this plastic is almost impossible to buy, and another reason, it will just break again eventually, one stray air ball and its cracked again.
The brushed stainless steel matches the theme of the area, a highway signpost over the 'road' leading into the supercharger
I just cut it roughly into shape, then used a very thin angle grinder blade to get it very close and finished off with a hand file and dremel.  I then used wet and dry emery paper to rough it up moving in one direction only.


« Last Edit: October 20, 2011, 08:54:18 PM by ktm450 »

Offline ktm450

  • Trade Count: (+1)
  • ******
  • High Score Initials:
  • Forum Posts:
  • Geelong, Victoria
Re: High Speed 2 - The Getaway Restoration Complete
« Reply #7 on: December 30, 2009, 11:26:11 AM »
BEFORE:


AFTER:

« Last Edit: October 20, 2011, 08:55:32 PM by ktm450 »

Offline ktm450

  • Trade Count: (+1)
  • ******
  • High Score Initials:
  • Forum Posts:
  • Geelong, Victoria
Re: High Speed 2 - The Getaway Restoration Complete
« Reply #8 on: December 30, 2009, 11:28:56 AM »
So here is a list of what was done:


-replaced all coil sleves
-replaced all rubbers
-replaced all star posts
-replaced slingshot plastics with NOS
-made plastic protectors for slings
-removed and polished every post and every screw
-a couple of small touchups
-PF completely stripped down cleaned polished and waxed
-new globes
-inserts cleaned from below playfield
-fixed a raised insert
-rebuilt all flippers, new bats, new plungers, links, and pawls. New coil sleeves and flipper bushings
-replaced pop bumper caps
-replaced pop bumper wafers
-New leg levelers
-added 3 new mirror glazed balls
-removed factory mylar with new mylar
-replaced u-turn plastic with NOS
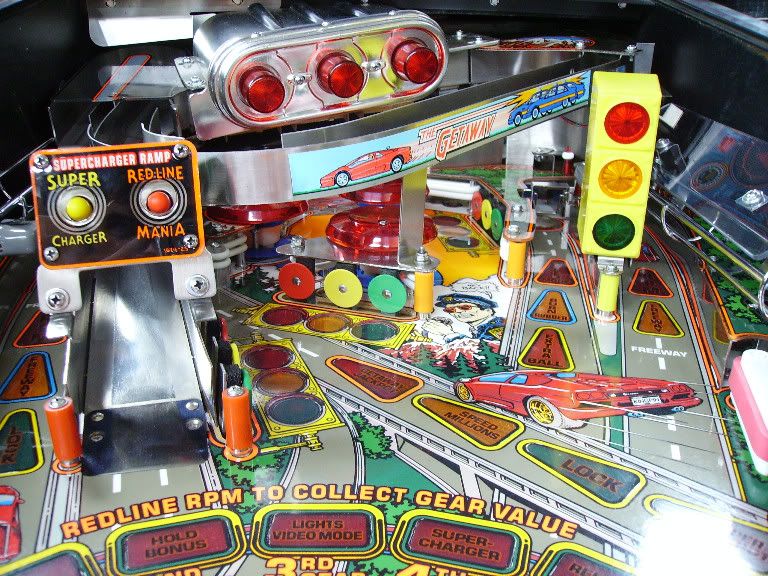
-made new supercharger entrance plastic from Stainless steel
-new cabinet flipper buttons
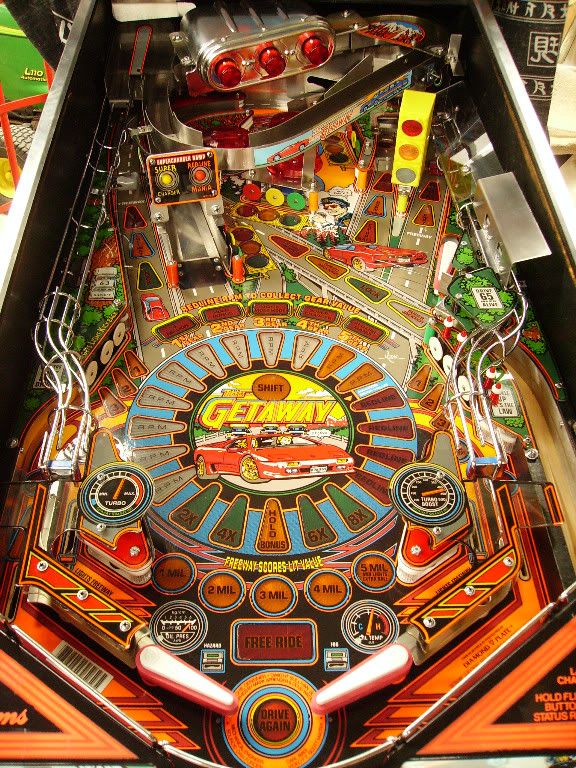

A few after pics:


« Last Edit: October 20, 2011, 08:56:36 PM by ktm450 »

Offline ktm450

  • Trade Count: (+1)
  • ******
  • High Score Initials:
  • Forum Posts:
  • Geelong, Victoria
Re: High Speed 2 - The Getaway Restoration Complete
« Reply #9 on: December 30, 2009, 11:29:58 AM »
A couple more:


« Last Edit: October 20, 2011, 08:57:59 PM by ktm450 »

Offline MartyJ

  • Trade Count: (+4)
  • ******
  • High Score Initials:
  • Forum Posts:
  • Melbourne
Re: High Speed 2 - The Getaway Restoration Complete
« Reply #10 on: December 30, 2009, 11:44:48 AM »
Very nice work indeed.  Great looking machine!

I like your supercharger ramp sign mod too!

Offline Strangeways

  • Pinball Restoration is my passion
  • Administrator
  • Trade Count: (+9)
  • *****
  • High Score Initials:
  • Forum Posts:
  • Melbourne
  • ABN 68 283 634 461
    • Ride The Boney Beast
Re: High Speed 2 - The Getaway Restoration Complete
« Reply #11 on: December 30, 2009, 05:52:21 PM »

Thats one AWESOMELY quick restoration - and the results are stunning. I can't find your touch up, which is good. The playfield is in super condition and has polished up very well. Mod fits the game (well done). I like the placement of the colored sleeves.

You should do more pins  ^^^
Aussie Pinball - Proud to be Australia's Premier Pinball Forum

http://www.australianpinballrestorations.com.au/

http://www.rtbb.com.au/catalog/

We carry the largest range of NEW Ramps in Australia

Offline ddstoys

  • Trade Count: (+23)
  • ******
  • High Score Initials:
  • Forum Posts:
  • Geelong
Re: High Speed 2 - The Getaway Restoration Complete
« Reply #12 on: December 30, 2009, 06:24:02 PM »
Looking good Matt will have to call over to test it out once every thing calms down from the silly season  ^^^

Offline Pinfan

  • Trade Count: (+2)
  • ******
  • Forum Posts:
  • Melbourne
Re: High Speed 2 - The Getaway Restoration Complete
« Reply #13 on: December 30, 2009, 06:32:12 PM »
Yep sure does look sweet....  ^^^

Nice work...

I have a soft spot for this title.... Always liked it !
Some people have big HEADS !

Offline carbonROD

  • Trade Count: (0)
  • ****
  • Forum Posts:
  • CANBERRA
    • PINHEADZ PINBALL PODcast
Re: High Speed 2 - The Getaway Restoration Complete
« Reply #14 on: December 30, 2009, 06:38:50 PM »
Very nice! Super clean machine now  ^^^
LIKE the Pinheadz PODcast on FACEBOOK or listen at iTUNES & STITCHER now!