Author Topic: Bally 1965 Aces High Restoration  (Read 13134 times)

0 Members and 8 Guests are viewing this topic.

Offline goodolddays

  • Trade Count: (0)
  • ******
  • Forum Posts:
  • Riverstone NSW
Re: Bally 1965 Aces High Restoration
« Reply #45 on: November 11, 2010, 09:03:06 AM »
I have a complaint...

that open contact on the switch stack was the very top set of contacts... this NEVER happens.. any EM tech knows that its ALWAYS the very bottom most difficult to get to and adjust set!

Very good point Gav and how true.  *%*
I need more room ! and more $$$

Offline Strangeways

  • Pinball Restoration is my passion
  • Administrator
  • Trade Count: (+9)
  • *****
  • High Score Initials:
  • Forum Posts:
  • Melbourne
  • ABN 68 283 634 461
    • Ride The Boney Beast
Re: Bally 1965 Aces High Restoration
« Reply #46 on: November 22, 2010, 10:05:33 AM »

Some Cabinet work

Taking a bit of a break from the task of rebuilding and adjusting switch stacks, I thought I'd start work on the cabinet. I think the cabinet is excellent for a machine that is older than I am ! Artwork is simply and intact. Webbing looks to be a bit more "crazy" than a Gottlieb of the same era. I think it will scrub up really well. The plan is to strip everything, treat the corrosion, repair the cabinet where required, and repaint the front door.

The front door has some nasty scratches in it. I will use the hammer finish paint that I use on Stern front doors. It seems to be the same. Here's a "before" picture of the door and front of the cabinet ;


Off comes all the hardware, to reveal the original paintwork.


In this picture, I've used Nifti and a green scotchwhite pad, working it in softly on the LEFT side only - just to see how clean I can get it without affecting the paintwork. Since it is all really the basecoat, it is fairly straight forward.


Years of dirt are cleaned off - very easily with a scotchbrite and Nifti.


Stripped cabinet - ready for cleaning. First, it needs a vacuum !


In order to be able to have the game on legs, I have to remove and treat the leg plates. These are corroded (more surface rust than anything else). First I clean them with a wire wheel on my buffer, then I drop them in a small container with RANEX. I swear by this product for doing this kind of work.

In the picture below, I have the four leg plates. The plate on the far right is finished. The two in the centre are untreated and straight from the machine. The fourth has been cleaned with the wire wheel and dropped straight into the RANEX, and you can see the immediate reaction. I leave it in the container for no more than 5 minutes, then I drop it straight into another container of Water mixed with windex. Dry the part, then you can use a scotchbrite to shine it up a bit before polishing it. They can be nickel plated using Beaky's methods - which I will try later on.


After the cabinet is cleaned, I refit the leg plates so I can continue with the machine on its legs


The cabinet needed some repairs. I used Liquid nails and a couple of blocks of wood. Leave for 2 days and it will be stable once more.


 $#$


Aussie Pinball - Proud to be Australia's Premier Pinball Forum

http://www.australianpinballrestorations.com.au/

http://www.rtbb.com.au/catalog/

We carry the largest range of NEW Ramps in Australia

Offline ddstoys

  • Trade Count: (+23)
  • ******
  • High Score Initials:
  • Forum Posts:
  • Geelong
Re: Bally 1965 Aces High Restoration
« Reply #47 on: November 22, 2010, 11:22:27 AM »
That's cleaning up well Nino and yor right about the webbing that's pretty full on would be a mission reproducing that

Offline faza

  • Trade Count: (0)
  • ******
  • Forum Posts:
  • Sydney
Re: Bally 1965 Aces High Restoration
« Reply #48 on: November 22, 2010, 04:43:09 PM »
Amazing how good the paintwork was underneath all that dirt .

Offline el_timbo86

  • Trade Count: (+1)
  • *****
  • High Score Initials:
  • Forum Posts:
  • Geelong, Victoria
    • Hot Rodded Pins
Re: Bally 1965 Aces High Restoration
« Reply #49 on: November 22, 2010, 05:21:22 PM »
Really enjoying this restore,

Look forward to the updates Nino  ^^^

Timbo

Offline oldpins

  • Trade Count: (+1)
  • *****
  • Forum Posts:
  • Brisbane North QLD
    • oldpinballs.com
Re: Bally 1965 Aces High Restoration
« Reply #50 on: November 22, 2010, 06:18:23 PM »
Great Work  ^^^  Love to see those old EM's come back to life. Do you plan on repainting the cabinet & BB or leave as original as possible ?


Offline Strangeways

  • Pinball Restoration is my passion
  • Administrator
  • Trade Count: (+9)
  • *****
  • High Score Initials:
  • Forum Posts:
  • Melbourne
  • ABN 68 283 634 461
    • Ride The Boney Beast
Re: Bally 1965 Aces High Restoration
« Reply #51 on: November 22, 2010, 06:43:13 PM »
Great Work  ^^^  Love to see those old EM's come back to life. Do you plan on repainting the cabinet & BB or leave as original as possible ?


Cabinet remains "as is" - I have some photos of the sides, and there is only a slight color fade in the "blues". The paintwork is in excellent and original condition. I only repaint if it needs to be done.
Aussie Pinball - Proud to be Australia's Premier Pinball Forum

http://www.australianpinballrestorations.com.au/

http://www.rtbb.com.au/catalog/

We carry the largest range of NEW Ramps in Australia

Offline JD

  • Trade Count: (0)
  • ******
  • Forum Posts:
  • Maitland NSW
  • There's no law against having fun, just yet!
Re: Bally 1965 Aces High Restoration
« Reply #52 on: November 22, 2010, 09:03:15 PM »
looking good Nino!

Some enthusiasts keep finishing one part (area) before moving on but I find if Í dont get some variation, I get bored or bogged down.

Just got to remember where all the pieces go!

J.D.
There is no law against having fun just yet (but I am sure they are busy are drafting one!)

Offline johnwartjr

  • Trade Count: (0)
  • ******
  • Forum Posts:
  • Columbus, Indiana USA
  • It's ALIVEEEEEE!
    • My Home Gameroom . com
Re: Bally 1965 Aces High Restoration
« Reply #53 on: November 23, 2010, 05:06:29 PM »
Wish I could find something that works like Ranex.. that stuff looks awesome!

Offline Strangeways

  • Pinball Restoration is my passion
  • Administrator
  • Trade Count: (+9)
  • *****
  • High Score Initials:
  • Forum Posts:
  • Melbourne
  • ABN 68 283 634 461
    • Ride The Boney Beast
Re: Bally 1965 Aces High Restoration
« Reply #54 on: November 23, 2010, 06:30:34 PM »
Wish I could find something that works like Ranex.. that stuff looks awesome!

John - I settled on Ranex after looking for a similar product to "Lightning Rust Remover". Seems that it is not as readily available in Australia, so after trying several products with limited success, I fould Ranex and I SWEAR by it these days !
Aussie Pinball - Proud to be Australia's Premier Pinball Forum

http://www.australianpinballrestorations.com.au/

http://www.rtbb.com.au/catalog/

We carry the largest range of NEW Ramps in Australia

Offline FirePower

  • Trade Count: (0)
  • *****
  • Forum Posts:
  • Sydney
Re: Bally 1965 Aces High Restoration
« Reply #55 on: November 23, 2010, 09:35:31 PM »
Wish I could find something that works like Ranex.. that stuff looks awesome!

According to the label it contains 345 mL/ L of phosphoric acid, maybe that will help locate an equivalent?

Offline Strangeways

  • Pinball Restoration is my passion
  • Administrator
  • Trade Count: (+9)
  • *****
  • High Score Initials:
  • Forum Posts:
  • Melbourne
  • ABN 68 283 634 461
    • Ride The Boney Beast
Re: Bally 1965 Aces High Restoration
« Reply #56 on: December 30, 2010, 11:31:49 PM »

This restore took the back seat as I completed the garage. now that I've finished that task, I'm back to restoring this game. This next step is often considered "boring" and can be somewhat difficult. The SIDE RAILS ! These must be removed, regrained and new nails be installed. These Ballys have a metal playfield glass channel - not plastic - and they become rusted. The telltale sign is a "grinding" noise when removing the glass and scratches on the glass edges. There's no way around it - the side rails must come off and the channel needs to be treated.

Siderail removal

Not that hard when you think about it. This is the method I've used (on and off) for years. The aim is to remove the nail intact AND more importantly - NOT scratch the siderail.

The first thing to do is place packing tape directly on the siderail, covering the nail head. Place a second piece of tape over the top and cut out the head with a sharp knife.


Use an OLD or cheap chisel to pry the head of the nail - go around the diameter of the nail head and you may need to go around a few times to dislodge the nail and raise it slightly.


View from above - the head is raised


I use an old pair of sidecutters for the next step. Place the sidecutters behind the head, and squeeze while turning counter clockwise. The tape will form a barrier between the siderail and the sidecutters. You MAY scratch the siderail while doing this - try not to - and use more tape if required. The head will raise with the counter clockwise movement.


At this stage, the head is well and truly raised, and the only scratching is on the tape.


Now I use a pair of pliers. Simply place the pliers over the head, but NOT pressing against the siderail, and turn counter clockwise. It should turn and raise. DON'T PULL THE NAIL OUT ! TURN IT ! It will come out easy. If you rip out the nail, then there will be no wood for the new nail to "grab". Side rail nails are NOT standard nails - they have a thread, much like a screw. Pulling them out is simply not the right way to do it.


ZERO damage to the siderail and a clean removal of the nail


Side rail is not removed and you can see the rusted channel. This rust scratches the playfield glass. It needs to be addressed.


Out comes the Dremel with the correct bit to remove the rust. I covered the inside of the machine and spend some time removing the rust from the channel. I finished off the removal by treating it with Ranex and then a red scotchbrite pad. It is very smooth and ready for the siderail to be re installed.


A progress picture of the rust removal and the results. To the right, is the completed section.


The left side of the machine is completed and ready for the siderail.


Why do I regrain the siderails and not "polish" them ? Because they are NOT polished from factory. They are GRAINED. I remove the siderails and REGRAIN them. This is easy - Lay the siderail on a flat surface, grab some 180 Grit wet/Dry and windex (don't use the cheap window cleaner) and use a block of wood with the 180 Grit and slide back and forth in a straight line. Do this several times and then clean with windex and a rag. It will remove most scratches and the machine looks "Factory".


Here's the right side regrained with new siderails ;


When fitting the new nails, use PVC wood glue and toothpicks to fill the hole and gently tap the nails in. Place a block BEHIND the nail (inside of the cabinet) when hammerring the nail.


That's it ! Next update will be the legs / door / lock down bar assembly - stay tuned !

Aussie Pinball - Proud to be Australia's Premier Pinball Forum

http://www.australianpinballrestorations.com.au/

http://www.rtbb.com.au/catalog/

We carry the largest range of NEW Ramps in Australia

Offline ddstoys

  • Trade Count: (+23)
  • ******
  • High Score Initials:
  • Forum Posts:
  • Geelong
Re: Bally 1965 Aces High Restoration
« Reply #57 on: December 31, 2010, 04:31:55 PM »
Nice work with the nail removal good step by step with no damage must try that method next time.    I normally use the wood chisel and a hammer approach then drill and plug the cabinet yours looks much easier.

 Also didn't know about the steel glass channel ante there any other games rant use this?

Offline Strangeways

  • Pinball Restoration is my passion
  • Administrator
  • Trade Count: (+9)
  • *****
  • High Score Initials:
  • Forum Posts:
  • Melbourne
  • ABN 68 283 634 461
    • Ride The Boney Beast
Re: Bally 1965 Aces High Restoration
« Reply #58 on: December 31, 2010, 04:54:00 PM »
Nice work with the nail removal good step by step with no damage must try that method next time.    I normally use the wood chisel and a hammer approach then drill and plug the cabinet yours looks much easier.

 Also didn't know about the steel glass channel ante there any other games rant use this?

Ballys of this era 60's - not sure about the Gottliebs.
Aussie Pinball - Proud to be Australia's Premier Pinball Forum

http://www.australianpinballrestorations.com.au/

http://www.rtbb.com.au/catalog/

We carry the largest range of NEW Ramps in Australia

Offline Strangeways

  • Pinball Restoration is my passion
  • Administrator
  • Trade Count: (+9)
  • *****
  • High Score Initials:
  • Forum Posts:
  • Melbourne
  • ABN 68 283 634 461
    • Ride The Boney Beast
Re: Bally 1965 Aces High Restoration
« Reply #59 on: January 13, 2011, 05:25:10 PM »

Had a bit of a setback with the updates - my NEW camera "somehow" became submerged in water  ^&^ so I've reverted back to my old one. Thankfully, I didn't have too many pictures lost - just the lockdown bar assembly repair.

I've also been experimenting with the Zinc plating kit - I'll get to that a bit later. There's heaps to update on this restoration  *%*

The Head !

Very heavy head (4 player - so more scorewheels and a couple extra steppers). I've removed the mechanical board and the instruction cards. There's quite a few in this machine and all are intact. I scan them and then either laminate the originals, or reproduce them. I prefer to keep the originals IF they are in good condition.
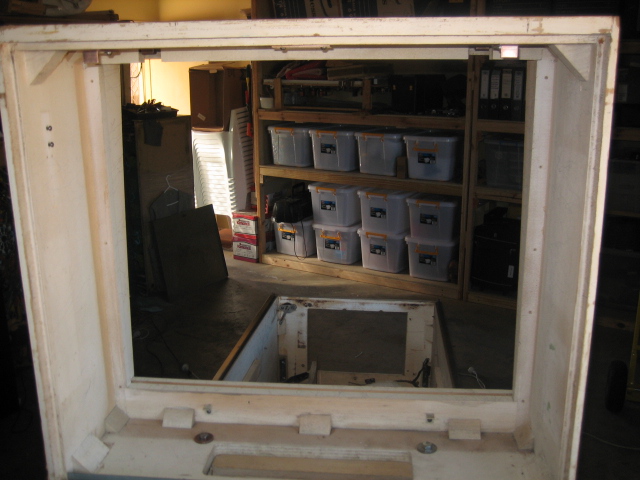


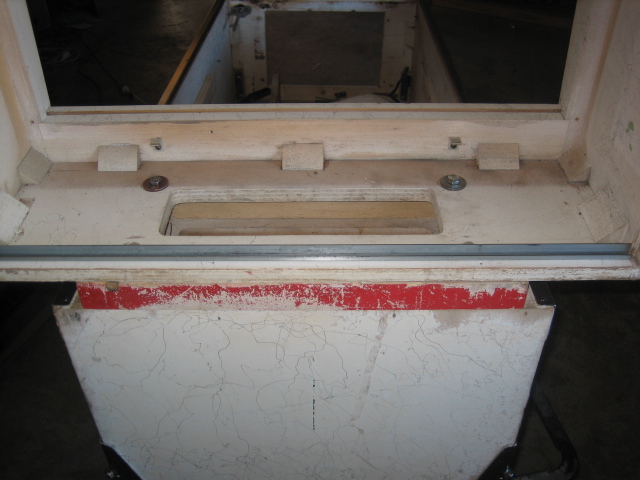
The channel is removed, cleaned and returned to the machine


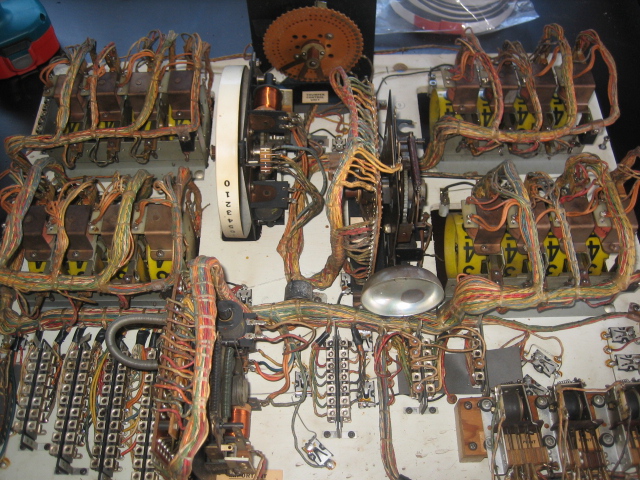
Here is the "before" shot of the mechanicals. I will be strippng EVERY single moving part. There are 16 scorereels to clean and replace the coil sleeves. Scorereel coil sleeves are plastic. All other coils have the brass sleeves and as long as they are not worn, they will be re used. The coils on these older machine have their sleeves as part of the coil - they cannot be replaced. If you attempt to remove the sleeve, the coil will fall apart. This is also the same deal on Bally Bingos.


Even though the game was almost playable, it rarely advanced to player 3 or 4. That is a direct result of this unit being sluggish. As will all units, it needs to be rebuilt. It is important to take photos of the unit in the "home" position on these style steppers as it simply won't work properly after re assembly.

Notice I've marked the bakerlite where the wiper blades are positioned in the "home" position. It is deliberately "offset" slightly. But this appears to be correct.
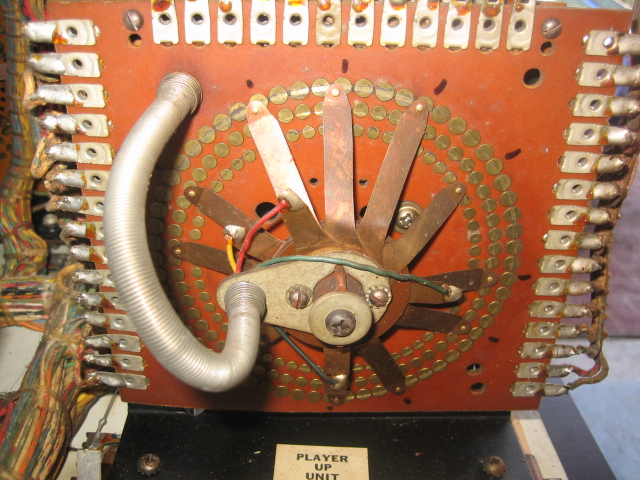


Another important thing to remember - count the number of turns on the spring when the unit is in the "home" position. It is usually 2 - 3 turns.


Unit coils and switch stacks removed and it is on the bench for further disassembly;
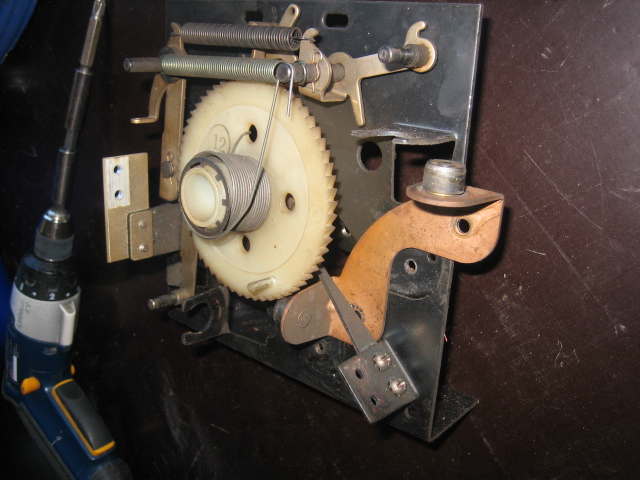


Here's the unit rebuilt and re installed into the machine. Works very well !


Scorereel rebuild

This is fairly repetitive work, but is easily done if you take your time and don't try to rush things ! These are the steps required to rebuild a Bally Scorereel assembly ;

Here is a scorereel removed from it's "cage"  %.% Notice is it a very simple design, and I think it is a more serviceable and reliable unit than most scorereel assemblies from Williams and Gottlieb. I much prefer working on these. The assembly consists of the score "reel" with the numbers on it, a plunger / link, spring, coil, cog and the bakerlite board. The contacts have three sets of switches. The middle set are normally closed from "1"-"8". The top set are closed at "0", and the bottom set are closed at "9". The coil pulls the plunger which advances the unit. There's a set of wiper blades on the cog which follows the scorereel position so the machine knows how many times it needs to advance.

This score reel is set to "0"


Step 1 - Remove the switch stack and the coil stop
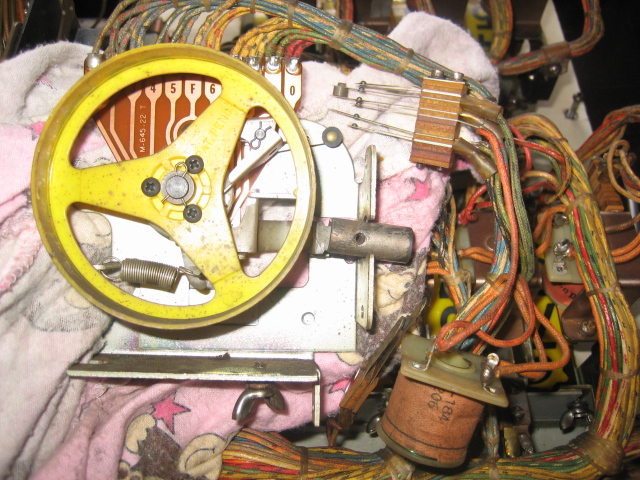


Step 2 - Remove the clip and the three screws that hold the scorereel in place. Notice a registration "nib" that ensures the score reel itself is returned in the correct position. Remove the spring ;
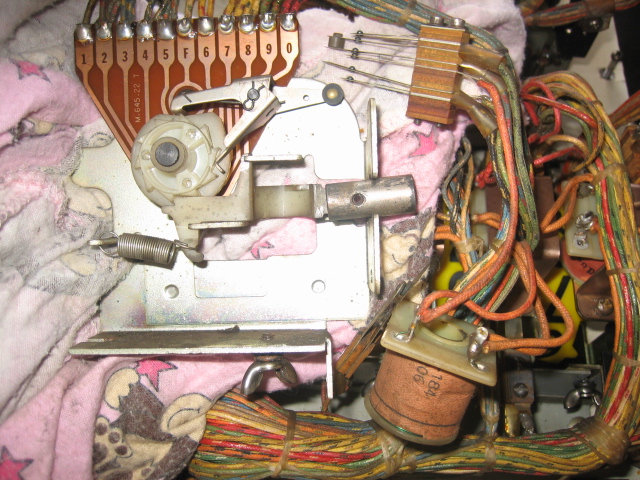


Step 3 - Remove the small clip, spring and two actuator arms. Remove the cog, which is done by moving the plunger back
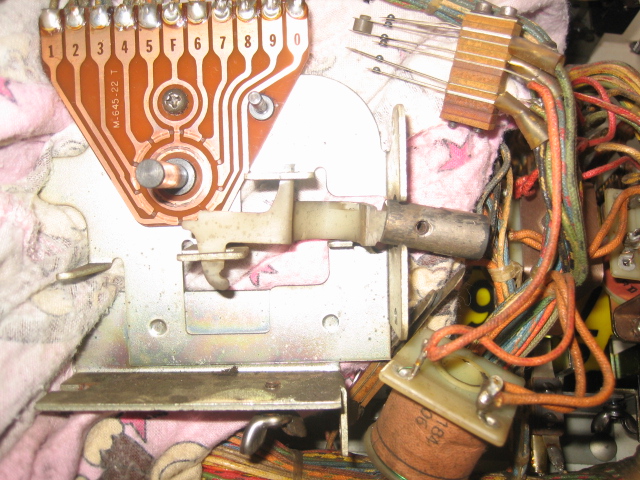


Step 4 - All the parts are ready to be cleaned. I use Nifti for the plastic parts, windex for the metal. Toothbrush is handy ! Use a scotchbrite to clean the bakerlite. I use compressed air to dry everything out. For FILTHY and gummed parts - drop the moving parts into a small tub of degreaser.
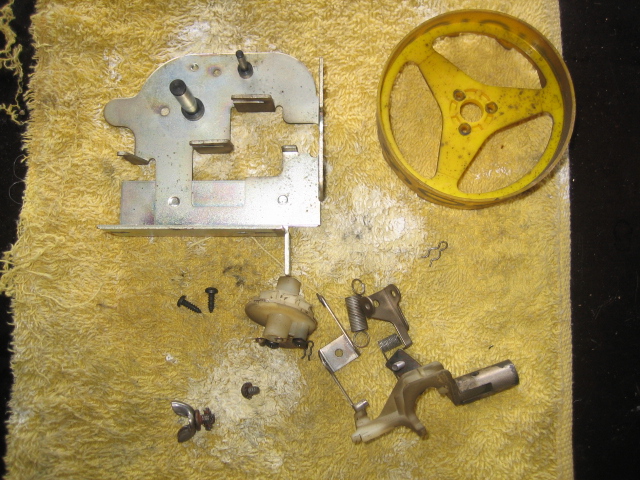


Parts cleaned - Don't use Novus 2 on the yellow scorewheel - it WILL remove the black ink
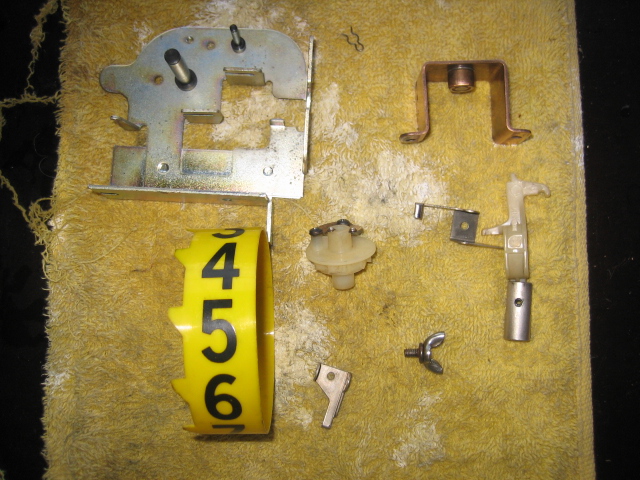


Bakerlite is cleaned with alcohol and a scotchbrite pad
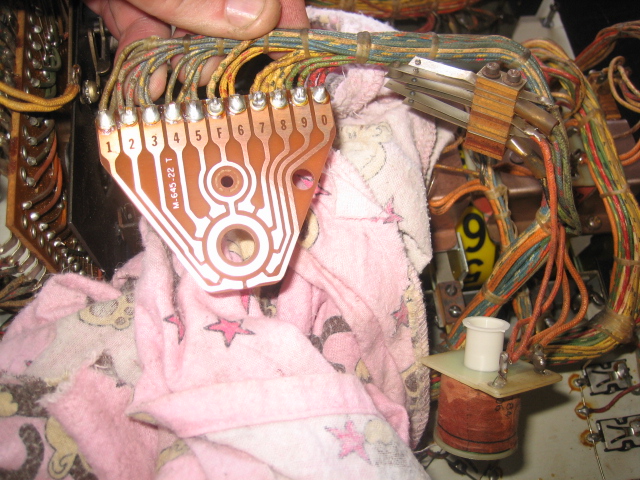


Reassemble in the reverse order that we used to disassemble. Note the two actuator arms are a bit hard to install, just make sure that they are oriented the correct way ;
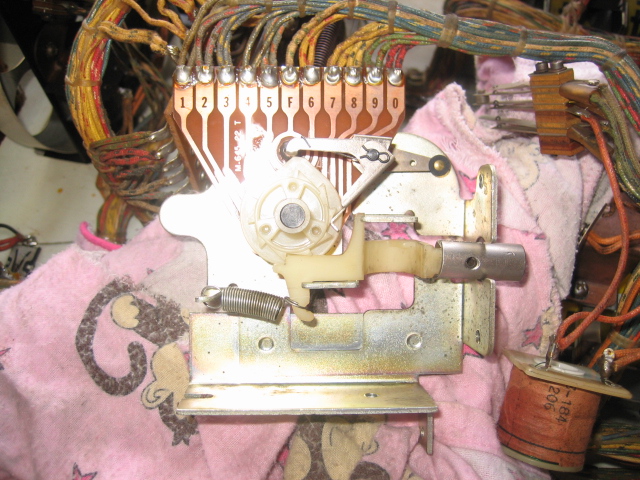


Replace the coil sleeve, clean the coil, refit the coil stop and switch stack. Test that the switches are cleaned and gapped. Should be ready to go !
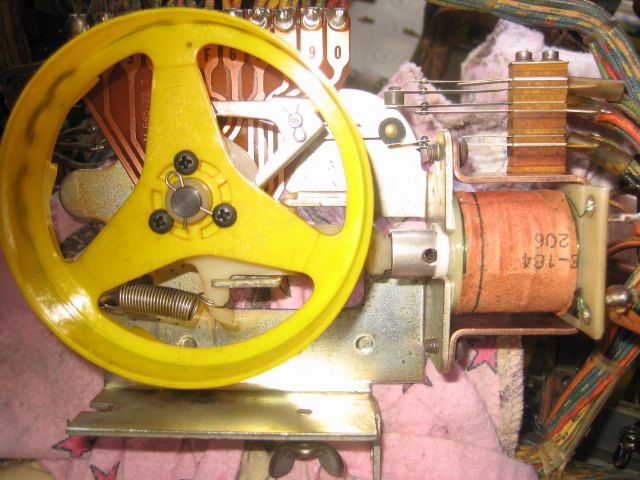


Here's a comparison between a rebuilt and dirty scorereel assembly
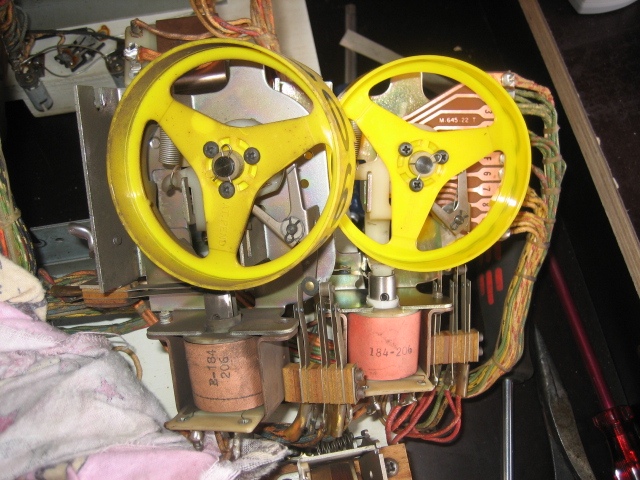


Here's the progress - 12 down and 4 to go !
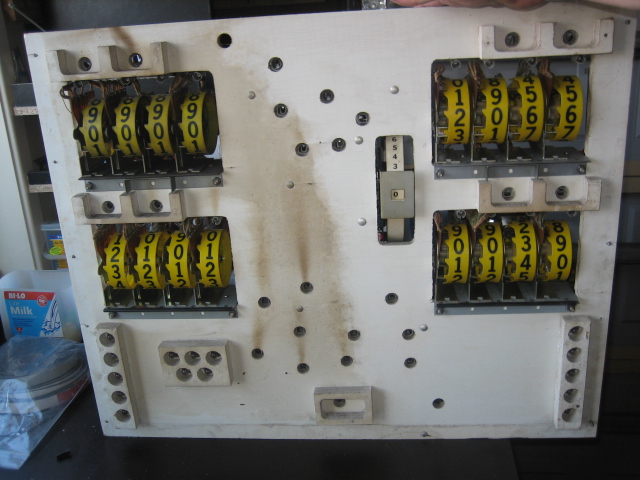


More coming later today !


Aussie Pinball - Proud to be Australia's Premier Pinball Forum

http://www.australianpinballrestorations.com.au/

http://www.rtbb.com.au/catalog/

We carry the largest range of NEW Ramps in Australia