Author Topic: Star Trek: The Mirror Universe pinball  (Read 10843 times)

0 Members and 1 Guest are viewing this topic.

Offline vinito

  • Trade Count: (0)
  • *****
  • Forum Posts:
  • Kansas City, KS USA
Re: Star Trek: The Mirror Universe pinball
« Reply #75 on: September 25, 2013, 09:00:43 AM »
Technically, I think the Borg was around, they just weren't on the show yet  %$%
I suppose a sub could be put about anywhere.
Actually I kinda liked the asteroid reference with the rock speakers too. My opinion, but I think you'd want to add something cool and more than just a couple asteroids sitting atop the backbox.  Can't think of anything yet though.
I feel more like I do now than I did when I first got here.

Offline femto

  • Trade Count: (0)
  • ****
  • Forum Posts:
  • Toowoomba, Qld
  • Go ahead....push my buttons!
Re: Star Trek: The Mirror Universe pinball
« Reply #76 on: September 25, 2013, 07:22:04 PM »
How about some speakers in the shape of the Enterprise nacelles on top of the backbox?

Offline zitt

  • Trade Count: (0)
  • ****
  • Forum Posts:
Re: Star Trek: The Mirror Universe pinball
« Reply #77 on: September 26, 2013, 02:28:10 PM »
Quote
How about some speakers in the shape of the Enterprise nacelles on top of the backbox?
There's an idea! going to give it some thought.

Now my attention turns to the stenciling of the side cabinet. First color... yellow:


Once the yellow dried overnight; I pulled the stencil up:


Yeap; that's right... The use of the waterslide decal came back and bit me in the butt. The stencil pulled the toner right off label.


<sigh> ^.^ @.@

Offline zitt

  • Trade Count: (0)
  • ****
  • Forum Posts:
Re: Star Trek: The Mirror Universe pinball
« Reply #78 on: September 26, 2013, 03:15:17 PM »
After many choice explicatives; I decided there wasn't much I could do now... so I went ahead and continued stenciling the grey; opting to see what (if anything) the Enterprise would cover. Ofcourse; I designed the decal location to be where the Klingons were; so I knew it wouldn't cover jack... but it made me feel better.  I also figured if the next stencil pulled up more; I could fix it once and be done.

Down goes the Enterprise stencil..


This time I left the protective backing on the section which went over the waterslide decal.
I sprayed the grey primer and let it dry overnight. The backing protect the label; so I proceeded to cover the paper areas with the black stain to match the color of the cabinet. I then re-airbrushed to blend the new black with the background image. I then re-sprayed the holographic flake and clear coat as best I could with airbrush.


Good as new? no. but, not too bad I guess.

Now for the orange stencil.


The orange wasn't Red enough for my Nacelles... so I sprayed them with cherry red.


And finally; the blue phasers:


Ofcourse; the blue phasers crossed over the nebula - I had to use some of the stencil to prevent paint bleed. At this point more toner came off; so I had to do some more repair. The result:


I'm not real happy with the blue phasers; they tend to not showup well on the black without a grey border. Not sure what if anything I'm going to do.

Offline ktm450

  • Trade Count: (+1)
  • ******
  • High Score Initials:
  • Forum Posts:
  • Geelong, Victoria
Re: Star Trek: The Mirror Universe pinball
« Reply #79 on: September 27, 2013, 04:37:48 PM »
Stencilling looks great shame about the lifting

Offline zitt

  • Trade Count: (0)
  • ****
  • Forum Posts:
Re: Star Trek: The Mirror Universe pinball
« Reply #80 on: September 30, 2013, 10:08:45 AM »
Now my attention turns to the front stenciling... First the Yellow:


I decided that I'm going to start "wrapping" the images under the cabinet to give it a unique look.


Orange:


Grey:


And the final result:


With that; I've completed one of each side of the cabinet. Now the "Busy" work of finishing the other sides of the cabinet begins.

Offline goodolddays

  • Trade Count: (0)
  • ******
  • Forum Posts:
  • Riverstone NSW
Re: Star Trek: The Mirror Universe pinball
« Reply #81 on: September 30, 2013, 10:22:23 AM »
Cab artwork is looking great  ^^^. I think you made a good recovery from the lifting  *%*
I need more room ! and more $$$

Offline zitt

  • Trade Count: (0)
  • ****
  • Forum Posts:
Re: Star Trek: The Mirror Universe pinball
« Reply #82 on: September 30, 2013, 10:36:06 AM »
Thank you sir!

In between stenciling; I waited for the LED test boards to come on a slowboat from china... I received them early last week. In short; I wanted to do some insert testing with some LEDs to find the "optimal" LED current using my inserts from earlier in the build. I didn't want the inserts to blind the player... but I also wanted to make them look right. As a result; I used the following circuit to vary the current thru the LED:


Basically the single 2n3904 transistor is operating in constant current mode; R2 is empty and the current is measured via the emitter resistor at R8. This particular board was designed to have two uses.
1) Enable "current" test early on...
2) Then after current is known; remove the active circuitry and simply populate the resistors R2 and R4.

Three of these boards would be used to lite under the dual lane inserts. For the LEDs; I went with 0.5W LEDs from Kingbright. the AA3535 series. I went with high power so that I could keep the currents low but still get plenty of photons from the LEDs. This was recommended by a friend in the "know" and I really appreciate his advice.

For the test boards; I went with smart prototypes out of china because they allowed me to order White silkscreen. The white silkscreen will help reflect and stray photons back toward the insert.

Here's the board installed under the test playfield. It mounts with two wood screws; and allows the pots to be adjusted.


Here's how the board looks from the top w/o the laser cut inserts:


Here's what I think the inserts should look like during play:


With this the measured currents were as follows:
Neutral White: 36.1mA ~= 41.2ohm 1/4W at 5V supply
Red: 24.07mA ~= 86.6ohm 1/4W at 5V supply

Given these are 150mA peak current LEDs; I'm not operating them anywhere near their peak currents. It should help prolog the life and keep them running cool.

Offline zitt

  • Trade Count: (0)
  • ****
  • Forum Posts:
Re: Star Trek: The Mirror Universe pinball
« Reply #83 on: October 21, 2013, 05:57:50 PM »
I've been quietly working on the remaining cabinet stencils and should be ready to clearcoat the cabinet by next weekend. I'm thinking about going with some 2part DuPont™ ChromaClear® 2370S™ Flexible Matted if I can get it locally.  Between stenciling sessions the house got struck by lightning about a week ago... so I've been digging out of the random bad electronics and such. One of which is my Color LaserJet which I need to finish the apron.

Anyway; tonight after dinner I did a marathon session at Techshop... leaving just after 10pm. The main thing I did was put the "base" on for the Apron. Like the cabinet; I wanted it black with a holographic star field. So I did a base coat in black and followed it up with some clear powdercoat with the holographic flakes in it.  Here's a closeup shot of the powdercoat:


I'm planning on waterjetting the inlayed pieces out of some 22ga steel and then doing a heat transfer of the graphics onto those pieces. Here's a mockup of the overall look; if it works as I hope it will.


A massive order of PCBs are on the way from Hong Kong ... so I expect to be working on various electronic boards... including the 5 Nixie Pinball displays over the next few weeks.  More later.

Offline zitt

  • Trade Count: (0)
  • ****
  • Forum Posts:
Re: Star Trek: The Mirror Universe pinball
« Reply #84 on: November 19, 2013, 05:24:21 PM »
I've been busy the last few weeks on other tasks including some PCBs for the project. I submitted another set of 4 PCBs to the china fab house last night so was able to spend some time on the apron.

Early last week I had a few minutes after work; so I went to Techshop and waterjetted some apron pieces out of some mild steel sourced from lowes. After cutting; I sandblasted them and This weekend I put them under some 220grit sandpaper to remove the coarseness added by the sandblasting. Once I had a smooth surface; I powdercoated them with some "Mirror chrome".

A few months ago I sourced some "SinglePrint (tm) Multi Surface Laser "no weed" " paper from them during a sale. The idea here is that using a heat press; I'd be able to "bond" laser printed graphics to the powder coated surface. Then be able to apply the needed clear powder coat over the label to give it a single resilient surface.

With the label printed using my color laser jet; I proceeded to bond the label to the substrate. I didn't have a heat press and I really didn't have the room for one anyway... so I thought I'd use a household iron. Once I received the paper; the included instructions said in italics "do not use a home iron". :(

Then I remembered I had a hot laminator which I used in attempting to make homebrew PCBs using laser paper. The laminator claimed it did 300F max... and would apply some pressure; so I figured what the hell. worth a shot.

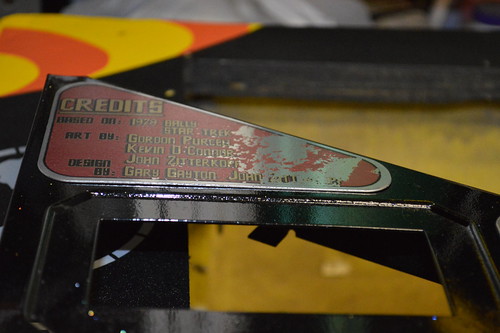
I preheated the substrate in the toaster oven to 300F and then applied the mirrored SinglePrint to the it and ran it thru the laminator about a dozen times. When removing the paper; it hadn't bonded to the surface. Humm. However, it was in place so I ran it thru twice to re-flatten the paper to the substrate... at this point I had nothing to really lose; so I put the substrate+paper back in the toaster oven set to ~325F. I let it bake there for about 2minutes; then quickly transferred it to the at temp Laminator. Running it thru 3 times. The returned the combo back to the oven for another heat session. I did this for about 4 times then let it cool for about 30seconds before peeling the paper from the substrate.

This time it was better; but not perfect.

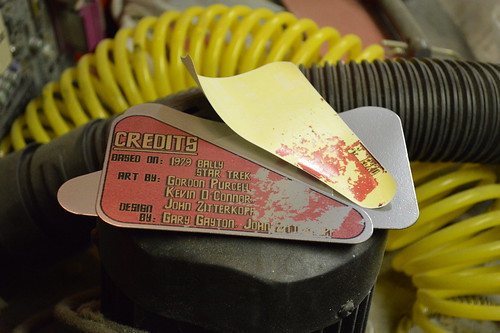
:( As you can see; some of the label stayed with the paper.
I could "erase the label" and try again; but the label isn't really "solid enough" for my tastes. The toner is somewhat transparent which leads to muddled colors against the metallic background. It's probably be perfect on a white powercoated substrate.

I may try to source some vinyl labels in order to get the look I think I want.
Here's the other apron pieces positioned on the apron:


Offline zitt

  • Trade Count: (0)
  • ****
  • Forum Posts:
Re: Star Trek: The Mirror Universe pinball
« Reply #85 on: November 23, 2013, 05:58:35 PM »
Looks to be a busy weekend. I got my SMT assembles back from SteveC for the Nixie Tube displays... I've already assembled two full displays. They'll go into testing hopefully Saturday afternoon... and if functional; the remaining 7 will be built.

Sneak peak... After work today... this happened at techshop.ws:


I <3 me some CNCing.


So yeah... me is happy:

Offline swinks

  • Trade Count: (+18)
  • ******
  • High Score Initials:
  • Forum Posts:
  • Lake Macquarie, NSW
Re: Star Trek: The Mirror Universe pinball
« Reply #86 on: November 23, 2013, 06:10:23 PM »
looks good, it's nice seeing a build coming out of the CNC
https://swinks.com.au

for pinball parts (reproduction & mods)
for pinball t-shirts

Offline zitt

  • Trade Count: (0)
  • ****
  • Forum Posts:
Re: Star Trek: The Mirror Universe pinball
« Reply #87 on: November 25, 2013, 04:11:25 PM »
Today I had another 4hour block on the CNC machine at techshop... I finished up drilling the holes in the PF:


I also flipped the PF and CNCed out the proximity slots on the underside of the PF:


I have about 7 hours total in the PF including setup and actual CNC time.
I cleaned the wood "fuzzies" from the top of the PF with a wire brush attachment on my dremel. There is currently Primer grey on the underside of the PF... trying to dry in this cold as$ texas night. Yes; I know your not suppose to paint below 50F... but I really don't have a lot of choice if I'm going to meet the TPF'14 deadline.

Tomorrow I hope to begin inserting the inserts. :D

Offline swinks

  • Trade Count: (+18)
  • ******
  • High Score Initials:
  • Forum Posts:
  • Lake Macquarie, NSW
Re: Star Trek: The Mirror Universe pinball
« Reply #88 on: November 25, 2013, 04:57:09 PM »
looking good, and look forward to your inserts going it
https://swinks.com.au

for pinball parts (reproduction & mods)
for pinball t-shirts

Offline zitt

  • Trade Count: (0)
  • ****
  • Forum Posts:
Re: Star Trek: The Mirror Universe pinball
« Reply #89 on: November 28, 2013, 06:45:19 PM »
I've been working on the PF; inserts are in. Glue is drying. Tomorrow I hope to complete sanding the inserts flat in prep of clear coat on the whitewood this weekend.

Inbetween sessions in the cold garage; I've been working on the External speaker solution. A while back I asked for some suggestions and femto here at the Aussie Pinball forums suggested that I make the speakers look like the nacelles of the Enterprise. I liked that idea; but was unsure how to execute it. Well; that all came to a head a couple of weeks ago when I came across some older
Altec Lansing FX2020 Expressionist
speakers during the uptenth time I looked for a suitable speaker set.  These speakers had the same basic shape as the warp nacelles so they be a good starting point. Once I had the speakers this past weekend; I unpacked them and promptly voided the warranty by taking them apart.  Once I had them apart; I hatched a plan to making them into warp nacelles. First; I was going to ditch the polycarbonate "stands" and replace it with a 3D printed "wrap" which I'd mock up in sketchup.

Removing the 4 silver screws on the front allows the speaker grill to be removed; then you have access to the speaker and the 4 screw tubes/standoffs which sandwiches the polycarbonate stand between the sliver ring and the black body. I decided I wanted to sandwich the 3D printed "nacelle wrap" identically as the stand.

Here's my 5th revision of the nacelle wrap:


Here's a rear view showing the hollow center for the speaker tube... thereby still giving access to the rear panels.


The wrap is about 4.5inches in diameter and about 5.9inchs long not including the spoke pattern guard.

One of the tradeoffs I ended up doing was that I wanted a "speaker grill" rounded like the front of the nacelles. IE a semi-spherical shape. The problem was I wasn't sure I could find a suitable material to "bend" in the correct but exacting shape. As I result; I brought out the spoke patterns into a spherical speaker grill to give the nacelle shape. I'll probably print the body in grey and the nacelle spokes in black to give it a better indication.

If anyone has the capability or know how to create an oval grill please let me know... I was thinking something like this:
http://www.mcmaster.com/#expanded-metal/=pkkkg8
but have no ideal how to shape it easily.