Author Topic: 1981 Gottlieb Black Hole Pinball Restoration  (Read 1116 times)

0 Members and 1 Guest are viewing this topic.

Offline zitt

  • Trade Count: (0)
  • ****
  • Forum Posts:
1981 Gottlieb Black Hole Pinball Restoration
« on: November 07, 2010, 02:10:51 PM »
Several weekends ago; a local pinball friend (thanks Joe!) offered me a deal I couldn't refuse on a 1981 Gottlieb Black Hole Pinball Machine. So being my first restoration of a Gottlieb machine; I'm sure I'll learn a lot. Besides; Someone has to do some modding around here. :P

Unlike the 1979 Bally Star Trek I did last year; this GTB machine is considered "high-maintenance" and has frequent electrical issues.  My goal is to return the machine to near new condition; and do most if not all of the circuit improvement suggested by Marvin's fixit site: http://www.pinrepair.com/sys80/index.htm in a effort to reduce this machine to a "it just works" machine.

This machine is a project machine which will require cleaning and releveling the Playfield inserts on both the upper and lower playfields. Many of the inserts have either fallen or risen due to heat and glue break down. Like the Bally machine; Both PFs will receive auto clearcoat to protect the playfield. The Black box will also need some door repair.

I have lots of plans for the machine as far as mods go... I think the machine will receive a set of flipper led mods since the buttons are identical to the Bally Star Trek. I'm thinking of doing something special with the pop bumpers - but you'll have to wait and see on that one.

As with all pictures in the worklog; remember to click the pictures for higher rez shots.

Here's the machine as it was unloaded from my truck:


Lower PF via blue window in the center of the upper PF:


Offline zitt

  • Trade Count: (0)
  • ****
  • Forum Posts:
Re: 1981 Gottlieb Black Hole Pinball Restoration
« Reply #1 on: November 07, 2010, 02:12:19 PM »
I wanted to start on the lower PF first; since it was smaller and had less componets to remove on the top side. It also has the most insert lifting but nearly no PF wear. So I pulled the lower playfield out of the machine and pulled off the dirty plastics.

The first thing I learned is I H-A-T-E those GTB press-on acorn "nuts". They are nearly impossible to remove (or I don't know the trick) without damaging the platics. Those press-on standoffs would be the first to go when reinstalling the PF parts. Terry at PinballLife.com sold me a set of the newer standoffs which have #6-32 threads on top; those will be used in combination with some stainless steel acorn nuts with make removing PF plastics easy-peazy.

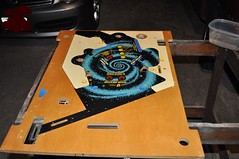
Here's the very dirty Lower PF with plastics removed.

Yeap - very dirty. And yes; there is some rust on some peices.

Take another angle shot; so you can remember where to return the parts on the PF:


Next step is to remove all the top side componets, screws, rails, bulbs, etc... and clean it well. For this I used mean green and a melamine foam sponge as was done in the Bally Star Trek worklog. This time the underlying PF was not flaking or signifigantly worn - and I took care not to be agressive with the cleaning.

I made sure to tape off the drop target holes as I did not remove them from the under the PF. I also taped off the filpper holes to prevent build up of soot and/or auto clear coat.

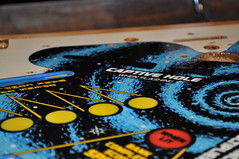
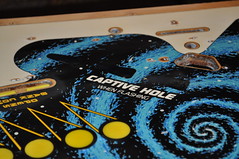
Next I used a heat gun, a rubber mallet, and a steel ruler to "level" the three captive hole blue inserts:


Now it's time to put the one light and one heavy coat of clear on the PF. Why? The clear coat to protect the PF from wear from the ball. Unsure if GTB had any protection on these early machines; but I'm guessing that like the Bally's of this era the only protection is "wax" put on over the painted PF.

Apply two coats of Dupont ChromaClear G2-7779S clear coat w/ 7785S Activator-Reducer. These two are mixed at a 4:1 ratio and allow for a flash of 20-40minutes between coats. Apply in thin light coats; don't go overboard of the clear coat won't cure.

I applied the coats using a HarborFreight HVLP Gravity Feed Spray Gun. Set the pressure dial to 20PSI so I got ~10psi when trigger is depressed.

Allow the two coats to cure overnight.


The next evening after work; It was ready for the orbital sander with 100grit discs. This was done to level any remain Playfield areas such as center dipping or ball wear. It's also done to remove the inital orange peel seen in the previous clear coat.


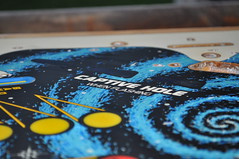
I then wiped away the sander dust to verify the inserts are flat:

TAKE CARE; do not blow through the clear coat and destroy your original paint! (I learned that lesson in the Bally ST worklog)

I then applied one lite and one heavy clear coat as a final protection. Again; at least 20minute flashes between coats and an overnight cure.


Then like the bally; the final sanding begins to remove the orange peel and restore that PF shine. Orbital Sander @ 150grit and the 220grit. Hand sand with wet/dry (wet) with 320grit, 500grit, 800grit, 1000grit, 1500grit. Then use the buffing wheel to apply two rounds each of rubbing compound, polishing compound, and carnuba wax.

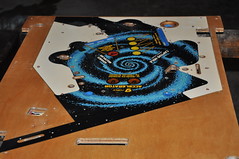
Nice, shiney, and smooth:


Sandblast away the rust, Polish the visible metal peices, and return the parts and plastics to the lower playfield:


With that; The mechanical work on the lower PF is complete... however, the electronics will need some fixes per marvin's suggestions.... I'll tackle that later when I get a digikey order created and purchased.

Offline zitt

  • Trade Count: (0)
  • ****
  • Forum Posts:
Re: 1981 Gottlieb Black Hole Pinball Restoration
« Reply #2 on: November 07, 2010, 02:13:58 PM »
Now that the Star Trek Conventions are out of the way; Attention returns to the Upper Playfeild where I begin by disassembling all the top componets as like bottom PF; it will get automotive clear coat to protect the PF... and some touchup paint.

Click Images for hiRez


Unlike the lower PF; the upper playfield had some serious sinking playfeild inserts; so these ares are going to need to be fixed as well as the areas near the PF window which have been rubbed to wood.


To raise the inserts; I used a heat gun to loosen the glue in the insert and the used a nut driver and a rubber mallet to raise them. Once I had them above the PF; I used a metal ruler and the mallet to "level" the insert to the PF. If the Insert was really loose; A couple were; I used some clear glue around the insert before leveling.


Once the inserts were level; I created some arrow shaped outline templates in corel draw; then proceeded to cut them out on the laser cutter out of transfer paper. I then carefully layed them over the inserts to redo the outlines:


Applied black enamel with a testors pen:

While I was at it I touched up other areas of the PF... namely the black where the turbobumper mylar use to be.  Also touched up the areas around the PF winder were there were chips and wood showing through.

Finally removed the transfer tape:


With the touchup complete; I put 4 coats of automotive Clear Coat with 20minute flashes between the coats. Then I sanded the PF flat - begining with 100gril orbital, 150grit orbital, and then 220 orbital. There were still some areas around the inserts (between inserts and wood) where there were some valleys so I used some clear and a small artist paint brush to fill with clear coat. 4 more coats of clear now that the PF was level.  Then 220grit orbital, 400grit, 500, 800, 1000, and finally 1500 grit hand sandings of the clear coat. Then rubbing compound, polishing compound, and then carnuba wax to make the PF shine.


With that the upper PF mechanical restoration is complete.

Offline zitt

  • Trade Count: (0)
  • ****
  • Forum Posts:
Re: 1981 Gottlieb Black Hole Pinball Restoration
« Reply #3 on: November 07, 2010, 02:15:03 PM »
I needed to order some parts from the Pinball Resource before I could begin to re-assemble the top PF; so I decided to spend some time on the shooter of the machine. Lets start with original pics of the shooter trim:

Ick! That won't do.

I could have bought a new shooter trim plate; but I wanted to experiment a little. So first I began by sandblasting the plate of it's rust. Then I polished it to a shine using 40, 80, 100, 280, 500, 800, 1000, 1500 grit sandpaper. Following up with rubbing  and polishing compound.

There were still some minor nicks and valleys in the trim; so I decided to try some experiments and settled on the following.
First, I scanned in the Manual logo and converted it to vector in Corel Draw. Then put some fiberglass tape on the plate where I laser vector cut the black background into the fiberglass tape using 100% power and 8% speed:


Then using my exacto knife; I carefully removed the letters from the tape:


Out came the powder coating gun and oven:


Remove the fiber tape:


Overlay some Transfer Tape and Laser etch the foreground lettering:


The carefully remove the detail areas with a set smt tweezers:


Sandblast with iron oxide:


Examine our work:

And then coat with some final clear powdercoat to protect the metal from future rust and grimmy hands:

TerDah!

Offline zitt

  • Trade Count: (0)
  • ****
  • Forum Posts:
Re: 1981 Gottlieb Black Hole Pinball Restoration
« Reply #4 on: November 07, 2010, 02:15:59 PM »
Now the shooter itself had some rust and needed some TLC; so I removed the rust with the sandblaster... then polished to a shine:


Then using the popbumper caps as inspiration:


I cut a stencil out of transfer tape using the laser cutter:


Sandblast the vortex with iron oxide:


Then Clear Powder coat to protect it:


And the final look and feel:

Offline zitt

  • Trade Count: (0)
  • ****
  • Forum Posts:
Re: 1981 Gottlieb Black Hole Pinball Restoration
« Reply #5 on: November 07, 2010, 02:18:57 PM »
I just finished building the first prototype for a modification to the Black Hole PopBumpers.
I've replaced the bulb with a circuit board and a rotating LED pattern. Drilled out the pop bumper cap; and put it all together.

It's designed to be a bolt-on mod; where you simply remove the existing blub; attach the power bulb, and screw in the circuit board into the existing unused popbumper mounting holes. Runs off of the standard 6.3VAC GI circuit.

I think it looks pretty good:


Click here to view on YouTube.com

Offline pinnies4me

  • Administrator
  • Trade Count: (+5)
  • *****
  • High Score Initials:
  • Forum Posts:
  • Victoria
Re: 1981 Gottlieb Black Hole Pinball Restoration
« Reply #6 on: November 07, 2010, 02:27:49 PM »
Wow, very neat!! One of my all time fav games, just got away from having a few games on it to find this thread! Thanks!!
“If you wanna escape, go up to a pinball machine. There’s a magic button on the front that takes you to a world under the glass and makes the the rest of the universe disappear.”

Offline big dog

  • Trade Count: (0)
  • *****
  • Forum Posts:
  • Grafton
Re: 1981 Gottlieb Black Hole Pinball Restoration
« Reply #7 on: November 07, 2010, 03:00:03 PM »
flash as,fine bit of bling,black hole is a great game..

Offline ddstoys

  • Trade Count: (+23)
  • ******
  • High Score Initials:
  • Forum Posts:
  • Geelong
Re: 1981 Gottlieb Black Hole Pinball Restoration
« Reply #8 on: November 07, 2010, 03:16:21 PM »
That looks awsome specially love the bumper cap idea

Offline FirePower

  • Trade Count: (0)
  • *****
  • Forum Posts:
  • Sydney
Re: 1981 Gottlieb Black Hole Pinball Restoration
« Reply #9 on: November 07, 2010, 03:22:07 PM »
Yep, that bumper lighting looks really good. Thanks for posting.

Offline Wotto

  • Trade Count: (+1)
  • ******
  • Forum Posts:
  • NSW Australia
Re: 1981 Gottlieb Black Hole Pinball Restoration
« Reply #10 on: November 07, 2010, 03:55:14 PM »
Some great idea's there and the overall restore looks terrific  ^^^

I like the shooter rod custom idea.
I was thinking if I knew anyone that was good with art/ceramics to make my own custom shooter rods with gloss ceramic images hardened onto them ( ie - like an Ace of Spades on the Hot Hand plunger etc )

Your idea is nice  #*#
DW Drums rule !

Offline ktm450

  • Trade Count: (+1)
  • ******
  • High Score Initials:
  • Forum Posts:
  • Geelong, Victoria
Re: 1981 Gottlieb Black Hole Pinball Restoration
« Reply #11 on: November 07, 2010, 09:45:19 PM »
Some great ideas there, nice work  ^^^

Offline goodolddays

  • Trade Count: (0)
  • ******
  • Forum Posts:
  • Riverstone NSW
Re: 1981 Gottlieb Black Hole Pinball Restoration
« Reply #12 on: November 07, 2010, 09:58:30 PM »
Great progress there .  ^^^  I like the bumper cap idea. Looks like it will fit well with the theme of the Pin.
I need more room ! and more $$$

Offline zitt

  • Trade Count: (0)
  • ****
  • Forum Posts:
Re: 1981 Gottlieb Black Hole Pinball Restoration
« Reply #13 on: November 08, 2010, 06:42:28 AM »
Thanks All. Still working on the electronics of the machine before it's playable.
That and a shipment from PBR for missing or damaged parts.

Offline Strangeways

  • Pinball Restoration is my passion
  • Administrator
  • Trade Count: (+9)
  • *****
  • High Score Initials:
  • Forum Posts:
  • Melbourne
  • ABN 68 283 634 461
    • Ride The Boney Beast
Re: 1981 Gottlieb Black Hole Pinball Restoration
« Reply #14 on: November 09, 2010, 10:17:28 AM »

Excellent restoration (so far  %$%) - Really like the mods on this machine and your attention to detail !
Aussie Pinball - Proud to be Australia's Premier Pinball Forum

http://www.australianpinballrestorations.com.au/

http://www.rtbb.com.au/catalog/

We carry the largest range of NEW Ramps in Australia