Author Topic: Monster Bash Restoration  (Read 5556 times)

0 Members and 1 Guest are viewing this topic.

Offline robm

  • Trade Count: (+1)
  • ******
  • Forum Posts:
  • Townsville
Monster Bash Restoration
« on: February 27, 2017, 11:00:32 PM »

Well have had this one sitting stripped down for a couple of years now, and with too many other projects in the road, never got around to it. With 1 more weeks leave, i thought i would make a start on this one and try to get a chunk of the cabinet work done. Not ideal conditions with 36 degree days and 90% humidity in Townsville, but have the fans cranking in the shed!


Started this arv with this...


I had previously stripped the playfield to have touched up and cleared by Savage Restorations in Brisbane, and it has been boxed away waiting to be rebuilt.


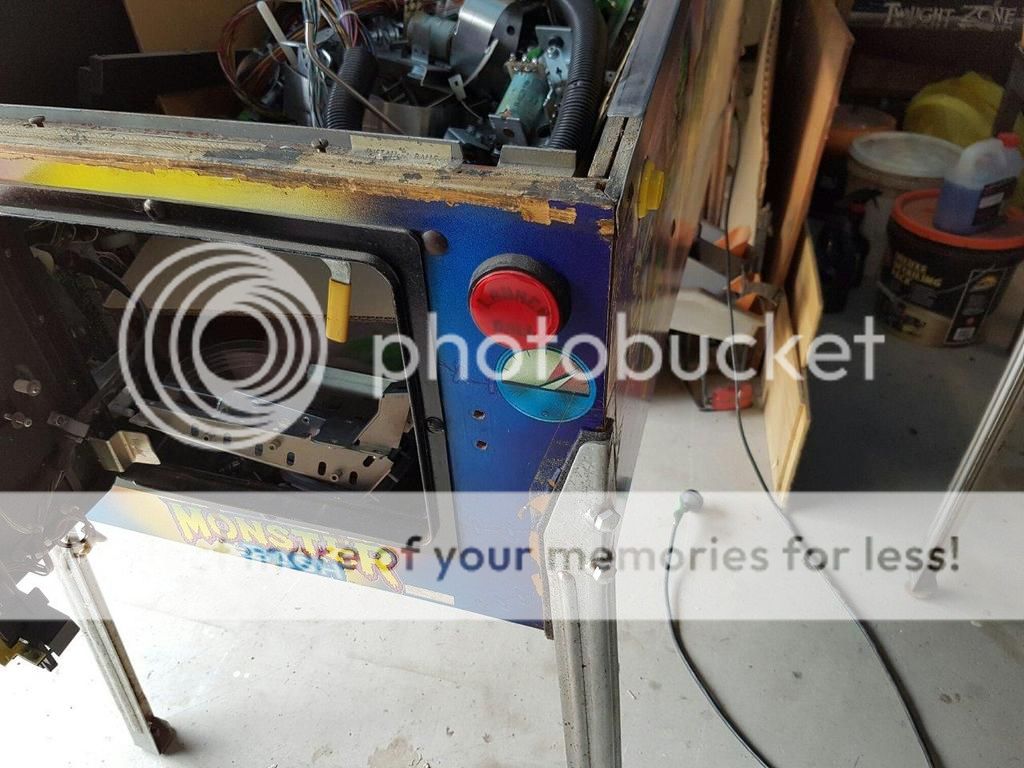
Ripped all the old bits out, and started organising them into bits to be cleaned and/or replaced and working out what parts i might need.


Cab itself is solid enough, but has quite a few chunks and gouges


Basically stripped everything out, then got onto removing the headbox decals


Before


Without exaggeration, 30 seconds later


I only recently got this Metabo sander, and it is AWESOME. It has an aggressive mode, and just eats the artwork off, taking the glue residue with it.  Both sides of the headbox were sanded to bare timber in just over 5 minutes.

Offline swinks

  • Trade Count: (+18)
  • ******
  • High Score Initials:
  • Forum Posts:
  • Lake Macquarie, NSW
Re: Monster Bash Restoration
« Reply #1 on: February 28, 2017, 06:52:25 AM »
love this game, will be watching with interest, you have a real nice collection Rob
https://swinks.com.au

for pinball parts (reproduction & mods)
for pinball t-shirts

Offline robm

  • Trade Count: (+1)
  • ******
  • Forum Posts:
  • Townsville
Re: Monster Bash Restoration
« Reply #2 on: February 28, 2017, 09:05:51 AM »


Got a cheeky bit of sanding in this morning before it gets too hot.

Sent from my SM-G930F using Tapatalk


Offline robm

  • Trade Count: (+1)
  • ******
  • Forum Posts:
  • Townsville
Re: Monster Bash Restoration
« Reply #3 on: February 28, 2017, 12:39:54 PM »
Clamping the cab together and glueing and screwing. There was a slight opening on the front corners.


Sent from my SM-G930F using Tapatalk


Offline pinnies4me

  • Administrator
  • Trade Count: (+5)
  • *****
  • High Score Initials:
  • Forum Posts:
  • Victoria
Re: Monster Bash Restoration
« Reply #4 on: February 28, 2017, 02:38:24 PM »
That sander looks like a ripper - what model is it?
“If you wanna escape, go up to a pinball machine. There’s a magic button on the front that takes you to a world under the glass and makes the the rest of the universe disappear.”

Offline robm

  • Trade Count: (+1)
  • ******
  • Forum Posts:
  • Townsville
Re: Monster Bash Restoration
« Reply #5 on: February 28, 2017, 03:36:58 PM »

I did a reasonable amount of research, and all the woodworking guys either go the Metabo or Festool. I got mine from total tools  [size=78%]http://www.totaltools.com.au/trade-tools/brand/metabo/cat1/powertools/cat2/powertools_polisherssanders/0[/size]


I used 80 grit paper - i have heard of some using 60, but 80 works . Obiously need to take it easy and not hook in past the adhesive layer and start taking too much wood off.


I bought a heap of various grades of sanding discs from smith and arrow (online), all in boxes of 25 and they seem quite good quality and very well priced.


Total time to do the main cab front and 2 sides was under 30 mins. Obviously needs finer grades of sanding but this is just decal removal.


At $330 its very worth it...particularly when i think about previous efforts burning fingers with a heat gun and scraper and using glue remover multiple times to get rid of adhesive residue.


The action on better brands is so much more effective than ozito and similar budget stuff. There is no way i could have done it like this with the ozito.

Offline robm

  • Trade Count: (+1)
  • ******
  • Forum Posts:
  • Townsville
Re: Monster Bash Restoration
« Reply #6 on: February 28, 2017, 07:11:55 PM »
This is my first attempt at using fibreglass resin to repair corner damage. Apparently it is much stronger than bog.

First step was to make a guard to stop it running everywhere. Got a 1mm thick aluminum strip from bunnings and bent this and nailed to the cab. This was coated with wax prior to nailing to ensure the resin didn't stick to it.

Then mixed a small quantity of resin and hardener in the kids medicine cup and dropped in with their syringe....hopefully they don't get sick tonight!

It goes off to a state where it won't run in a few minutes and then i removed the aluminum. Will leave overnight before sanding it.


Sent from my SM-G930F using Tapatalk


Offline robm

  • Trade Count: (+1)
  • ******
  • Forum Posts:
  • Townsville
Re: Monster Bash Restoration
« Reply #7 on: March 01, 2017, 05:35:59 PM »
Had a pretty big day today in very hot weather! Started by sanding down the fibreglass resin and some bogging done last night.


Then more bogging and sanding and removed the rear rails on the back of the cab.


Then after more bogging and sanding was happy. Final sand with 600 grit


Put the rear rails back on after a sand and primer coats.


Then just finished a couple of coats of satin black on the inside, rear and edges.


Will let the black cure for a week or two until i put the decals on....time to head to the air conditioning now!

Sent from my SM-G930F using Tapatalk


Offline robm

  • Trade Count: (+1)
  • ******
  • Forum Posts:
  • Townsville
Re: Monster Bash Restoration
« Reply #8 on: March 05, 2017, 09:38:43 PM »
While waiting for the cab paint to cure, started cleaning and polishing some of the metal cabinet bits, painting cabinet bolts etc.

Also gave the transformer a tidy up and gave its legs a quick polish.


Started to clean some of the playfield stuff as well, you never can trust what monsters get up to once all soaped up....


I gave the figures a coat of clear by hanging them from a ladder


A couple of places on them went a bit cloudy as it is so humid here, so i sanded those spots back and gave it a quick touch up with clear again in my makeshift spray booth...otherwise known as the laundry tub!  At least inside it was air conditioned and a lot dryer and the clear was much better.


Sent from my SM-G930F using Tapatalk


Offline robm

  • Trade Count: (+1)
  • ******
  • Forum Posts:
  • Townsville
Re: Monster Bash Restoration
« Reply #9 on: March 27, 2017, 04:08:49 PM »
Well we are totally prepared for cyclone Debbie, although it looks like it will now go well south of us now, so may as well get into the decal job!

Got my toothless helper on board today.


Love the colour in these decals.


Sent from my SM-G930F using Tapatalk


Offline Strangeways

  • Pinball Restoration is my passion
  • Administrator
  • Trade Count: (+9)
  • *****
  • High Score Initials:
  • Forum Posts:
  • Melbourne
  • ABN 68 283 634 461
    • Ride The Boney Beast
Re: Monster Bash Restoration
« Reply #10 on: March 27, 2017, 10:29:57 PM »
Was a bit concerned when I heard it was heading for Townsville. Nothing like working in the Shed to forget about what's going on in the outside world !
Aussie Pinball - Proud to be Australia's Premier Pinball Forum

http://www.australianpinballrestorations.com.au/

http://www.rtbb.com.au/catalog/

We carry the largest range of NEW Ramps in Australia

Offline ddstoys

  • Trade Count: (+23)
  • ******
  • High Score Initials:
  • Forum Posts:
  • Geelong
Re: Monster Bash Restoration
« Reply #11 on: March 27, 2017, 11:01:25 PM »
Looking great rob


Sent from my iPhone using Tapatalk

Offline robm

  • Trade Count: (+1)
  • ******
  • Forum Posts:
  • Townsville
Re: Monster Bash Restoration
« Reply #12 on: March 28, 2017, 07:08:08 PM »
Got the cab done.


I use the metal cab protectors that stand the legs off the cab so as not to cause decal wrinkling. I fit the protectors, then cut about 1mm or so away from them by angling a blade


Then remove protector and cut part of decal away. This corner is the one that was trashed and repaired with fibreglass resin.


A few shots of the finished cab, with inner cab decals installed as well.


Sent from my SM-G930F using Tapatalk


Offline turbo27

  • Trade Count: (0)
  • ****
  • Forum Posts:
  • Adelaide
Re: Monster Bash Restoration
« Reply #13 on: March 28, 2017, 07:39:32 PM »
Looking sweet, but how was the weather, hopefully no damage


Sent from my iPhone using Tapatalk

Offline swinks

  • Trade Count: (+18)
  • ******
  • High Score Initials:
  • Forum Posts:
  • Lake Macquarie, NSW
Re: Monster Bash Restoration
« Reply #14 on: March 28, 2017, 07:49:59 PM »
looking great, a dream pin for me one day
https://swinks.com.au

for pinball parts (reproduction & mods)
for pinball t-shirts