Author Topic: el_timbo's Funhouse Restoration...  (Read 5017 times)

0 Members and 4 Guests are viewing this topic.

Offline ktm450

  • Trade Count: (+1)
  • ******
  • High Score Initials:
  • Forum Posts:
  • Geelong, Victoria
Re: el_timbo's Funhouse Restoration...
« Reply #45 on: March 20, 2010, 09:49:52 PM »
What a great first attempt mate, keep up the great work  ^^^

Offline ddstoys

  • Trade Count: (+23)
  • ******
  • High Score Initials:
  • Forum Posts:
  • Geelong
Re: el_timbo's Funhouse Restoration...
« Reply #46 on: March 21, 2010, 12:23:34 AM »
Well im sorry but i have to say it....


 There is no way your a teacher.......   Show me your qualifications...


 My teachers were lucky to spell there own name let alone do any of what you have done for your first restore.

Well done.

Im inviting myself around for a game when this is done you do realise that?    ^^^

Offline Strangeways

  • Pinball Restoration is my passion
  • Administrator
  • Trade Count: (+9)
  • *****
  • High Score Initials:
  • Forum Posts:
  • Melbourne
  • ABN 68 283 634 461
    • Ride The Boney Beast
Re: el_timbo's Funhouse Restoration...
« Reply #47 on: March 21, 2010, 09:51:58 AM »

Really impressed with your work, Timbo.

You must of had some sort of restoration experience, because your techniques and results are A1 !

Any particular reason why you lay 2 coats of clear and then comment touch ups ? Is that to seal the current "wear" and then just build on that ? Why wouldn't you just touch up the bare playfield ?

Keep the updates coming mate - really enjoying your thread.
Aussie Pinball - Proud to be Australia's Premier Pinball Forum

http://www.australianpinballrestorations.com.au/

http://www.rtbb.com.au/catalog/

We carry the largest range of NEW Ramps in Australia

Offline el_timbo86

  • Trade Count: (+1)
  • *****
  • High Score Initials:
  • Forum Posts:
  • Geelong, Victoria
    • Hot Rodded Pins
Re: el_timbo's Funhouse Restoration...
« Reply #48 on: March 21, 2010, 10:38:04 AM »
Thanks very much guys for the kind words - i was really worried about this step of the restore, as i really didnt want to buy a repro playfield.

ddystoys, your more than welcome to come round for a game when she is all finished, the more the merrier.

Strangeways, the first coat of clear is very light, and after that has flashed off - the second coat is just slightly 'thicker'. Speaking with both High End Pins and Melbourne Pinball Restorations (Marty), two clears should provide a really level surface for airbrushing and refinishing. The reason i really wanted to get two clears down, was because i will be doing alot of frisket masking, and if there is any grain on the playfield, i will get overspray, which will stick out like a sore thumb. The clear does an amazing job of filling fine grain, so its good to get this down first.

I will be starting the touchups tomorrow, and this is the part i've been looking forward to the most in during this restoration.

Look out for an update/writeup soon!

el_timbo

Offline johnwartjr

  • Trade Count: (0)
  • ******
  • Forum Posts:
  • Columbus, Indiana USA
  • It's ALIVEEEEEE!
    • My Home Gameroom . com
Re: el_timbo's Funhouse Restoration...
« Reply #49 on: March 21, 2010, 04:05:21 PM »

Really impressed with your work, Timbo.

You must of had some sort of restoration experience, because your techniques and results are A1 !

Any particular reason why you lay 2 coats of clear and then comment touch ups ? Is that to seal the current "wear" and then just build on that ? Why wouldn't you just touch up the bare playfield ?

Keep the updates coming mate - really enjoying your thread.

As far as artistic skills, I'm 10 thumbs - but I've done a fair amount of research, as I really had to prove to myself that I am 10 thumbs :)

An initial clear is crucial before doing touchups. Doesn't need to be a significant amount, but it's important because it allows you to wipe any mistakes off if you are unhappy with the initial touchups.

I'm looking forward to seeing the playfield retouch!

Offline MartyJ

  • Trade Count: (+4)
  • ******
  • High Score Initials:
  • Forum Posts:
  • Melbourne
Re: el_timbo's Funhouse Restoration...
« Reply #50 on: March 21, 2010, 07:56:09 PM »
Timbo,

I think we need to definitely get the mods to change your status under your name.  I know with more posts it will update later, but the words 'rookie' are just wrong!

Great work, cannot wait to see your airbrush skills.

Offline el_timbo86

  • Trade Count: (+1)
  • *****
  • High Score Initials:
  • Forum Posts:
  • Geelong, Victoria
    • Hot Rodded Pins
Re: el_timbo's Funhouse Restoration...
« Reply #51 on: March 23, 2010, 10:21:42 PM »
Hey guys,

Well here goes the first installment (or second if you count the initial clearcoat) of my Funhouse playfield restoration.

This post will hopefully provide some insight into the tools, and methods needed to bring your own playfield back to life through the use of an airbrush.

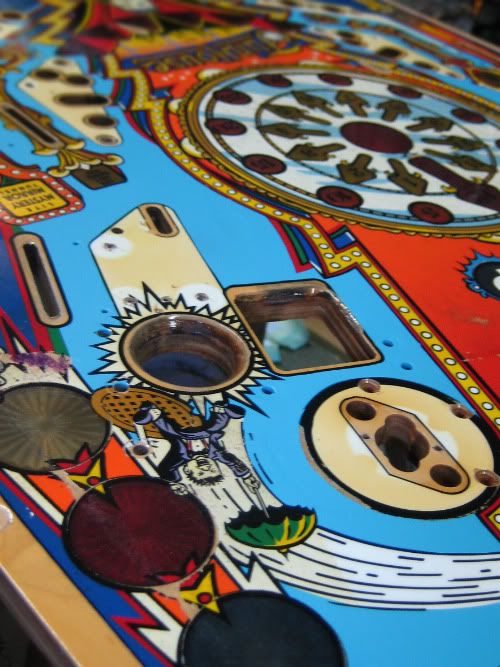
I will be tackling the lighter blue areas in this demonstration, for no other reason than because i wanted to do that colour first.

Preparing your surface should be the first thing you do. With the two initial clears down and cured, give the playfield a good wipe over with prepsol or another automotive type wax and grease remover.
Wipe this off with another rag (lint free).

In order to achieve nice clean lines of paint, you really need to use good masking material. Frisket mask is the only product i use. For the following reasons...

* Its low tack (similar to a post-it note) so it is easily removed and wont pull up any other paint with it...
* Its see through, so you can see the lines you are cutting match the surrounds...
* It is easily pierced by a sharp blade. You do NOT have to press down at all with the blade. With practice, you should be able to score your lines without leaving a mark on the playfield.
* It is relatively cheap, as you shouldnt need any more than 4 meters for a worn playfield.
* It really does WORK. It leaves a very proffessional finish, and the lines are razor sharp - absolutely NO bleed.

With the playfield ready and waiting, roll out some of the frisket mask, and decide on a colour you want to retouch. You may only need a small section, so dont cut off a whole meter for one small line. Cut off only what you need, as the rest of the playfield can be masked off with newspaper.

Line up the frisket paper over the area you intend to spray. It should be noted, that the frisket has a paper backing, allowing you to move it around until you NEED the tack. Use a weight of some kind to hold it in place for the next step...

Dont peel back the whole sheet of mask and expect to be able to apply it without getting bubbles in your film. You need to peel back about two inches of mask, and drape it back over itself (see image). With this completed, cut off about half the paper backing (see image). Pick up the frisket that you draped in the earlier step, and carefully rest it back down on your playfield.

All lined up and ready to peel...


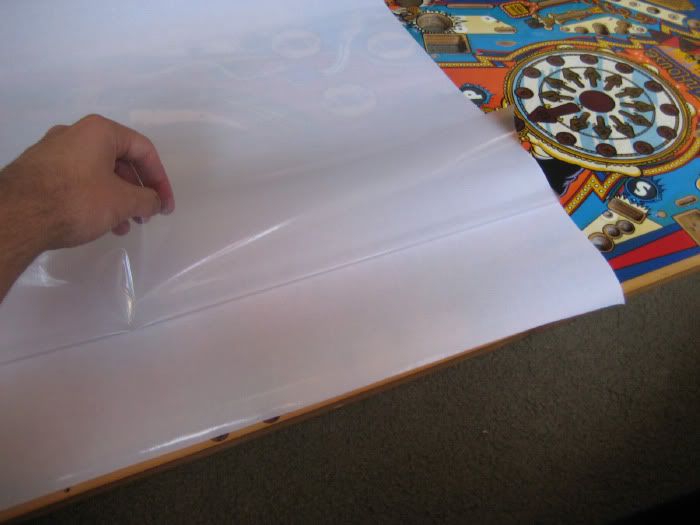
Frisket draped back over itself, and getting ready to cut an inch off the backing paper...


Now that it has been applied to the playfield, you can remove the weight, lift up the paper-backed frisket, and begin to slowly drag back the paper backing; being careful to rub down LIGHTLY the mask onto the playfield. When you have completed the section, it should something like this...

All applied nice and bubble free...


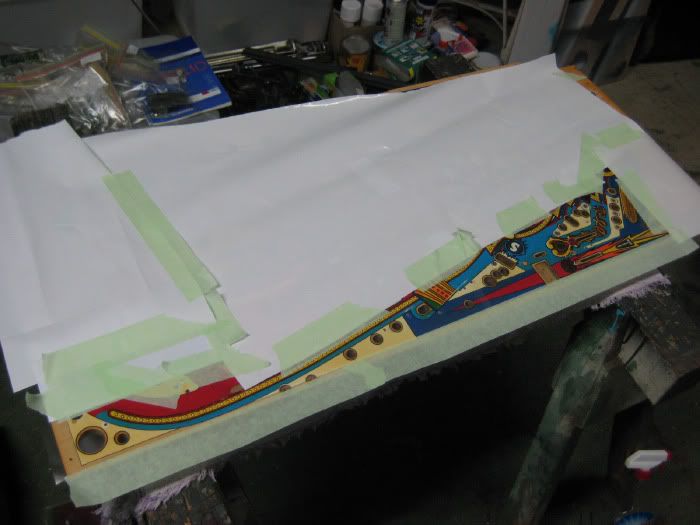
This is the fun part. Take your blade, i would buy a NEW ONE - and you need to lightly begin to remove the sections that you inted to respray. In this case, im doing the light blue, so that would be the only section i want exposed to the paint.

Complete this for the entire mask. It is a slow process, but once you have finished - its extrememly rewarding once you remove your stencils, to see the results. Remove the frisket you dont need with your blade tip.

Lift the frisket gently...


And its OFF...


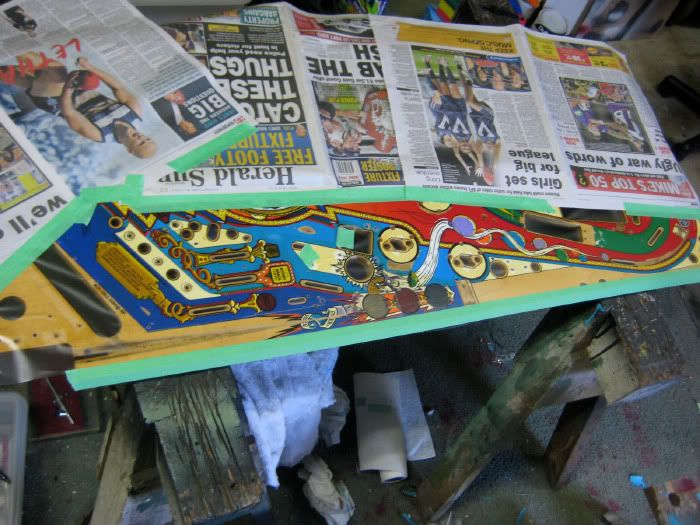
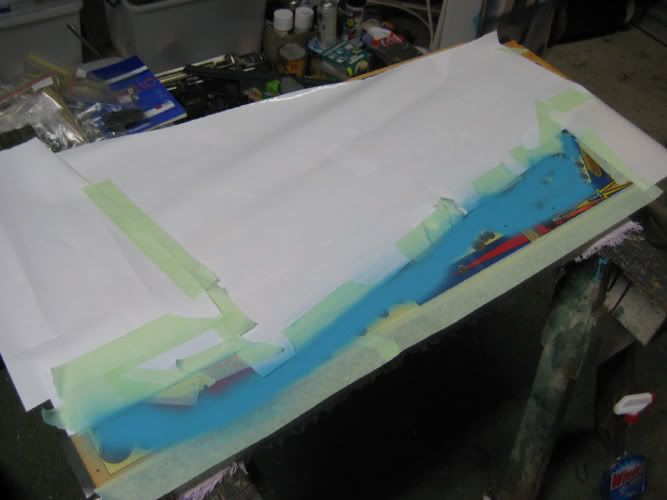
Mask off the rest of the playfield with some old newspaper etc, and tape it down in all areas. Airbrushing, although very precise, moves ALOT of air, and will blow paint to all unwanted areas. So make sure you get the rest of the playfield HIDDEN! Here is my playfield masked and ready for paint.

Here is the left side...


And the right too...


Acrylic paint is generally quite thick, which means you have to think about these things...

1. Thinning it down. I use a product called 'Airbrush Medium'. You can up to 50/50 ratio with your paint, however you may only need as little as a few drops to get the paint coming off the brush smoothly.
   
My product of choice...


2. Air pressure
Thicker paint will require more pressure to get an even flow of paint and air. To little or to much pressure will give you undesired results, such as a spatter effect, or uneven coverage. I cant stress enough the importance of having some scrap paper nearby to test your flow on BEFORE spraying on your playfield.

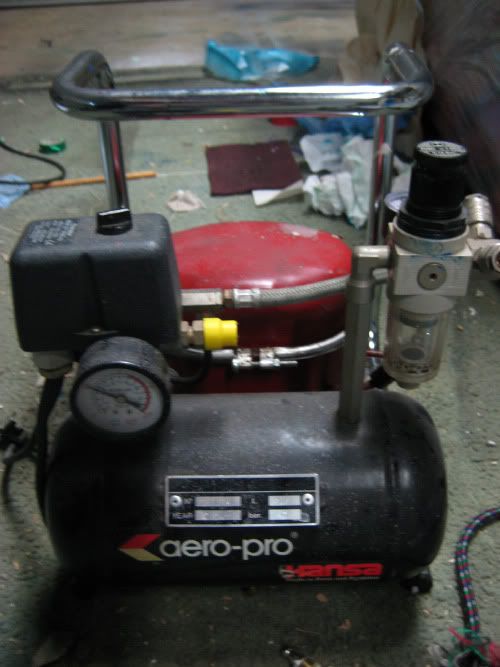
My Aero-Pro compressor...


3. The Airbrush
Your airbrush will have certain settings, which will allow you to control the amount of paint to air, and the shape of your spray pattern. I wont get into this too much, as it really comes down to you knowing how your specific airbrush works. Get to know your brush, and its capabilities before spraying your playfield.

When you lay down your paint, i try not to spend too much time in one area. I move across my stencil left and right, similar to the way i cleared my playfield. This technique will gradually build up a very rich, even colour - WITHOUT creating a 'skin' of paint that looks separate from the playfield. You should aim for maximum colour, with minimal application.

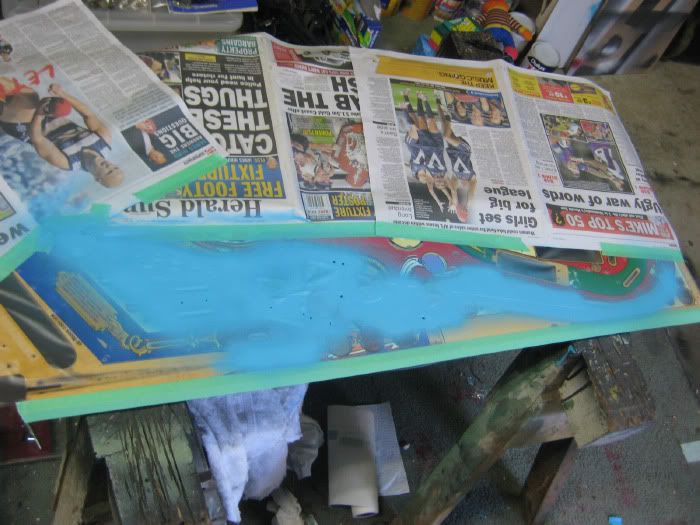
Here is the result of my blue application. ** Please note that the blue is slightly different to the original Funhouse colour. I have had the colour matched, and will become 'richer' like the original hue once cleared.

Left side...


Right side...


I would not recommend leaving the frisket mask on while the paint dries. This will only give the paint a film to stick to, and you risk pulling up all of your tedious masking work. Spray your area - give your brush a quick clean (just get all paint out of the line) - and then carefully remove the mask.

Once you remove the mask, it should look like this...

All the glamour...


this shows that with a bit of patience, you can mask even the smallest of black lines (ie. the balloons)...


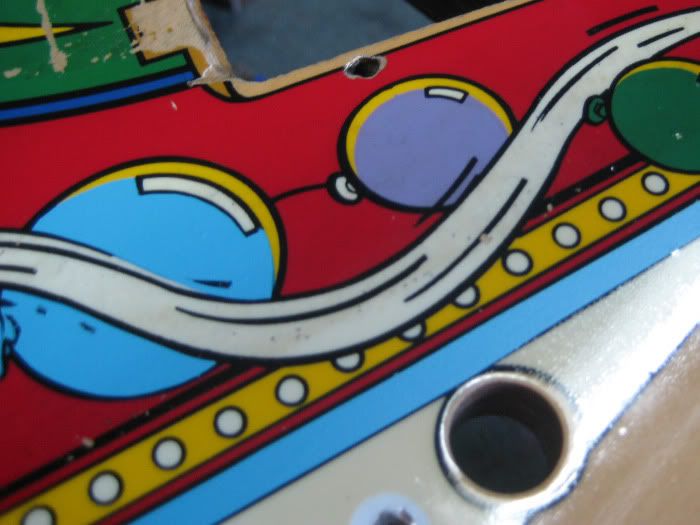
All around the star shape...


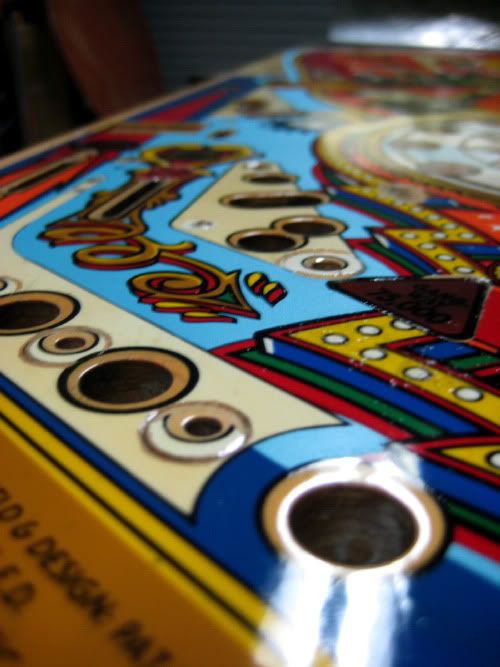
And the pop bumpers...


And the right inlane...The inlane art took the longest. Damn you John Youssi!! haha


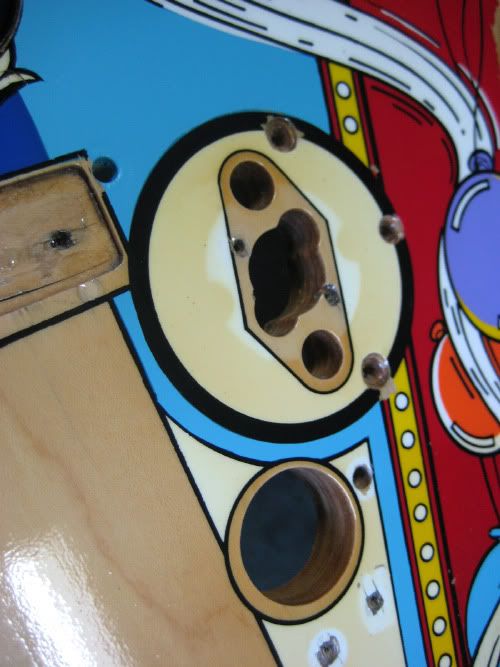
These were the wear areas that i really wanted to address. The clear levelled them well, and my colour covered them perfectly...


Thats pretty much it in terms of Frisket masking. I'm sure this hasnt covered EVERYTHING you need to know, but at least it may help some of you take the plunge, and give it a go yourself. Like i said, its really time consuming, but VERY rewarding when you see the mask coming off...it really does make it all worth while.

Its also a great feeling when you show someone and they cant pick the newly painted part...


Anyway, when you have finished spraying, clean your brush, bottle up any unused paint - and clean your work area. You dont want any unintended paint mixing going on around your playfield.

I hope you enjoyed the post, stay tuned for further updates...

el_timbo

Offline MartyJ

  • Trade Count: (+4)
  • ******
  • High Score Initials:
  • Forum Posts:
  • Melbourne
Re: el_timbo's Funhouse Restoration...
« Reply #52 on: March 23, 2010, 10:26:37 PM »
Outstanding work there Timbo.

This playfield will look a million dollars once you've finished.  You'll have people banging down your door now!

Offline ddstoys

  • Trade Count: (+23)
  • ******
  • High Score Initials:
  • Forum Posts:
  • Geelong
Re: el_timbo's Funhouse Restoration...
« Reply #53 on: March 23, 2010, 10:38:41 PM »
MMMM Friskit makes me hungry..  %.% %.%  Never heard of it but i really think i should get hold of some and have a try would be good to finally use my airbrush for something useful

Offline Mr Pinbologist

  • Trade Count: (+5)
  • ******
  • High Score Initials:
  • Forum Posts:
  • Wauchope NSW
Re: el_timbo's Funhouse Restoration...
« Reply #54 on: March 23, 2010, 11:22:14 PM »
All i can say is, Wow.. nice job, lookn sweeet! ^^^ ^^^

Offline johnwartjr

  • Trade Count: (0)
  • ******
  • Forum Posts:
  • Columbus, Indiana USA
  • It's ALIVEEEEEE!
    • My Home Gameroom . com
Re: el_timbo's Funhouse Restoration...
« Reply #55 on: March 24, 2010, 08:49:49 AM »
Very nice. I saw a thread recently on another site where someone used frisket to repaint all the red on a BSD cabinet and I thought it was pretty dang cool.

I may have to grab some to play with, along with an airbrush - but I doubt anyone sees me refinishing playfields :)


Offline d3vlin

  • Trade Count: (0)
  • ***
  • Forum Posts:
  • geelong
Re: el_timbo's Funhouse Restoration...
« Reply #56 on: March 24, 2010, 07:07:24 PM »
mate thats a fantastic job. where do u get all your free time i cannot believe how good that came up. do u paint for a living or some think. or are u a sales man for frisket lol %.%

Offline ajlaird

  • Trade Count: (0)
  • ******
  • Forum Posts:
  • Greensborough, Melbourne
  • Go Ahead, Make My Day
Re: el_timbo's Funhouse Restoration...
« Reply #57 on: March 24, 2010, 08:46:22 PM »
Love the instructions and attention to detail.

Don't think I am that patient, though!

Offline pinnies4me

  • Administrator
  • Trade Count: (+5)
  • *****
  • High Score Initials:
  • Forum Posts:
  • Victoria
Re: el_timbo's Funhouse Restoration...
« Reply #58 on: March 24, 2010, 09:06:59 PM »
Sorry if I missed this - but where do we buy Frisket mask??
“If you wanna escape, go up to a pinball machine. There’s a magic button on the front that takes you to a world under the glass and makes the the rest of the universe disappear.”

Offline el_timbo86

  • Trade Count: (+1)
  • *****
  • High Score Initials:
  • Forum Posts:
  • Geelong, Victoria
    • Hot Rodded Pins
Re: el_timbo's Funhouse Restoration...
« Reply #59 on: March 24, 2010, 11:04:40 PM »
Thanks for the encouragement guys, this masking stuff does get really tedious.

Frisket mask can usually be found at any art store. Cavallier Art Supplies in Geelong is where i get my art gear from. I think the whole roll of mask cost me 25 dollars.

In answer to the question about where i get all the spare time, being a teacher means i finish pretty early (3pm)...I also have a very understanding girlfriend who believes i have a pinball related 'sickness'. Actually, to be fair, she is pretty cool about the whole thing. It does take up alot of my time, but she usually tags along when i go to play the various sited pinnys in the area.

Average game (IMO) but a top girlfriend!


ANYWAY, got all of the white masked and airbrushed tonight. The white REALLY changes the whole look of the playfield. Starting to look much cleaner now. The clock face took the longest, but it was certainly worth the effort - artistically, the clock is my favorite part of the entire Funhouse art package.

Masking off the clock...


Comparing apples and oranges now... (or tarnished yellows and bright whites in this case!!)


And in the day time...


I'll keep posting my colour updates as i go, sorry about the mound of photos - i just figured its better to have more than less in terms of reference material.

el_timbo