Author Topic: Bally Solenoid Driver Repair  (Read 12828 times)

0 Members and 1 Guest are viewing this topic.

Offline Strangeways

  • Pinball Restoration is my passion
  • Administrator
  • Trade Count: (+9)
  • *****
  • High Score Initials:
  • Forum Posts:
  • Melbourne
  • ABN 68 283 634 461
    • Ride The Boney Beast
Re: Bally Solenoid Driver Repair
« Reply #15 on: October 18, 2008, 11:22:25 AM »
Reading this thread with a system 11 power board in front of me, another coincidence. +100v is ok -100v reads -130v and is like nino mentioned, affecting the display. Just began testing last night. Havent played much with sys 11's but learning my way around quick. Anyone point the finger at the above culprit before I test all components? Thinking it may be a cap.

I had a similar issue on a my JP (Data East) ... Similar setup.

There are a couple of things to check - R1 and R4 should be 39K. Measure them as a starting point.

There are two zener diodes (ZR2 & ZR4) that drop the voltage to -100V and +100V. They are 1N4764A from memory..You can use another diode 1N4763A to drop the voltage to -91V and +91V - this prolongs the life of the display.

That's where I would start.. From a hobbyist's point of view, I just rebuild these HV sections as a general rule.

Would need a second opinion - as I have not worked on a system 11 for YEARS


Aussie Pinball - Proud to be Australia's Premier Pinball Forum

http://www.australianpinballrestorations.com.au/

http://www.rtbb.com.au/catalog/

We carry the largest range of NEW Ramps in Australia

Offline silverball

  • Trade Count: (0)
  • ******
  • Forum Posts:
Re: Bally Solenoid Driver Repair
« Reply #16 on: October 18, 2008, 02:44:27 PM »
Reading this thread with a system 11 power board in front of me, another coincidence. +100v is ok -100v reads -130v and is like nino mentioned, affecting the display. Just began testing last night. Havent played much with sys 11's but learning my way around quick. Anyone point the finger at the above culprit before I test all components? Thinking it may be a cap.

I had a similar issue on a my JP (Data East) ... Similar setup.

There are a couple of things to check - R1 and R4 should be 39K. Measure them as a starting point.

There are two zener diodes (ZR2 & ZR4) that drop the voltage to -100V and +100V. They are 1N4764A from memory..You can use another diode 1N4763A to drop the voltage to -91V and +91V - this prolongs the life of the display.

That's where I would start.. From a hobbyist's point of view, I just rebuild these HV sections as a general rule.

Would need a second opinion - as I have not worked on a system 11 for YEARS


Thanks Nino,have tested diodes/resistors last night.....all appear good. Wanted to get this one moving without doing a full rebuild but looks like I will have to. Where do you get your source your power rebuild parts?

I have had some great faults that took a while to nut out, I agree that we should document them on this forum and share our tips/experiences with each other.

Offline Retropin

  • Trade Count: (+4)
  • ******
  • Forum Posts:
Re: Bally Solenoid Driver Repair
« Reply #17 on: October 18, 2008, 03:19:26 PM »
 have had some great faults that took a while to nut out, I agree that we should document them on this forum and share our tips/experiences with each other.


Couldnt agree more..... This is a great thread to have.
Clays tips are great but are not the be all and end all to fixing your game. I take what i can from Clays, but use a lot of my own methods also. for example, i still dont quite get how he tests the transistors, i prefer to do a resistance test either way through the legs - i understand that.

looking forward to seeing this thread progress, this is just the kind of stuff that will determine this forum...


Awesome

Offline Strangeways

  • Pinball Restoration is my passion
  • Administrator
  • Trade Count: (+9)
  • *****
  • High Score Initials:
  • Forum Posts:
  • Melbourne
  • ABN 68 283 634 461
    • Ride The Boney Beast
Re: Bally Solenoid Driver Repair
« Reply #18 on: October 18, 2008, 03:54:02 PM »

Dave - Shoot Greg a PM / email - He might have a rebuild kit..

Otherwise ;

http://www.greatplainselectronics.com/products.asp?cat=45


If you are not in a rush, I might be making an order soon - I can grab one then for you ?
Aussie Pinball - Proud to be Australia's Premier Pinball Forum

http://www.australianpinballrestorations.com.au/

http://www.rtbb.com.au/catalog/

We carry the largest range of NEW Ramps in Australia

Offline Pinball Fixers

  • Trade Count: (0)
  • ******
  • Forum Posts:
  • Montrose, VIC
Re: Bally Solenoid Driver Repair
« Reply #19 on: October 18, 2008, 10:50:25 PM »

It is actually DAMAGING the displays, and if you had an Altec MPU board in the game... That could be nasty...


Just a quick point about the Alltek (yes, Nino misspelled it :lol) MPU board: It has a voltage clamp built into the board, so that if the power supply has a problem in the +5 Volt section, the board will be protected, and not boot up.

You will see a Red LED and a Green LED on the lower left hand side of the board - the Green LED means that voltage is OK, and the Red LED means over or under voltage.

Offline Pinball Fixers

  • Trade Count: (0)
  • ******
  • Forum Posts:
  • Montrose, VIC
Re: Bally Solenoid Driver Repair
« Reply #20 on: October 18, 2008, 11:02:06 PM »

Clays tips are great but are not the be all and end all to fixing your game. I take what i can from Clays, but use a lot of my own methods also. for example, i still dont quite get how he tests the transistors, i prefer to do a resistance test either way through the legs - i understand that.


Yes Gavin, I've found many "holes" in Clays documents also, but it is a great starting point and resource for anyone beginning or doing regular pinball repairs (mainly circuit board repairs). I find it very helpful, as I don't have to remember the things I worked out years ago, or remember what Clay has already written down that I hadn't worked out yet. I was working on pinball boards for about 4 years before I even knew Clays guide existed!

One thing my electronics teachers taught me when I was studying at TAFE for the Diploma of Engineering (Electronics) - It's not as important to remember everything you learn here, but it is important to remember where/how to find the information you currently need. I have no problem telling people I use Clay's guides, as he has written it down, and I know where to look for the info I need at any given time (if I know it is already there).

What I have worked out over the years is in a note book that I can look up when needed. That way when I have a few too many to drink on a weekend and loose the brain cells that had that information I don't have to worry... I've already written it down!  :lol
« Last Edit: October 18, 2008, 11:06:30 PM by pinball-fixer »

Offline Pinball Fixers

  • Trade Count: (0)
  • ******
  • Forum Posts:
  • Montrose, VIC
Re: Bally Solenoid Driver Repair
« Reply #21 on: October 18, 2008, 11:52:06 PM »
Reading this thread with a system 11 power board in front of me, another coincidence. +100v is ok -100v reads -130v and is like nino mentioned, affecting the display. Just began testing last night. Havent played much with sys 11's but learning my way around quick. Anyone point the finger at the above culprit before I test all components? Thinking it may be a cap.

I had a similar issue on a my JP (Data East) ... Similar setup.

There are a couple of things to check - R1 and R4 should be 39K. Measure them as a starting point.

There are two zener diodes (ZR2 & ZR4) that drop the voltage to -100V and +100V. They are 1N4764A from memory..You can use another diode 1N4763A to drop the voltage to -91V and +91V - this prolongs the life of the display.

That's where I would start.. From a hobbyist's point of view, I just rebuild these HV sections as a general rule.

Would need a second opinion - as I have not worked on a system 11 for YEARS


I would just rebuild any High Voltage power section as a rule of thumb... Years ago I used to just replace the faulty part, only to find that something else would fail within a few weeks.

So, in the High Voltage section of any pinball board, I replace all active components - Transistors, Diodes, Zener Diodes and Bridge Rectifiers - and also the capacitors (capacitors dry out, and then cause their own problems). It's always a good idea to check the resistors and make sure they are in spec - many resistors have a 10% tolerance, so if they are out of this range, replace them. For some resitors it is a good idea to use "Flameproof" resistors... these are usually a "Metal Film" type, but are specifically designed to be flameproof. I have seen a few catch fire!

stuba

  • Guest
  • Trade Count: (0)
Re: Bally Solenoid Driver Repair
« Reply #22 on: October 19, 2008, 11:50:23 AM »


You should be right Stu. The best way to check a TIP102 is to set the MM to "continuity" and then check for any shorts. Testing them this way is the easiest, and when you switch the game on, you won't have any locked on coils caused by the transistors. Measuring resistance to ground will give you different readings as you are measuring the "circuit", not the component. There are other components influencing the reading as the other components can have a 10% tolerance - like resistors for example..


cheers mate. one question re the HV section - the trimmer pot ? - do you use it? what do you trim voltages(?) to ?


Offline Strangeways

  • Pinball Restoration is my passion
  • Administrator
  • Trade Count: (+9)
  • *****
  • High Score Initials:
  • Forum Posts:
  • Melbourne
  • ABN 68 283 634 461
    • Ride The Boney Beast
Re: Bally Solenoid Driver Repair
« Reply #23 on: October 19, 2008, 12:02:15 PM »


You should be right Stu. The best way to check a TIP102 is to set the MM to "continuity" and then check for any shorts. Testing them this way is the easiest, and when you switch the game on, you won't have any locked on coils caused by the transistors. Measuring resistance to ground will give you different readings as you are measuring the "circuit", not the component. There are other components influencing the reading as the other components can have a 10% tolerance - like resistors for example..


cheers mate. one question re the HV section - the trimmer pot ? - do you use it? what do you trim voltages(?) to ?


The trimpot is used to adjust the high voltage to the displays. I usually drop mine to 170vdc. Grab a MM and set to VDC. Place the black lead on the GND TP and the red lead on TP2. The pot is used to lower the output voltage, so by adjusting it down to 170vdc, you are prolonging the life of the displays. It the HV section has a faulty transistor, you will get full 220vdc to 240vdc on TP2. Not Good.

If adjusting the trimpot does not change the output voltage at TP2, then you need a Bally HV Kit ;

http://www.rtbb.com.au/catalog/product_info.php?cPath=22_128_130&products_id=1127


Aussie Pinball - Proud to be Australia's Premier Pinball Forum

http://www.australianpinballrestorations.com.au/

http://www.rtbb.com.au/catalog/

We carry the largest range of NEW Ramps in Australia

Offline Strangeways

  • Pinball Restoration is my passion
  • Administrator
  • Trade Count: (+9)
  • *****
  • High Score Initials:
  • Forum Posts:
  • Melbourne
  • ABN 68 283 634 461
    • Ride The Boney Beast
Re: Bally Solenoid Driver Repair
« Reply #24 on: October 27, 2008, 01:55:31 PM »

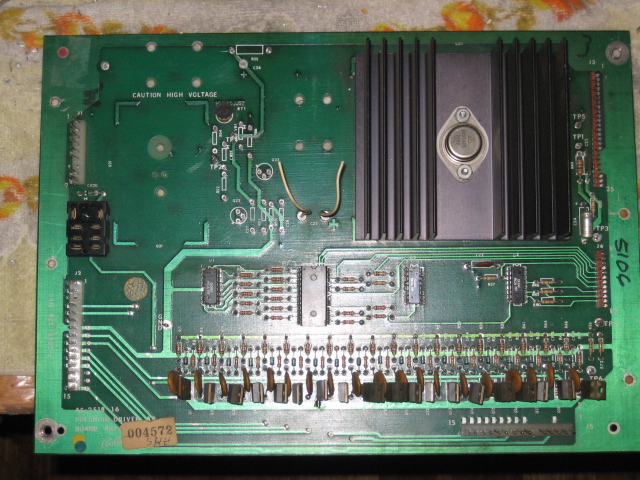
The design of the solenoid Driver board is a curious one. If the HV section develops a short across one of the transistors, then the full voltage appears at the displays. Ever seen the "dots" on a display ? Thats a sign that the display High Voltage is indeed "High Voltage".. Rather than the 175VDC - 190VDC, it has 220VDC applied which causes the displays to "wear out" from the over voltage. From memory, the reason behind this is that if the Transistor shorted and the HV to the displays was fused, then the displays would be protected, but the game would not be earning any takings ! It was assumed that the operator would see the "over bright" displays and then swap the SD over. That never happened !

In addition to the mandatory replacement of the HV Transistors, I made up an additional "kit" that replaces all the HV components. R35 and R31 are usually stressed and quite often burned out. This starts a chain reaction in the circuit and component tolerances are compromised..

C23 and C26are also replaced. C23 should be replaced as it was designed to last 10 years, not 30. On this particular SD, C26 was leaking, literally.


Removing the Components

Very easy step. Remove all the components in the HV area. If you are JUST replacing the HV Kit, then remove the transistors only. This involves removing the small heatsink for Q21.

Should look lie this ;


Use 320 Grit Wet/Dry to clean up the solder pads to ensure the fresh solder has the best possible surface area to solder. Clean up using Metho or IsoAlcohol


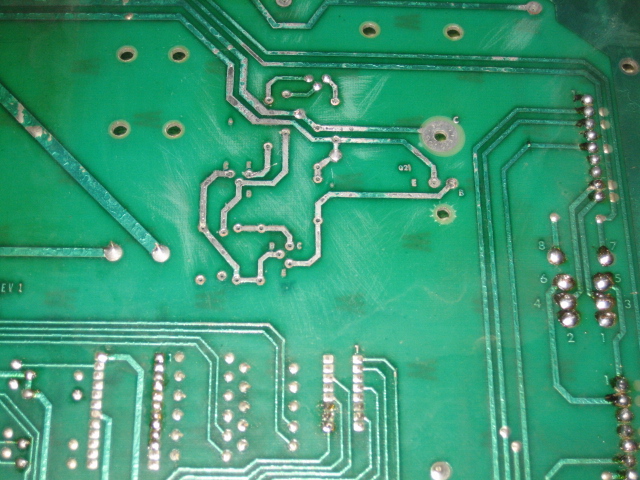
Close up of the rear of the board ;


Close up of the front of the board ;


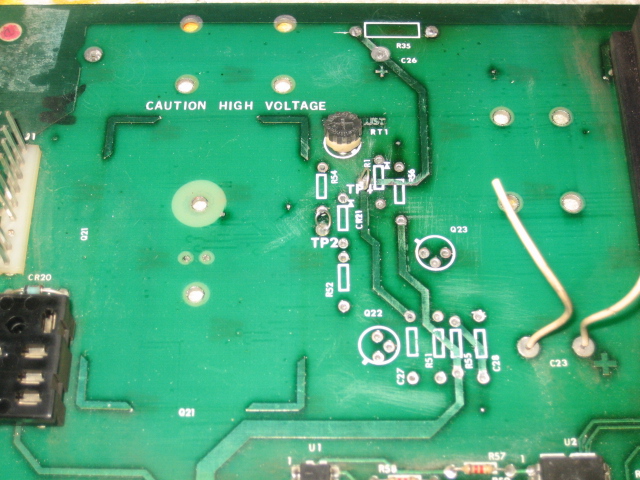
Sand the area clean, and be careful of the solder collars.. I have tested the Adjustment Pot, and it measures fine, so it will be left on the board. Now all is in readiness to install the new components, which I will list and cover in the next update !


Aussie Pinball - Proud to be Australia's Premier Pinball Forum

http://www.australianpinballrestorations.com.au/

http://www.rtbb.com.au/catalog/

We carry the largest range of NEW Ramps in Australia

Offline Creech

  • Forum Founder
  • Trade Count: (0)
  • *****
  • Forum Posts:
  • Adelaide
Re: Bally Solenoid Driver Repair
« Reply #25 on: October 27, 2008, 02:24:17 PM »
Top info. Thanks for sharing. It makes electronic newbies like me want to get the soldering iron out.

Offline Strangeways

  • Pinball Restoration is my passion
  • Administrator
  • Trade Count: (+9)
  • *****
  • High Score Initials:
  • Forum Posts:
  • Melbourne
  • ABN 68 283 634 461
    • Ride The Boney Beast
Re: Bally Solenoid Driver Repair - Additional Parts
« Reply #26 on: November 04, 2008, 11:46:30 PM »

Early on I mentioned additional parts I used in a more advanced kit than the standard HV Kit for this the Solenoid Driver board. This kit is not mandatory, but I find that on most of these boards, if the Transistors are faulty, something before or after are also out of tolerance or faulty.

Here's the list ;

R35 - Resistor 100K 1 Watt
R51 - Resistor 22K 1/2 Watt
R52 - Resistor 390 Ohm 1/4 Watt
R54 - Resistor 8.2K 1/4 Watt
R55 - Resistor 1.2K 1/4 Watt
R56 - Resistor 82K 1/2 Watt
VR1 - Zener Diode 140V 2 Watt
CR21 - Diode 1N4004
C27 & C28 - Capacitor 0.1uF 400V Polyester

Most of these parts SHOULD be available locally, but I bought them from Great Plains Electronics in the States.

Here's a pic of the advanced kit ;


Q22 & Q23

These two transistors have some spacers which need to be retained and used with the new transistors in the HV Kit. Do not discard them. They look like this ;


Next step - Install the parts and replace the connectors.

 :D
Aussie Pinball - Proud to be Australia's Premier Pinball Forum

http://www.australianpinballrestorations.com.au/

http://www.rtbb.com.au/catalog/

We carry the largest range of NEW Ramps in Australia

Offline Creech

  • Forum Founder
  • Trade Count: (0)
  • *****
  • Forum Posts:
  • Adelaide
Re: Bally Solenoid Driver Repair
« Reply #27 on: November 04, 2008, 11:52:03 PM »
Nino, where did you learn about electronics? Are you trained or did you pick this up yourself? While I understand the general idea behind electronics and all the components involved, I'm amazed at how well you know the ins and outs of each component and the relationships between them all. Fascinating!

Offline Strangeways

  • Pinball Restoration is my passion
  • Administrator
  • Trade Count: (+9)
  • *****
  • High Score Initials:
  • Forum Posts:
  • Melbourne
  • ABN 68 283 634 461
    • Ride The Boney Beast
Re: Bally Solenoid Driver Repair
« Reply #28 on: November 05, 2008, 12:04:22 AM »
Nino, where did you learn about electronics? Are you trained or did you pick this up yourself? While I understand the general idea behind electronics and all the components involved, I'm amazed at how well you know the ins and outs of each component and the relationships between them all. Fascinating!

It's all about learning troubleshooting techniques. I could troubleshoot EMs when I was 14 and Bally Bingos at 16.. By 18 I was Working on Juke Boxes from the 50's and 60's.. Even assisted a restoration of a Continental II by the time I was 25... By this age most kids that age were out drinking, modding cars and chasing tail.. I was more interested in Z80 and 6502 machine language programming ... Oh the memories...

I completed a Basic Electronics Certificate and an Advanced Certificate in Electronics in 1988-91.. So I can understand circuits using the same troubleshooting techniques learned from EM schematics.

Stupid me got into Computers... But then again, my Dad had the foresight to recognize that if the Arcade industry ever dissipated / collapsed, then I'd have something to fall back on..

Ironically, after 18 in the IT industry, I'd love nothing more than to work on pins from a restoration aspect.. Not necessarily repairs.

I even kept my old school notes and texts...  :D

But I'm no electronics guru.. Just the basics..

Aussie Pinball - Proud to be Australia's Premier Pinball Forum

http://www.australianpinballrestorations.com.au/

http://www.rtbb.com.au/catalog/

We carry the largest range of NEW Ramps in Australia

Offline Creech

  • Forum Founder
  • Trade Count: (0)
  • *****
  • Forum Posts:
  • Adelaide
Re: Bally Solenoid Driver Repair
« Reply #29 on: November 05, 2008, 08:43:24 AM »
But I'm no electronics guru.. Just the basics..

Could have fooled me!